Roadnet Anywhere v5.3 - New Features and Enhancements
Roadnet Anywhere version 5.3 contains several new features that make it easier for you to plan and monitor your routes throughout the day, as well as analyze your overall transportation operation.
- Roadnet Active Alert emails can now contain URLs and up to two images. Emails will also feature a new, convenient, and easy to find unsubscribe link.
- If you drag and drop a stop or unassigned order onto the map in an area where there is a cluster of stops, the new Move Stops (and Unassigned Orders) window will appear so you can confirm where exactly the stop and/or unassigned order is being moved to.
- You can now print a stop list directly from within Roadnet Anywhere Client.
- You can now define the width of your equipment.
- You can now define a default line item type for a business unit in Roadnet Anywhere Web.
- You can now edit historic travel speeds for all road segments.
- You can filter the orders list in Roadnet Anywhere Client so you only see the orders for the current routing session.
- You can have Roadnet Anywhere Client append routing information to the original import orders file when using Send Orders.
- In FleetView's Overview you can now filter the equipment by whether it is a depot or not, as well as by how long it has been inactive.
- Custom properties allow you to include information about your service locations that is not normally included; for instance if you wanted to identify the sales person for each service location you could create a Sales Person custom property. You can now see service location custom properties in all Stop and Unassigned lists in Roadnet Anywhere Client.
- In the FleetView Overview, you can now view all route makers on the map regardless of what page of route cards you are looking at.
- In the FleetView Overview, you can now hover over a stationary event to see which route that event is associated with.
- FleetView's enhanced timeline has several new features that provide more info at a glance, like color coded stop markers that categorize a stop as early or late for a service window using a missed service window threshold that you are able to set.
- In the FleetView Overview, you can now quickly identify the status of a route with an icon included in the route position tooltip.
- You can now see a Telematics device's current power source in Telematics Diagnostics.
- You can now see engine hours for a piece of equipment in Roadnet Anywhere.
Mobile
- Forms can be seen on the mobile device based on if a stop, order, or line item was planned, or added by the dispatcher, worker, or helper.
- Workers can complete a mobile form before a route is selected as well as after logging out of Roadnet Mobile for Android.
- Workers can now drop off or pick up trailers at the route's origin.
- Workers can select the Equipment ID of a trailer that is to be hooked up during a route from a list.
- The Trailer Drop/Hook list is now automatically updated between Schedule and Hours of Service. Trailers can be dropped or hooked up in either application and the other application will also display the change in the Trailer Drop/Hook list. This enhancement is only for workers using RDC.
- You must now assign an identifier to each new form control, which will make it easier to integrate responses with a system outside Roadnet Anywhere.
- You can specify the placement of individual mobile forms within the worker's task list on the Android mobile device.
- Workers can now verify orders or line items at pre-delivery, as they are being removed from the truck. You can also require that your workers perform a pre-delivery scan before they are able to depart the stop.
- You can control how far over the actual quantities are from the planned quantities when the worker inputs them on the Android mobile device.
- Workers can now add multiple orders at the same time for a single stop.
- Workers can update equipment once they are logged into Roadnet Mobile for Android, before a route is loaded on the mobile device.
- You can change the word Route to Trip on the mobile device.
- You can display information about the route, such as Route ID and Date, Region ID, and up to six route custom properties, at the top of the Stop List in Roadnet Mobile for Android.
- You can have Roadnet Mobile Android validate a text or numeric mobile form response, so that the worker cannot save an invalid entry.
- You can now easily distinguish between regular messages and high priority messages in Centralized Messaging.
- You can have custom property data type entries validated, so that the worker cannot enter invalid information. Text, integer, and decimal data types can be validated when data is entered on the Android mobile device.
- You can now use CoPilot 10 with Roadnet Mobile.
Compliance
- Compliance customers can set a Yard Move Termination option, to end a yard move when the ignition is turned off, when the vehicle's speed reaches 20 MPH, or both.
- Compliance customers can now allow the co-driver to use the mobile device while the vehicle is in motion.
- Compliance customers can now define a Canadian registration number that will appear on the Driver Log report.
- Compliance customers can now specify workers that are exempt from ELD vehicle inspection requirements.
- Compliance customers can set a time limit for warning messages that appear on a mobile device when a vehicle is in motion.
Active Alert Email Enhancements
If you use Roadnet Active Alert emails to keep your customers updated on the status of their deliveries, you can now put your company’s personal touch on the messages with URLs and images. For instance, you can add your company’s logo to the top of the email, so your customer recognizes the sender right away, at the bottom of an email to accompany a signature, or anywhere else in the body of the message. You will upload these images on the business unit's Active Alert settings page so they can be used for an entire business unit. If, in addition to a logo, you want to provide your customer with the ability to see more information about your company or how you can be contacted, you can simply add a URL to your webpage in the body of the message. If your customers decide that they no longer wish to receive active alert emails, there is a new, convenient, and easy to find Unsubscribe link at the bottom of the message.
Uploading images for Active Alert Emails
1. Go to Administration and select Business Units.
2. To add a new Business Unit, click the add icon. The Add Business Units window opens.

To edit an existing Business Unit, click the edit icon. The Edit Business Unit window opens.

3. In the Add/ Edit Business unit window, click on the Active Alert Tab.
4. Use the [Browse] button to select an image for Email Template Image 1 and Email Template Image 2, you will use these tags to add the images to the active alert template. You are only able to upload two images.
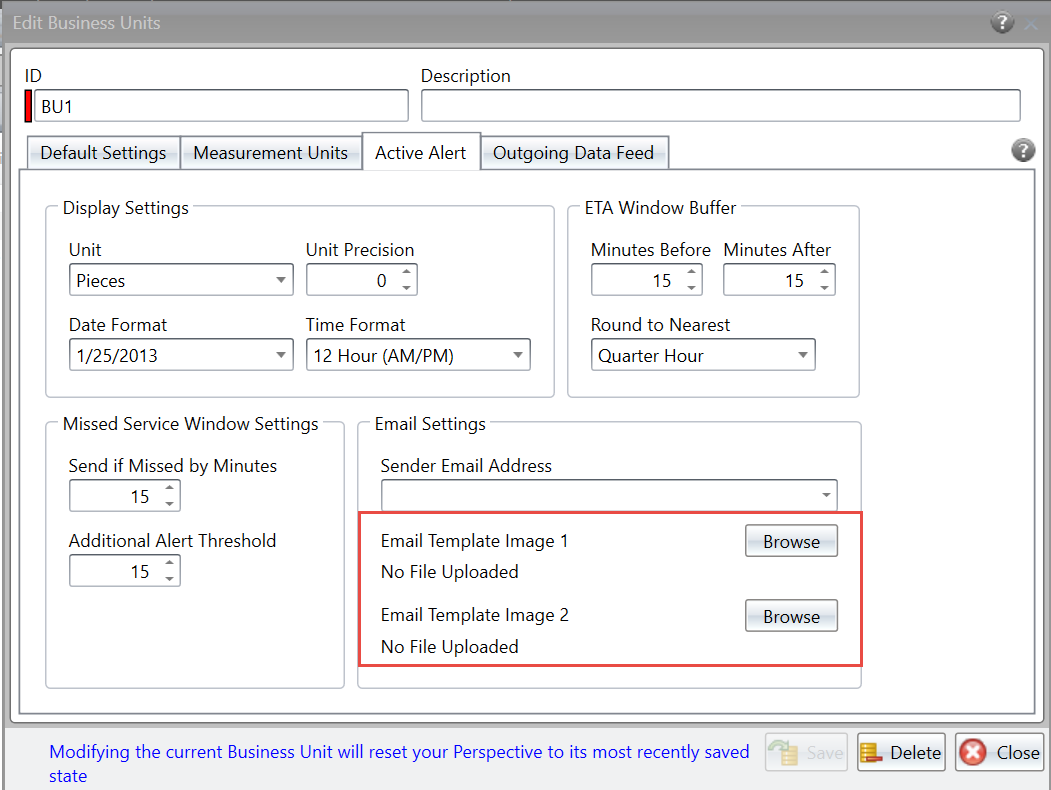
When the image is uploaded, you will see a small preview of the image. If you want to delete an image or chose another image, click [Clear].
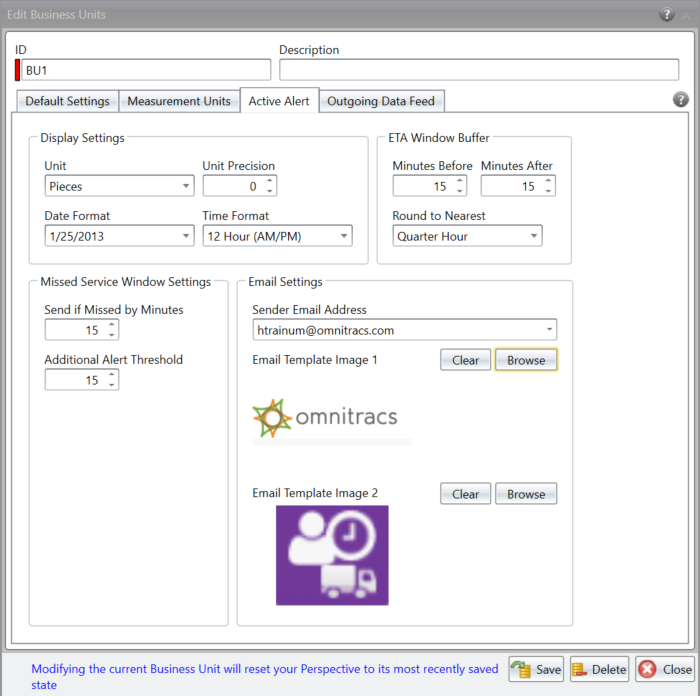
5. Click [Save].
Adding Images to Active Alert Templates
Note: You must upload the image on the Business Unit Active Alert page in order to add it to an active alert template.
1. Go to Active Alert and select Recipient Types.
2. To add a new recipient type, click the add button. The Add Recipient Types window opens.

To edit an existing recipient type, click the edit button. The Edit Recipient Types window opens.

3. In the Add/ Edit Recipient Types window, click on the Templates tab.
4. Use the arrows to select or change the Notification Method and Alert Type if necessary.
Note: Images can only be added to emails.
5. Add an image anywhere in the body of the email by typing the specific tag for the image you want to use. For instance , to use the first image type: {email_template_image1} . To use the second image type: {email_template_image2}. You must use curvy brackets.
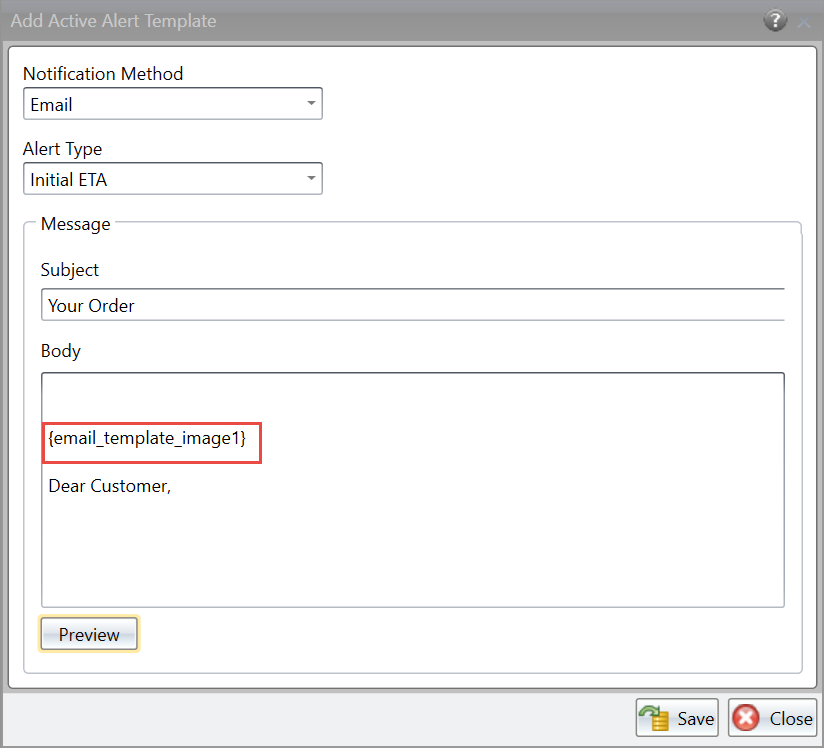
When you preview the email, you will see the image at its actual size.
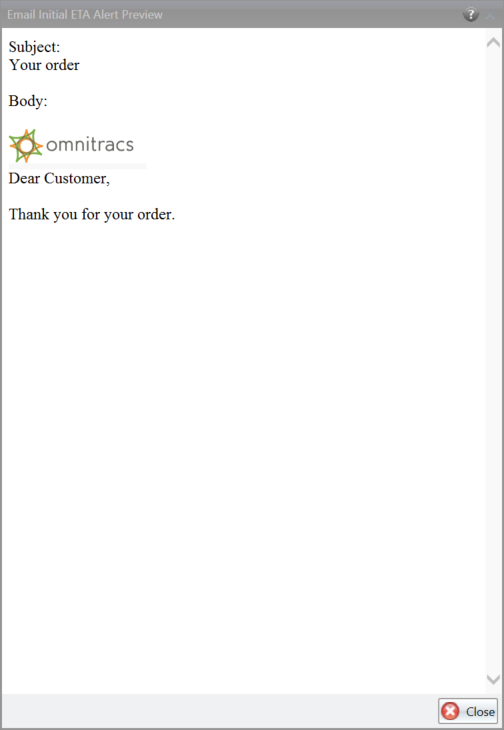
6. Click [Save].
Adding a URL to Active Alert Templates
You can add a URL anywhere in the body of the message. The link will not be active in the preview but will be functional in the actual email.
Unsubscribing from Roadnet Active Alert Emails
Customers can unsubscribe from active alert emails by clicking on a link included in the emails. Previously, this link consisted of a long and potentially confusing URL. Now, customers see a shorter, more straight forward link at the bottom of the emails that says "Click to unsubscribe." that they can click to unsubscribe from future emails.
Dragging and Dropping Stops and Unassigned Orders on the Map
Found in Roadnet Anywhere Web
In Fleetview, you are able to move stops and unassigned orders to a new route by dragging and dropping them on the map. In situations where you need to move a stop or unassigned order to an area where other stops or routes are very close together on the map, it may be difficult to tell exactly where your stop will end up. Now, when dropping a stop or unassigned order over a cluster of stops, the Move Stops (and Unassigned Orders) window will appear. This window will give you the option to select the specific stop you want and tell you exactly where the stop or unassigned order will appear in the sequence of the route.
To Move Stops on the Map:
1. Go to FleetView and open the Routes Map, Route Details, or Transfer Stops.
To open the Routes Map, click on the [Map] button.
To open Route Details, click on the desired route from either the Cards screen or the Routes Grid.
To open Transfer Stops, click on the desired routes from either the Cards screen or the Routes Grid. Two, and only two routes must be selected. Then click on the Route Actions menu and select Transfer Stops.
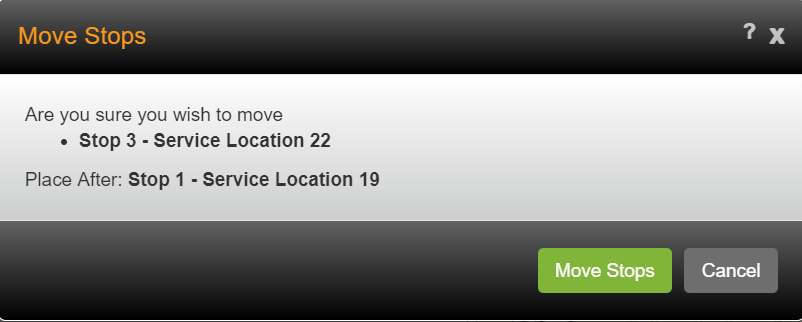
2. In the stop list or on the map, select the stop you want to move, drag it to its new position onto a stop already routed on the map, and release the mouse button. The Move Stop window will appear.
3. The window will ask you to confirm the stop you are moving and which stop will precede it in the sequence of the route. If the Information is correct click [Move Stops].
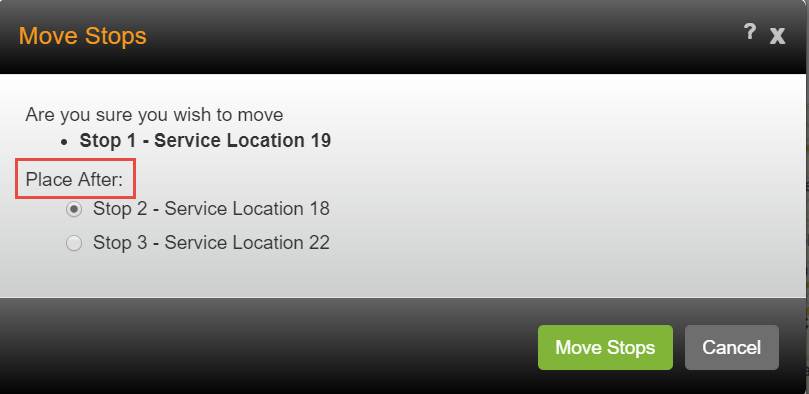
If you are moving a stop to an area with a cluster of stops, the window will include a list of those stops. Select where the stop you are moving will fall in the sequence of the route by clicking the stop that will precede. For instance, if you want Stop 1 to be moved between Stop 2 and Stop 3, select Stop 2 in the list under Place After.
Note: If you are dragging a stop to an area where there are multiple routes, the window will list the stops for both routes so you're able to confirm which route you'll be moving the stop to.
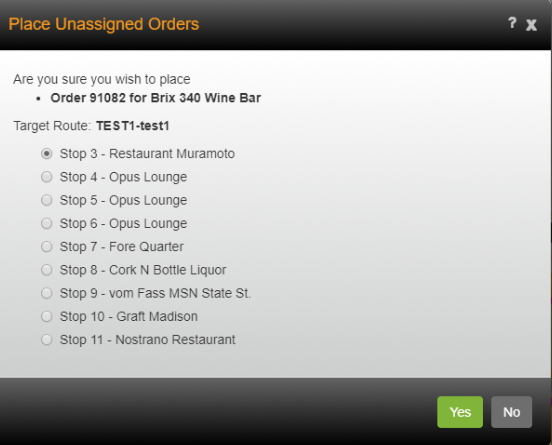
If you are moving an unassigned order, the window will ask you to confirm the stop that you are placing the unassigned order on. Select the stop from the list and click [Yes].
Printing The Stop List
You have always been able to print a stop list or driver manifest from the Reports list, but what if you want to quickly print a stop list that contains only information that you select? Now you can print a stop list directly from a manifest while you are working with the routes.
Before printing a stop list, there are some important things to remember:
- All visible columns will be printed, in the order shown on the screen, so hide columns you don't want to print and arrange the columns in the order you would like to see the information.
- The amount of information visible in the column is what will print, so adjust the column widths as needed to display the information. For instance, the Address column may need to be wider than the Sequence column.
- Extra pages will be added to print all the columns as needed.
You can print a stop list from any of the manifests: Route Planning, Route Dispatching, or Route Query. The same procedure is used on each manifest.
1. Arrange and size the columns in the stop list so the report will include the information you want.
2. Click the Printer icon on the stop list. The Print Preview window opens.
![]()
The Print Preview window lets you see what the report will look like, and how many pages it will be. You can perform many actions from the window, including saving, exports, zooming, and searching.
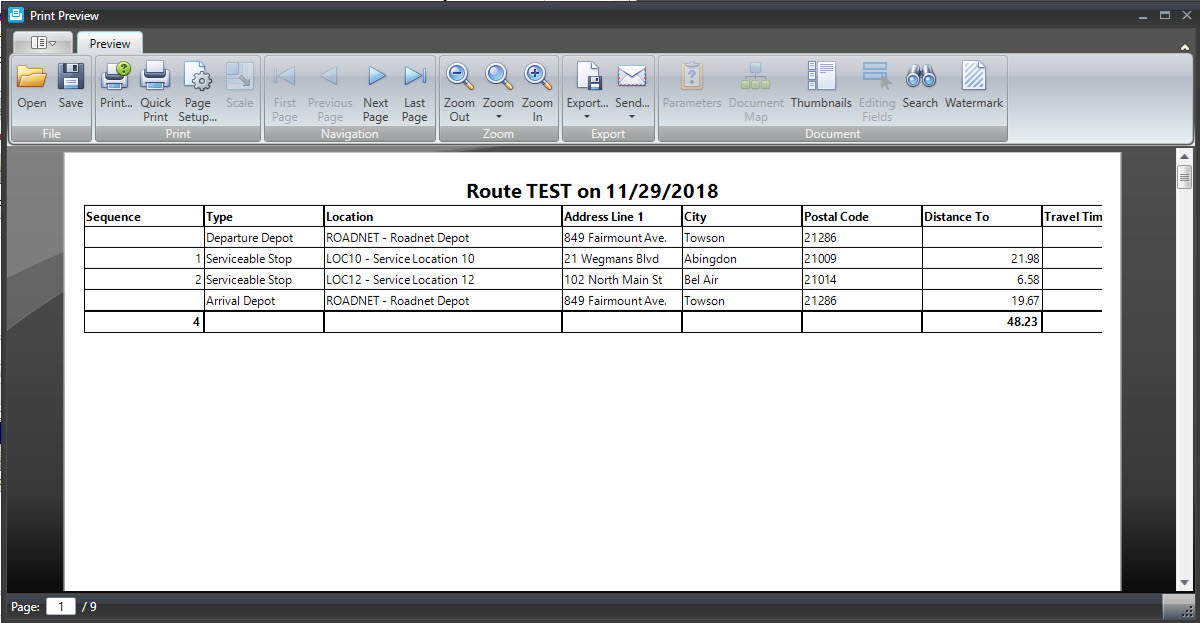
3. When you are ready to print the report, click the Print icon. The report is sent to the specified printer.
![]()
Note: You can also right-click on a route, stop, or order and select Print - Print All or Print - Print Selected Items to print individual, or the complete list, of routes, stops, or orders. You can not print unassigneds in this way.
Defining the Equipment Type's Width
There may be times when you need to know the width of an equipment type. You could already define the height, weight, and length of the equipment type; now you can also define the width of the equipment type. While this information is not used in Roadnet Anywhere, you can export it with the other equipment type information so that it can be used elsewhere in your operation.
In Roadnet Anywhere Web
1. Open Maintenance.
![]()
2. Click on the green button and choose Equipment Types.
3. To add an equipment type, click the [Add] button.
To edit an existing equipment type, click the Edit icon.
The Equipment Type window opens.
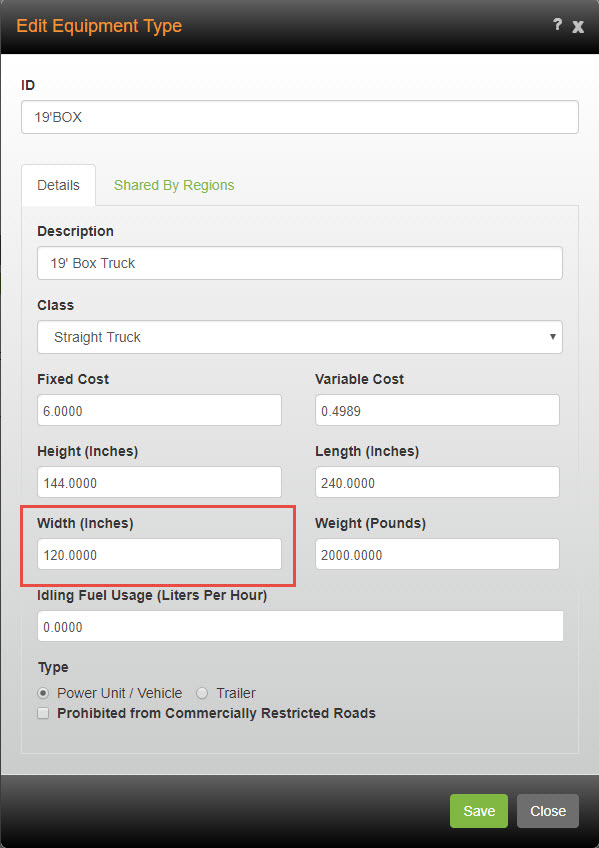
4. Enter the width of the equipment type, in inches or centimeters.
5. Complete the remaining information for the equipment type as necessary.
6. Click the [Save] button.
In Roadnet Anywhere Client
1. Click on the Maintenance menu and scroll to Equipment Types. The Equipment Types list opens.
2. To add an equipment type, click on the Add New Item icon.
![]()
To edit an equipment type, click on the Edit icon.
![]()
The Equipment Type window opens.
3. Enter the width of the equipment type, in inches or centimeters.
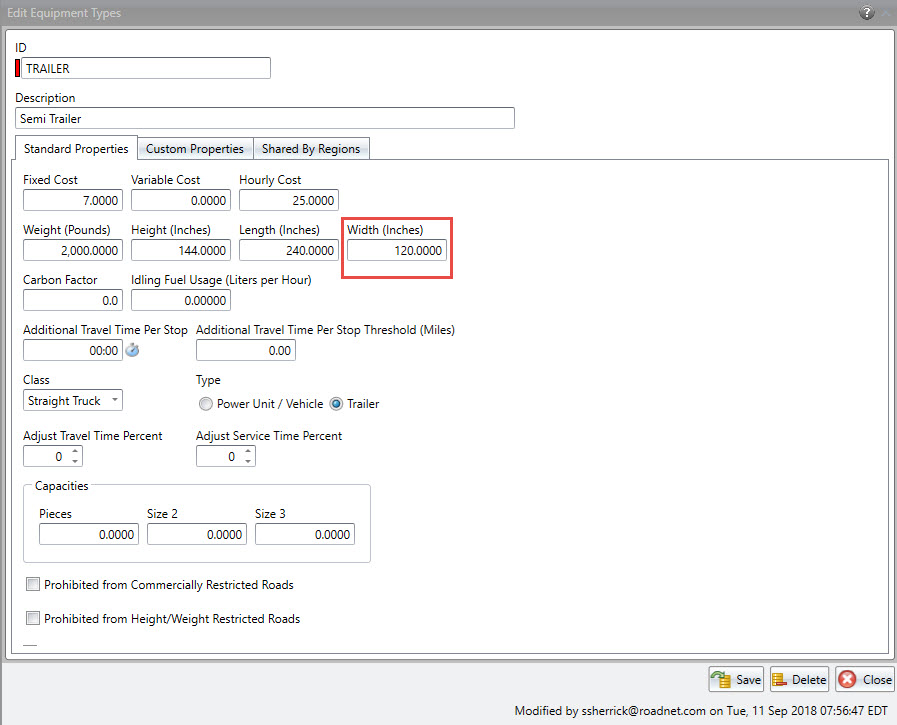
4. Complete the remaining information for the equipment type as necessary.
5. Click the [Save] button.
If you want to change the width for several equipment types simultaneously, you can use the Replace feature. Simply select the equipment types you want to change, then right-click and select Replace. In the Replace window, enter the new width and click the [Save All] button.
You can import the width information for your equipment types, simply update your import file with the appropriate information.
| Field | Required | Max. Length/ Range | Description |
| Width | No | 0-999999.9999 | Enter the width of the equipment type in either inches or centimeters. |
Setting Default Line Item Type for a Business Unit
Found in Roadnet Anywhere Web
If you use line items on your orders, you can now set a Default Line Item Type for the entire business unit in Roadnet Anywhere Web. When a line item is added to an order, it will automatically default to being either a pickup or delivery based on your business unit setting. The line item can be changed for any line item as it is added.
Note: If Use Line Items is checked, the Default Line Item Type will be defaulted to Delivery.
Edit Historical Travel Speeds for all Roads
Found in Roadnet Anywhere Web and Roadnet Anywhere Client
Note: Some of the options described are purchasable and may not appear. Contact your Omnitracs sales representative for more information about acquiring additional features.
When planning or navigating a route, the Map Editor gives you the ability to make changes to a street’s attributes, allowing you to adjust speed limits, height and weight restrictions, commercial status, and even rush hours. If you use historic speeds to compensate for rush hour traffic, you can edit a road’s historical travel speeds. In the past, you have had the ability to edit historical travel speeds when historical traffic data is available for the road, which is typically only the case for large roads like interstate highways. Now, you are able to edit the historical travel speeds for any road segment, even small local roads. So if your route includes both a highway and a neighborhood street, you can adjust the historical travel speeds for each road to avoid heavy traffic and create the quickest route possible.
To Edit Historical Travel Speeds for Road Segments in Roadnet Anywhere Web
1. Go to Map Editor.

2. To search for a street using the address, click the Address Search icon on the right side of the window; the Address Search panel opens. Enter the address you are looking for; you must enter at least the city, state, or postal code; to only search for streets currently displayed on the map check Limit to View. To limit the number of results that are displayed, check Max Results and enter the largest number of results you want displayed. To keep previous results in the Results list, instead of replacing them with the results of the new search, check Append Results.
Click the [Search] button. Street segments that meet your search criteria appear in the Results pane.
To select a street on the map, right-click on the map and choose Select Street from the menu that pops up. Click on the street segment you want to work with; the street segment turns green and appears in the Results list.
3. Select the Edit Icon.
![]()
4. Click on the Historical Travel Speeds tab.
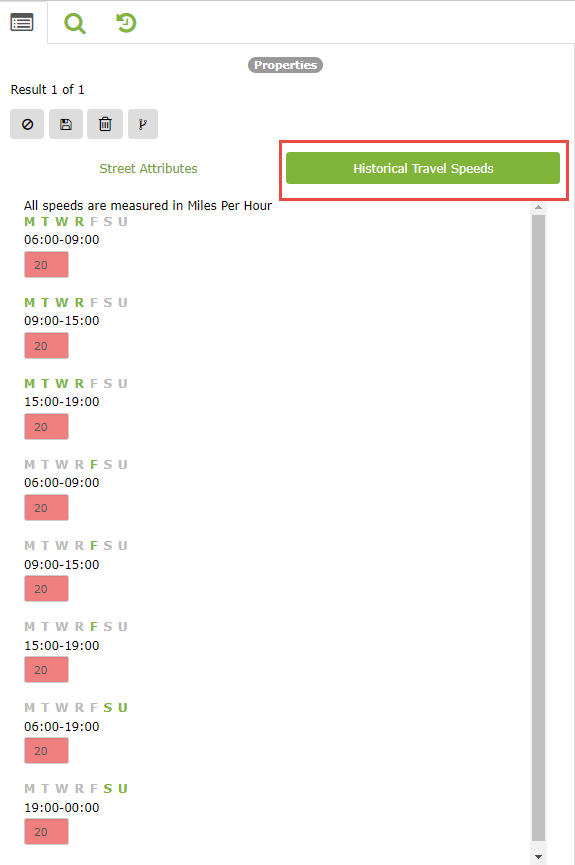
5. Change the Historical Travel Speed for any of the eight defined time periods by entering the speed in the entry fields.
Notes: If a road segment doesn't have any travel speeds based on historical traffic data, the background of the entry field will be red. When a value is entered the red background will turn to white.
All times use a 24 hour clock, so 3:00 PM appears as 15:00.
The days that the time period applies to are green. There are separate time periods for Monday through Thursday, Friday, and then Saturday and Sunday.
6. Click the Save icon.
To Edit Historical Travel Speeds for Road Segments in Roadnet Anywhere Client
1. Click View, then Map Editor.
2. To search for a street using the address enter the address you are looking for in the Address Search panel at the bottom of the window; you must enter at least the city, state, or postal code; to only search for streets currently displayed on the map check Limit to View. To limit the number of results that are displayed, use the arrow to select the number of results you want displayed.
Click the [Search] button. Street segments that meet your search criteria appear on the Results tab.
To select a street on the map, right-click on the map and choose Select Street from the menu that pops up. Click on the street segment you want to work with; the street segment turns green and appears in the Results list.
3. Right click the street segment you'd like to edit in the Results list. Select Edit Street Attributes from the menu. The Edit Street Attributes window appears.
4. Click on the Historical Travel Speeds tab.
5. Change the Historical Travel Speed for any of the eight defined time periods by entering the speed in the entry fields.

Notes: If a road segment doesn't have any travel speeds based on historical traffic data, the background of the entry field will be red. When a value is entered the red background will turn to white.
All times use a 24 hour clock, so 3:00 PM appears as 15:00.
The days that the time period applies to are black. There are separate time periods for Monday through Thursday, Friday, and then Saturday and Sunday.
6. Click [Save].
Filtering the Orders List
Found in Roadnet Anywhere Client
When evaluating the routes in a routing session you may want to easily see a list of all the orders in the session. In the past, you could sort the Orders list by routing session so that all the orders for the session were listed together, but the list still contained orders from the other sessions, causing you to search to the list to find the orders you want. Now, you can filter the Orders list so you only see orders for the current routing session, or all orders in the system.
To filter the Orders list to only show orders in the current routing session, click the Show items for the current session icon. To show all orders again, click the Show all items icon.
![]()
Adding Routing Information to the Orders File when Sending Orders
Found in Roadnet Anywhere Client
When you create an order file to import into Roadnet Anywhere, you may include information that Roadnet Anywhere does not need but is essential for other parts of your business. However, when you exported the routing information from Roadnet Anywhere using Send Orders, this additional information was not included and so was lost. Now, you can have Roadnet Anywhere add the selected routing information to the original import order file so that you do not lose the other information that your company needs.
Some things to remember if adding routing information to the import orders file:
- this functionality only works with fixed length files
- you need to leave space in the import orders file to add the desired routing information
- you need to select Save Original Order Records on the Import Orders options
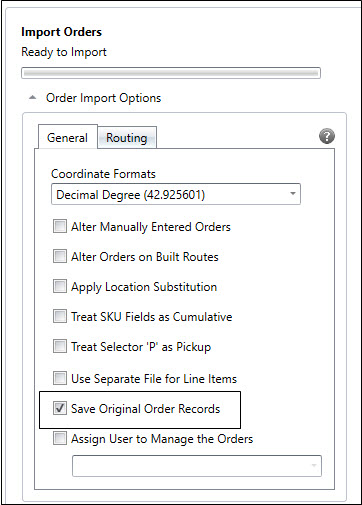
1. Create your Send Orders data transfer layout, defining where in the file you want the routing information to be placed.
2. After you create your routes, click Tools then Send Orders to open the Send Orders window.
3. Check Include Original Order Records.
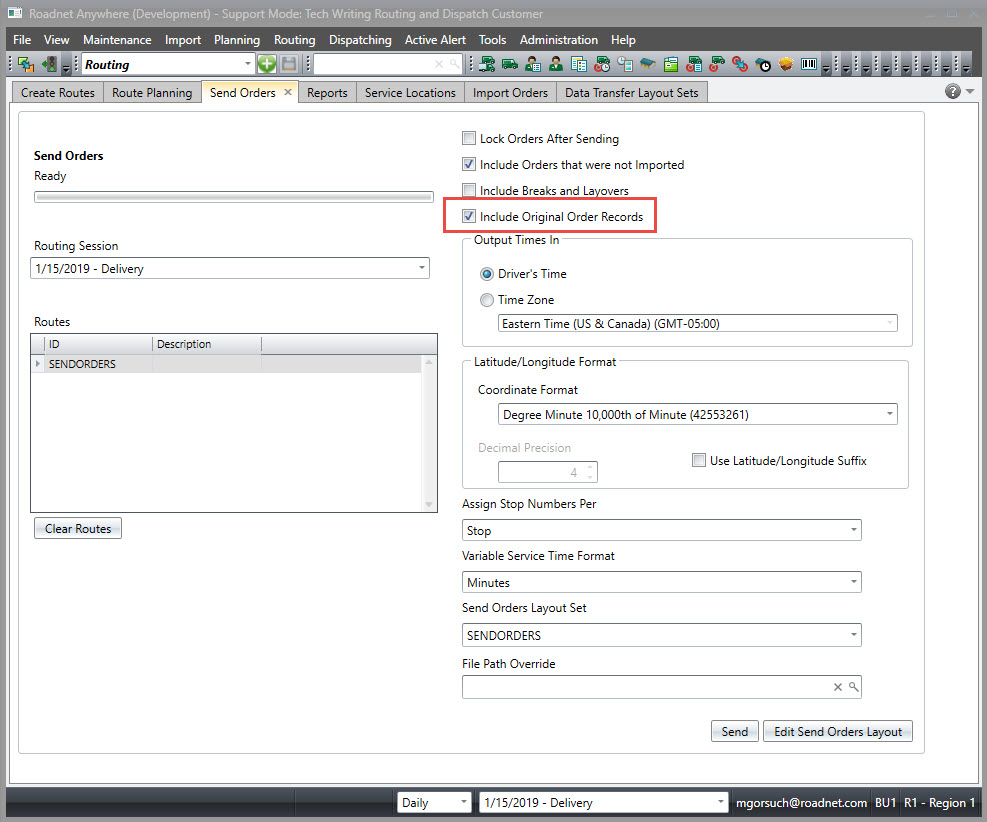
4. Complete the remaining options on the Send Orders window, then click the [Send] button. The original order file is exported and updated with the routing information.
Enhanced Filtering in Overview
Found in Roadnet Anywhere Web
In FleetView, the Overview allows you to easily see your entire fleet or search, filter, and sort vehicle cards to find the information you need. To help maximize efficient use of all your equipment, Roadnet Anywhere has added new filters that allow you to isolate and identify equipment that you need to see for specific situations. If you want to find equipment that has left a depot, you can filter equipment based on whether or not it is located within the service area of a depot. If you want to assess which pieces of equipment haven’t been used recently, you can also narrow your search to equipment that hasn’t been assigned to route in the last 24 hours. These pieces of equipment are considered inactive. You can filter your search to see equipment that has been inactive for more or less than 24 hours. Both of these filters can be useful in situations where you need to quickly find equipment that isn't in use, whether it is at a depot or not. For instance, if you need to replace a piece of equipment that has broken down with one that is at a depot and inactive, so is available to be used.
Using Enhanced Filters in Overview
1. Go to FleetView.

2. Use the arrow to change the view to Overview

3. Click the Filter button.

4. To filter inactive equipment based on how long it has not been on a route, select Inactive Less Than 24 Hours or Inactive for More Than 24 Hours.
5. To filter equipment based on whether it is located at a depot or away from a depot, check Show Vehicles at a Depot or Show Vehicles not at a Depot. At least one option must be selected.
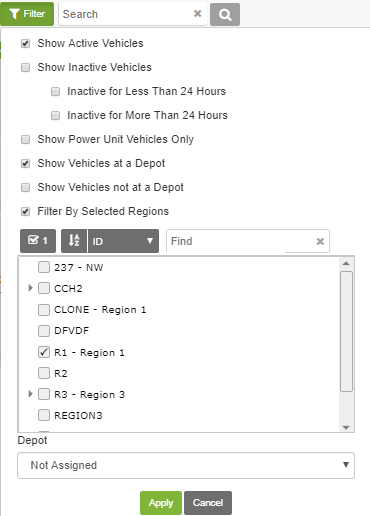
6. Click the [Apply] button to save your selection.
FleetView Map Enhancements
FleetView’s Route Map allows you to visualize your routes for an entire day or based on certain criteria like route type or region. Working with your routes on the map is an easy way to assess your fleet and quickly get information about a particular route. Roadnet Anywhere has made several enhancements to the map to make sure that you’re able to get the most information possible with just a glance.
You can now:
- View all route makers on the map regardless of what page of route cards you are looking at.
- Hover over a stationary event to see which route that event is associated with.
- Quickly identify the status of a route with an icon included in the route position tooltip.
View all Route Markers on the Map
Previously, you only saw routes for the page of route cards you were looking at, so you were unable to get an overall picture of your routes. Now, all routes will be displayed on the map, regardless of which page the route card is located on. So if you are responsible for 200 routes, you are now able to zoom in or out on the map and view all of them- even if their respective route cards are spread out over 20 pages. This will make it much simpler to get a big picture of a day's routes or routes filtered by route types or regions, without having to worry about navigating through pages.
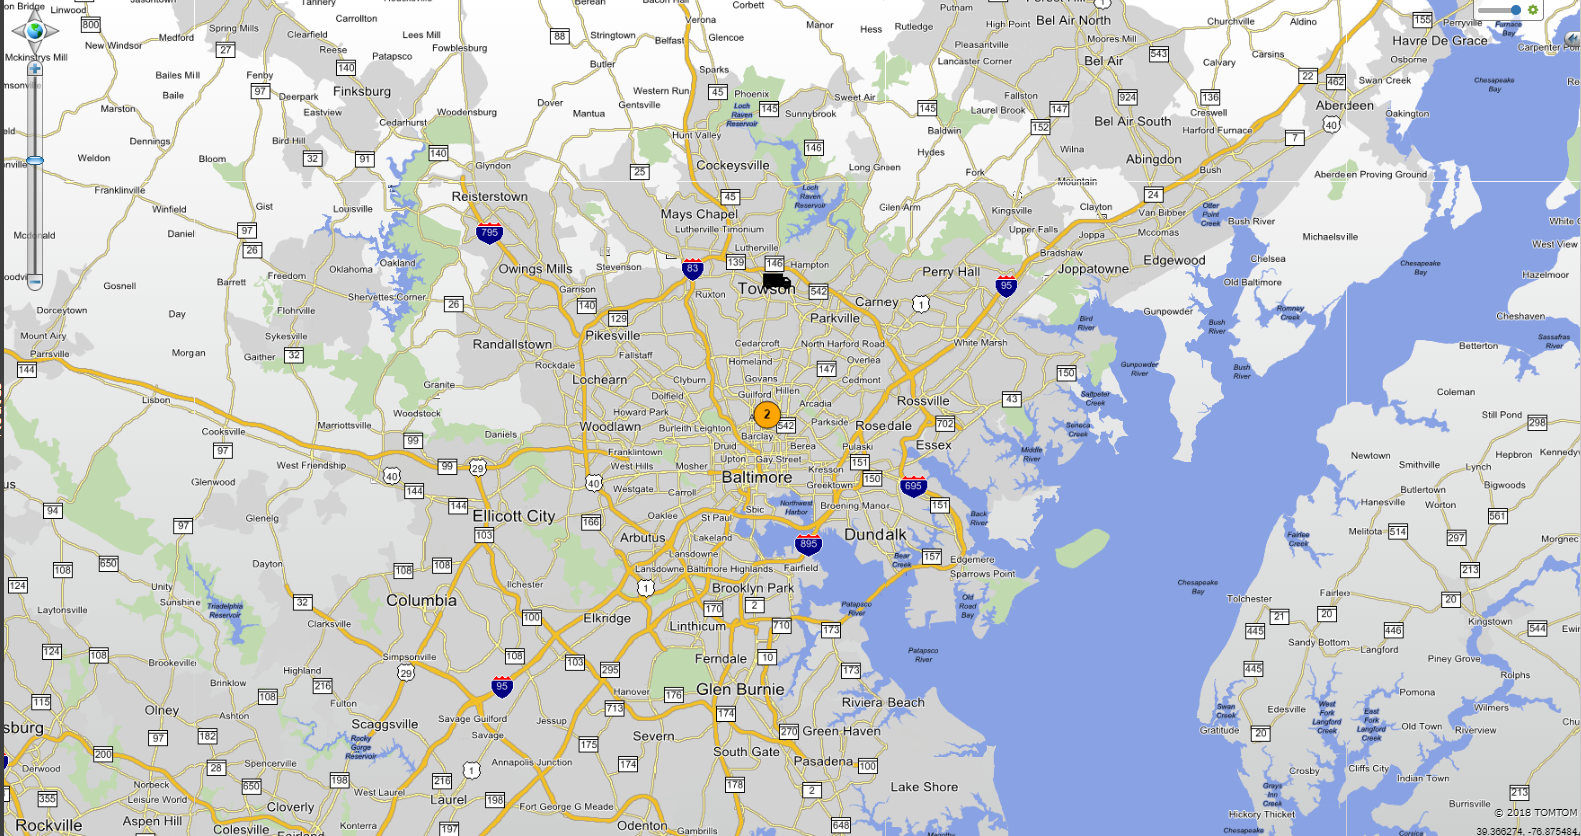
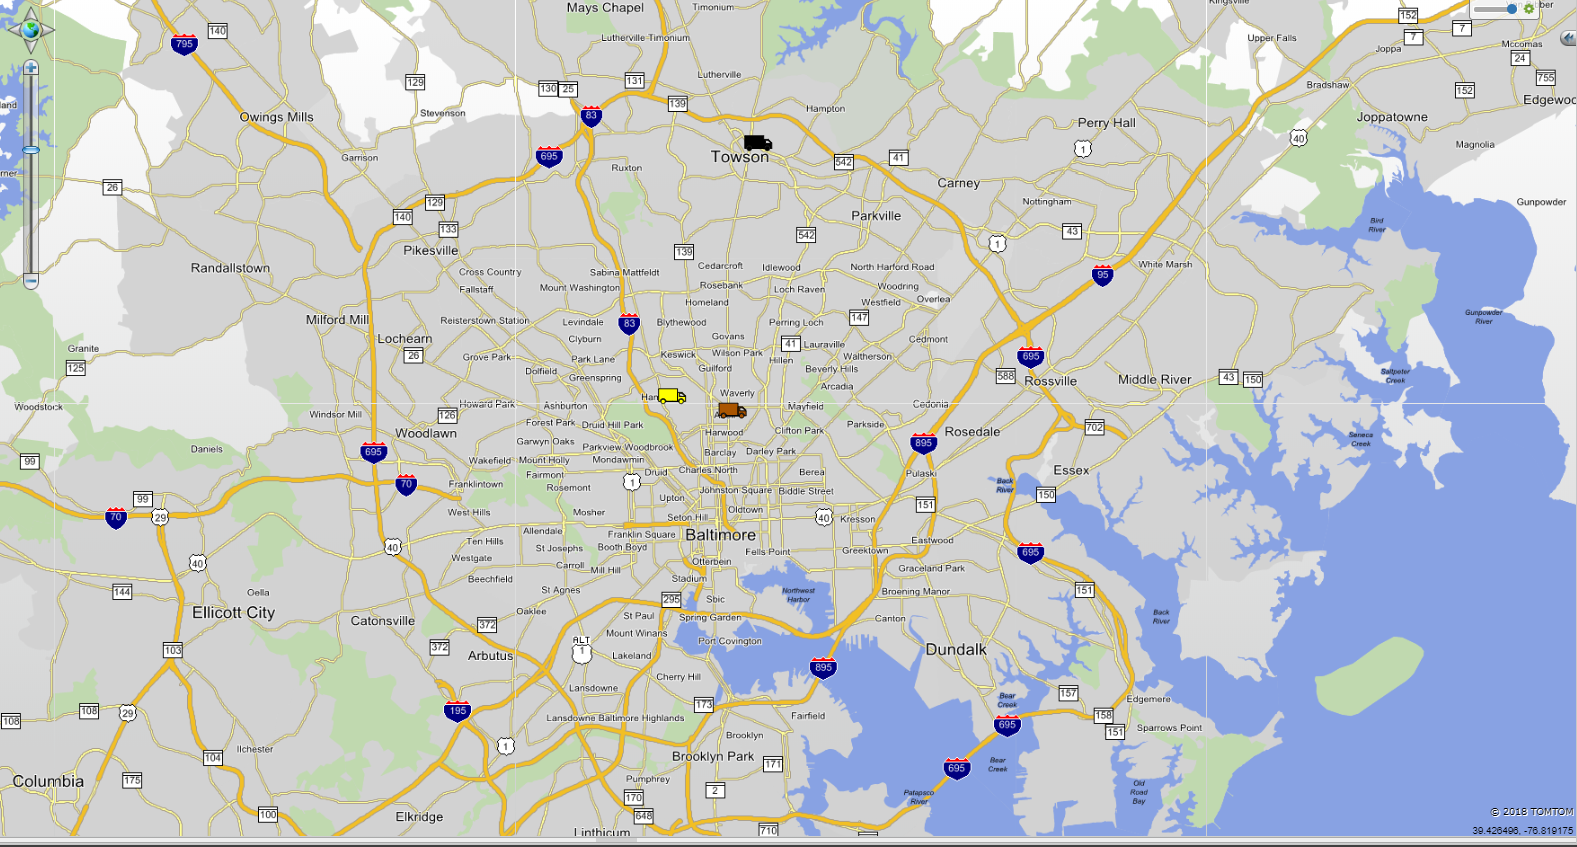
When you zoom out on the map, a cluster of routes will be marked by an orange circle that will display the number of active routes in that cluster.
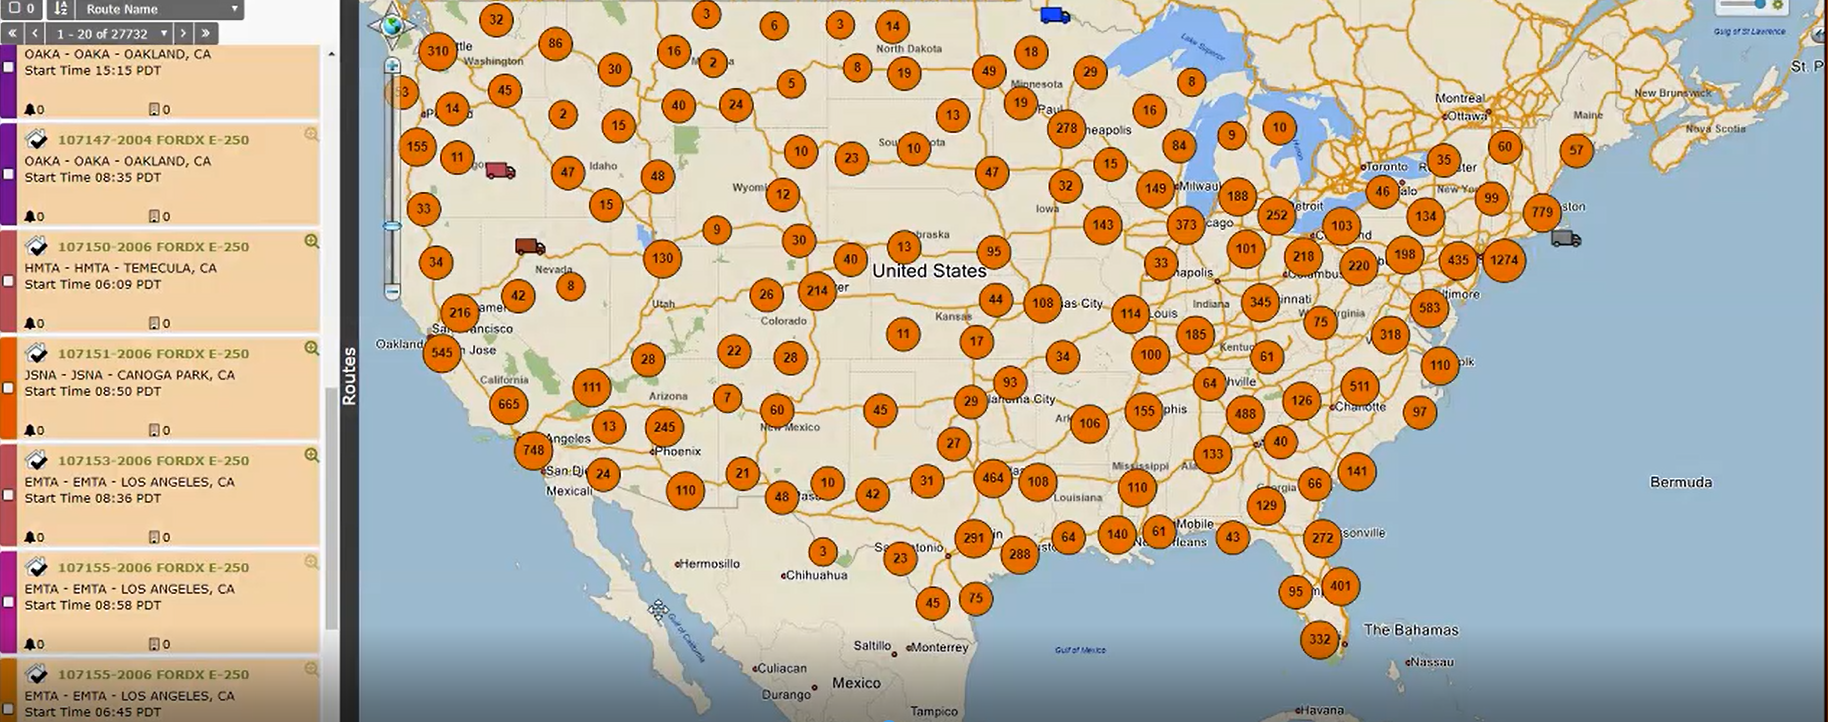
Hovering over a circle will give you a summary of the route states.
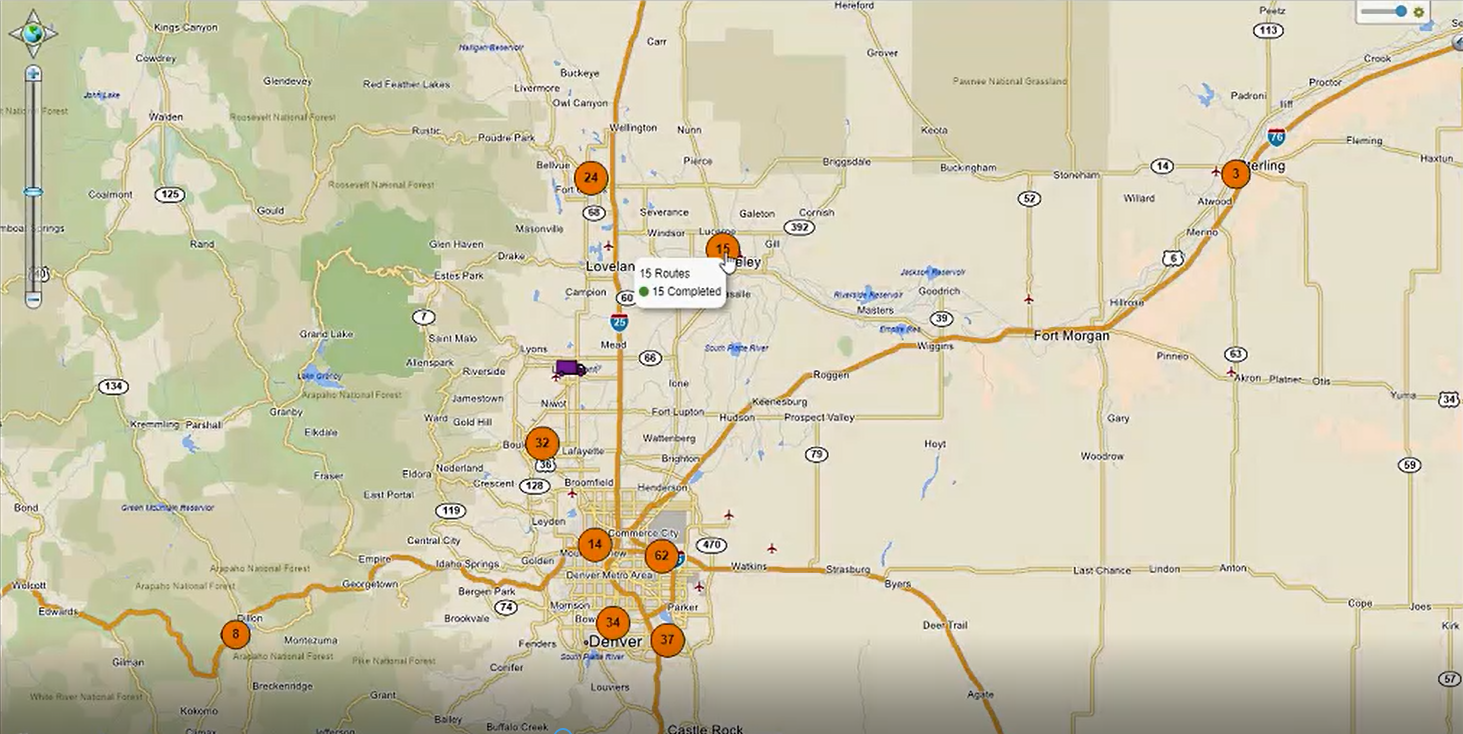
When you zoom in on a cluster of routes, the orange circle will disappear and each individual route will be represented by a truck icon. Hovering over the truck will give you more information about the route.
Viewing Route State Icons in the Route Position Tooltip
When you hover over a vehicle, the tooltip now includes an icon that will identify the route state. This allows you to quickly see the state of a route to make an assessment of its progress. For instance, if a route is behind schedule, you'll be able to immediately tell if it is waiting at a stop or delayed.
Note: The icons displayed in the tooltip are the same route state icons used on the route cards.
![]()
![]()
Working with FleetView's Enhanced Timeline
FleetView's timelines allow you to easily assess the progress of your routes by displaying them on a graphical timeline. Now, to make it even simpler to check on a particular route with just a glance, both Timeline mode and the timeline in Route Details have several enhancements designed to save you time:
- Stops with a service time window will have colored coded markers based on whether they are early, late or on time for the service window. You are able to chose how many minutes a stop must arrive before or after a service window to be considered early or late in the region notebook.
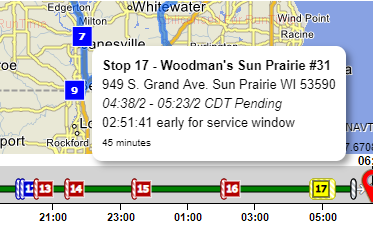
- A new tooltip will tell you if a stop missed an open/close time or service window and by how much time.
- You can easily look at a route and see how much it is off of its planned time.
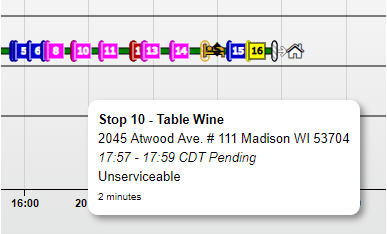
- Stops that are unserviceable or marked for redelivery will be marked magenta so that they stand out.
Setting the FleetView Timeline Missed Service Window Threshold Minutes
In order to fully utilize the new color coded stop markers on the timelines, you must define the threshold that will mark stops as early, late, or on time relative to the order’s service time windows or open and close times. This can be found in the regions settings. Its default value will be zero, but you have the ability to change that to any number of minutes in order to give workers a margin of error to meet service time window deadlines. For instance, you could enter five minutes as the FleetView Timeline Missed Service Window Threshold Minutes. If the stop's arrival is projected to be more than five minutes before the service time window, it will be considered early and marked as yellow on the timeline. If that same stop is arriving more than five minutes after the service time window, it will be considered late and marked as red.
In Roadnet Anywhere Web:
1. Go to Administration. Click on Region.

2. To add a new region, click the [Add] button. The Add Region window will appear.

To edit an existing region, click the edit icon. The Edit Region window will appear.
![]()
3. In the Add or Edit Region window, select Dispatch and then the General tab.
4. Enter the number of minutes into the FleetView Timeline Missed Service Window Threshold Minutes field. The default entry will be zero.
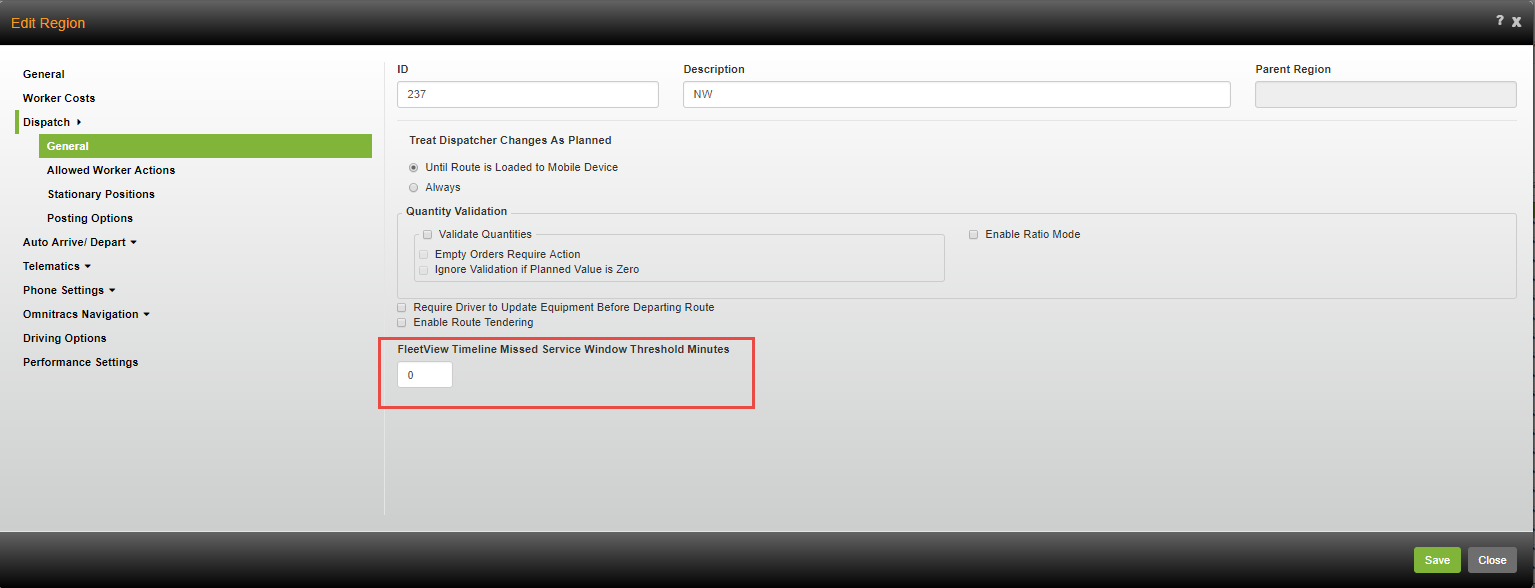
Note: To disable the enhanced timeline coloring, leave the FleetView Timeline Missed Service Window Threshold Minutes field blank.
5. Click the [Save] button
In Roadnet Anywhere Client:
1. Go to Administration and select Region.
2. To add a new region, click the Add icon. The Add Region window will appear.

To edit an existing region, click the edit icon. The Edit Region window will appear

3. In the Add or Edit Region window, click the Dispatch Settings tab.
4. On the Dispatch Settings page, select the General tab.
5. Enter the number of minutes into the FleetView Timeline Missed Service Window Threshold Minutes field. The default entry will be zero.
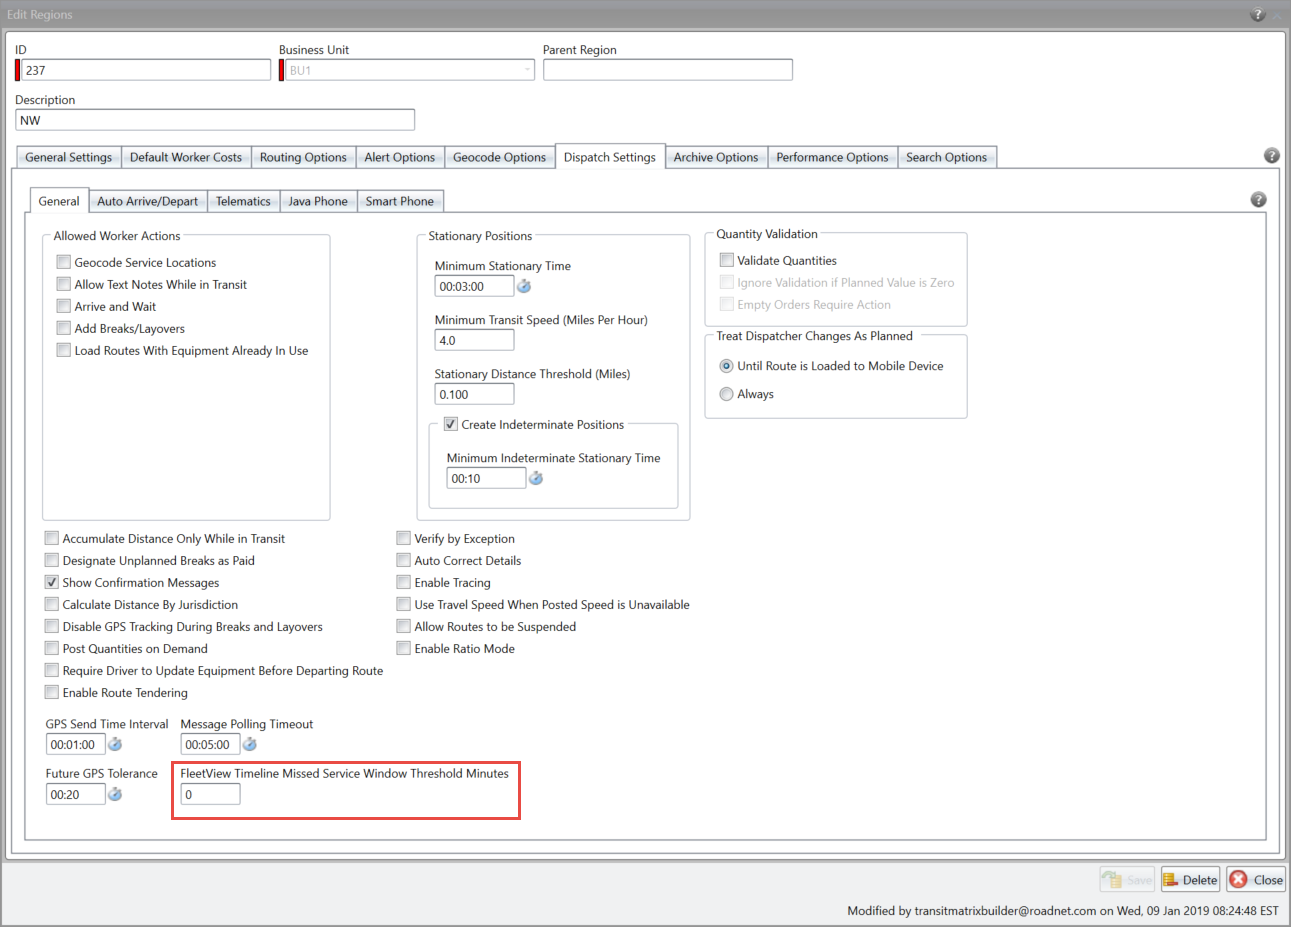
Note: To disable the enhanced timeline coloring, leave the FleetView Timeline Missed Service Window Threshold Minutes field blank.
6. Click the Save button.
Understanding the Enhanced Timeline
Once Timeline Missed Service Window Threshold Minutes is defined, you will be able to quickly assess whether a stop will be early, late, or on time to meet a service time window by looking at the color of the stop marker. Planned routes will be shaded in yellow or red.
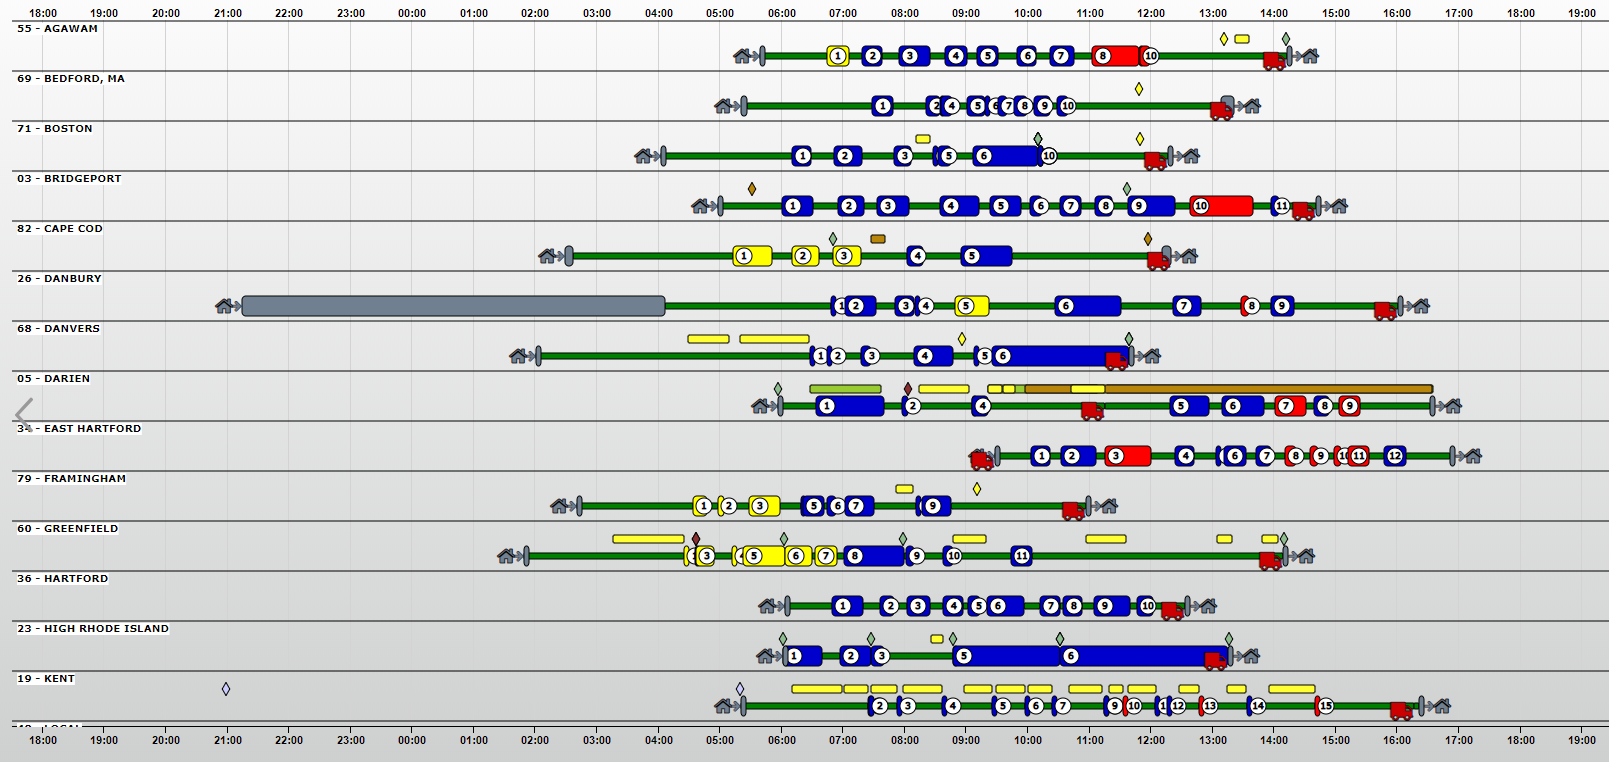
If a stop has a service time window it will be:
Yellow: if the stop's arrival is early by more than the FleetView Timeline Missed Service Window Threshold Minutes .
Red: if the stop's arrival is late by more than the FleetView Timeline Missed Service Window Threshold Minutes .
Blue: if the stop's arrival is neither early nor late.
Planned routes will be shaded in yellow or red.
When you hover over a stop on the timeline that is early or late, a tooltip will appear and indicate whether the stop missed a service window or open/close time and by how much time.
The timeline will indicate if a route is off of its planned time and by how much. If the route is late it will appear in red, along with a (+) symbol. If the route is early it will appear in green along with a (-) symbol.

Note: This is only displayed for planned routes
If a worker was not able to service a stop at the planned time or it was marked for redelivery, it will be magenta on the timeline so it is easily noticeable.
View a Device's Current Power Source on the Telematics Diagnostics Screen
Found in Roadnet Anywhere Web
Telematics Diagnostics allows you to quickly see the status of your telematics devices and troubleshoot any issues. Now, in addition to displaying basic information about the device and the equipment it is installed in, the new Current Power Source column will indicate when a device is unplugged from the vehicle and relying on its internal power source.
The column will display one of three values.
Unknown - if the status of the device is unknown.
Vehicle Power - if the device is plugged in and using the vehicle as a power source.
Device Power- if the device is unplugged and using its internal battery for power.

View Engine Hours in the Stop Grids
Found in Roadnet Anywhere Web and Roadnet Anywhere Client
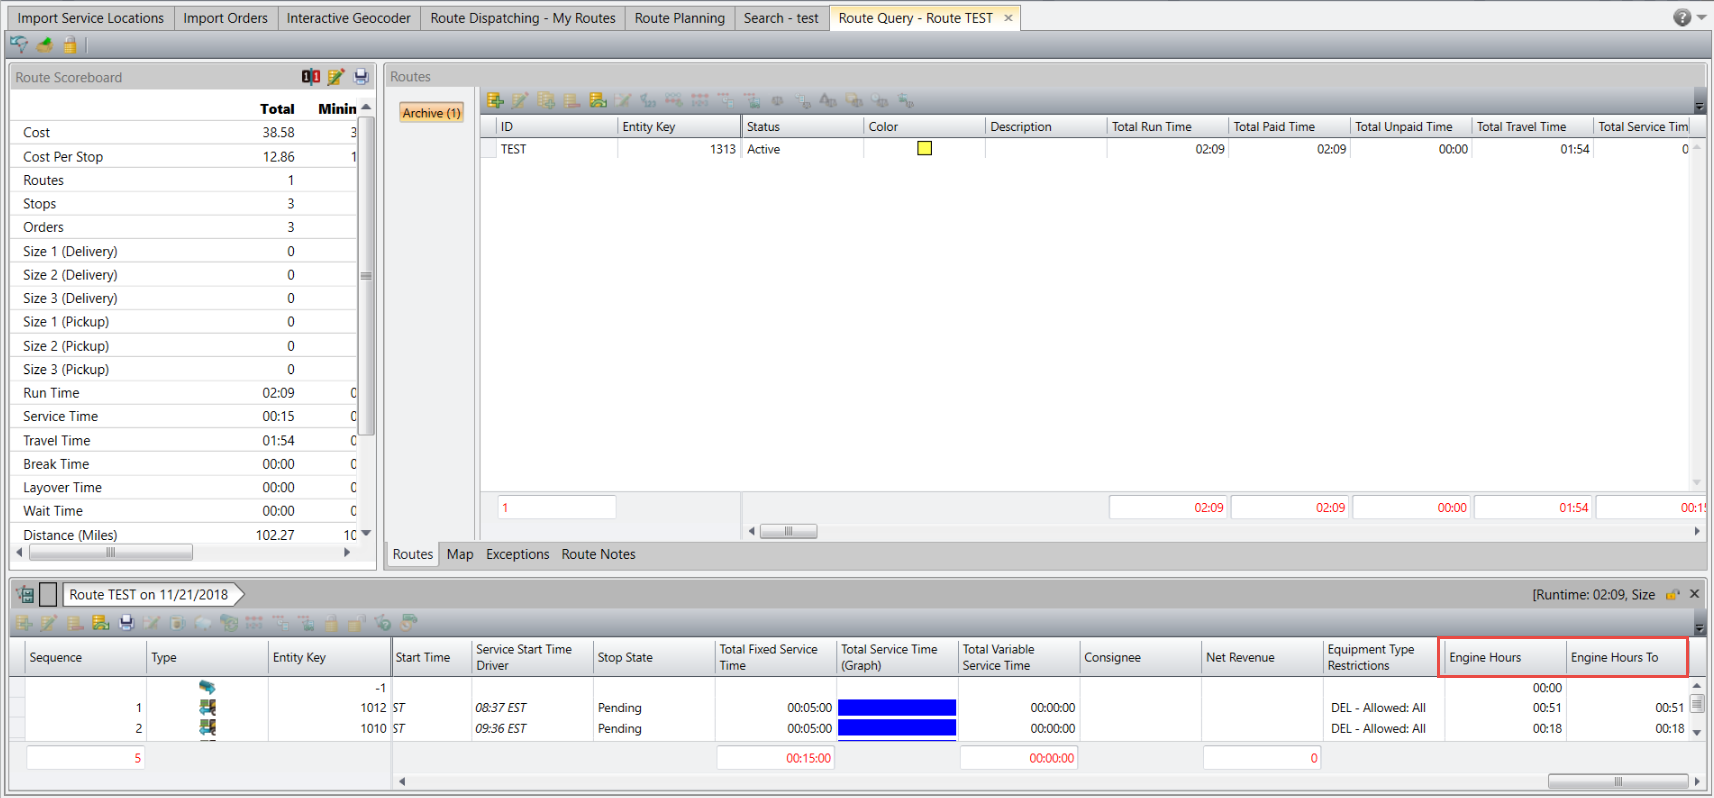
In Roadnet Anywhere, the Stop Lists not only provide you with details about the route, but also important information about the equipment. To better keep track of daily engine wear and tear and fuel usage, you may want to know exactly how long a piece of equipment's engine was running while traveling to a stop and/or idling at a stop. With two new columns in the stop lists, you can now view Engine Hours and Engine Hours To for any given stop. Engine Hours will display the amount of time the engine was running while at a stop. Engine Hours To will display the amount of time the engine was running while traveling to the stop. You will be able to track the amount of time the engine was running throughout the sequence of the route: at the origin depot, each individual stop, the destination depot, and all of the segments of travel in between.
In Roadnet Anywhere Web, Engine Hours and Engine Hours To are displayed in Route Details.
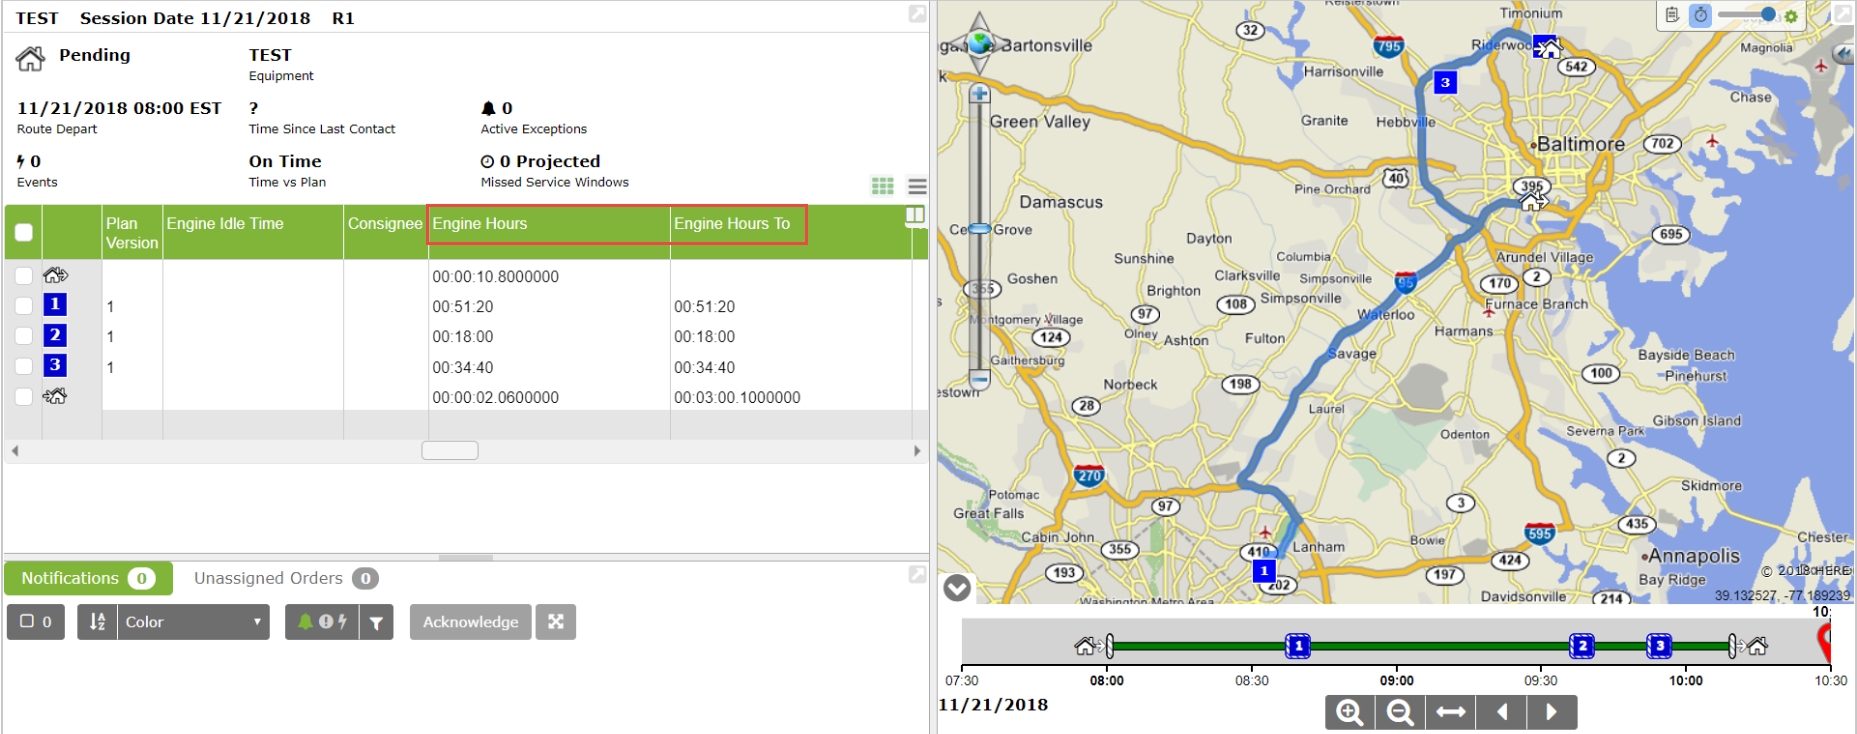
In Roadnet Anywhere Client, Engine Hours and Engine Hours To are displayed in the Stops grid.
Note: You must edit your view configuration to view these new columns.
Limiting Forms By Who Adds a Stops
Found in Roadnet Anywhere Web
If you have questions that need to be answered when a worker adds a stop to a route, but you don't need them answered for planned stops, you still need to send the mobile form to the device. The way mobile forms work now, the worker sees the form as part of the mobile form list for all the stops, not only the one just added to the route. Depending on how many forms exist, the list can quickly get too long to skim through.
Now, you can create a filter that limits when a form is seen, based on who or when a stop, order, or line item is added to a route. This means that when you create an assignment rule, if the new Source filter criteria is set to Worker Added, the form won't show until the worker adds a stop, order, or line item on the mobile device or if you set the Source to Dispatcher Added, the form won't show unless the dispatcher adds a stop, order, or line item, while the route is being run. You can also filter based on Planned stops and Worker Added stops.
For example, you may want the worker to explain why it was necessary to add a stop to the route. Obviously, this question is not needed for planned or dispatcher added stops. If you create an assignment rule that assigns the form to stops and you check evaluate on-the-fly, you can add a When filter to the assignment rule that limits the form to show only when a stop's Source is equal to Worker Added. When you assign this rule to a form, the form only displays in the mobile form list of a stop added to the route by the worker.
To add an assignment rule in Roadnet Anywhere Web that lets a form display only when a certain role, such as dispatcher or worker, creates a stop, order, or line item on a route:
1. Go to Mobile Workflow, then click Mobile Forms at the top of the screen.
![]()
2. Click the [Add] button, to create a new form or click on the form you want to edit on the left side of the screen to make changes to an existing form.
Note: When adding a new form, you must save it before you are able to create new form controls.
3. Enter an ID and Description for the form.
4. Add form controls to the form in the Assigned Form Controls area.
5. Click Add Assignment Rule.
6. In the Assign As field, click the arrow and select when the form will be completed on the mobile device: Pre-Route, Post-Route, or at a Stop, on an Order or Line Item, at Anytime, or at a Stop or Group.
7. Check Evaluate on-the-fly so that the fields available on the mobile device display on the expression line.
Note: Evaluate on-the-fly must be checked for the new Source filter to display.
8. Choose When. Use the expression line to create a filter that defines when the form will be assigned.
9. Click the arrow and select either Match All or Match Any. Match All matches every filter expression you create. Match Any matches at least one of the filter expressions you create.
10. Click on the first arrow and choose Stop, Order, or Line Item from the list.
11. Click on the second arrow and choose Source from the list.
Note:Source only displays when Stop, Order, or Line Item is chosen in the first field.
12. Click on the third arrow and choose the comparison you want to use, Equal To or Not Equal To.
13. Click on the fourth arrow and choose the limiting criteria in the final field. Choose from Planned, Dispatcher Added, Worker Added, or Helper Added.

Notes: Depending on which criteria you choose, the form is seen or hidden on the mobile device. If you choose Planned, when a planned stop, order, or line item is part of a route, the form is seen on the mobile device. If you choose Dispatcher Added, when the dispatcher adds to the route after it is started, the form is seen on the device. If you choose Worker Added or Helper Added, when the worker or helper adds a stop, order, or line item to the route on the mobile device, the form displays.
Other filters that are part of the form may also impact if a form is seen or hidden on the mobile device.
14. Add any other filters you need.
15. Click the [Save] button to save the assignment rule.
16. Click the [Save] button to save the form.
When the worker runs the route on the Android device, depending on what Source filter criteria was chosen when creating the form, a form may or may not display in the mobile form list. In our case, the form that asks why a stop was added to the route only displays in the mobile form list when the worker adds a stop to the route.
Completing Mobile Forms Before Route Select and After Logoff
Found in Roadnet Anywhere Web and Roadnet Mobile for Android
If you need to gather specific information before the worker loads a route, such as "Did you check in with the warehouse? or "Does the truck have any visual damage?," you can now have the worker complete a mobile form after logging into Roadnet Mobile, while still on the Load Route screen. You can also prompt the worker to complete a form after pressing the log out button.
Creating a form that is completed before a route is selected or after the worker presses the log out button is as simple as choosing Pre-Start or Pre-Logoff in the Assign As field when adding the Assignment Rule to a form.
If a Pre-Start form is required, the worker is prevented from loading the route until the form is completed. As well, if a Pre-Logoff form is required, the worker is unable to log out of Roadnet Mobile until the form is completed.
To add an assignment rule in Roadnet Anywhere Web that lets a form display before a route is selected or when the worker logs out:
1. Go to Mobile Workflow, then click Mobile Forms at the top of the screen. The Mobile Forms window displays.
![]()
2. Click the [Add] button, to create a new form or click on the form you want to edit on the left side of the screen to make changes to an existing form.
Note: When adding a new form, you must save it before you are able to create new form controls.
3. Enter an ID and Description for the form.
4. Add form controls to the form in the Assigned Form Controls area.
5. Click Add Assignment Rule.
6. In the Assign As field, click the arrow and select when the form will be completed on the mobile device: Pre-Start or Pre-Logoff.
Pre-Start—The worker completes the form after logging into Roadnet Mobile, but before selecting the route.
Pre-Logoff—The worker completes the form after pressing the Log Off button.

7. Click the [Save] button to save the assignment rule.
8. Click the [Save] button to save the form.
When the worker logs into Roadnet Mobile on an Android device, if there are any tasks that need to be performed before a route is loaded, the Tasks list displays. When the worker presses the Tasks arrow, Pre-Start mobile forms along with any other pre-route load tasks show in the tasklist. The worker simply checks the mobile form box and the form displays for the worker to complete. If the form is required, the worker cannot load the route until the form is completed.
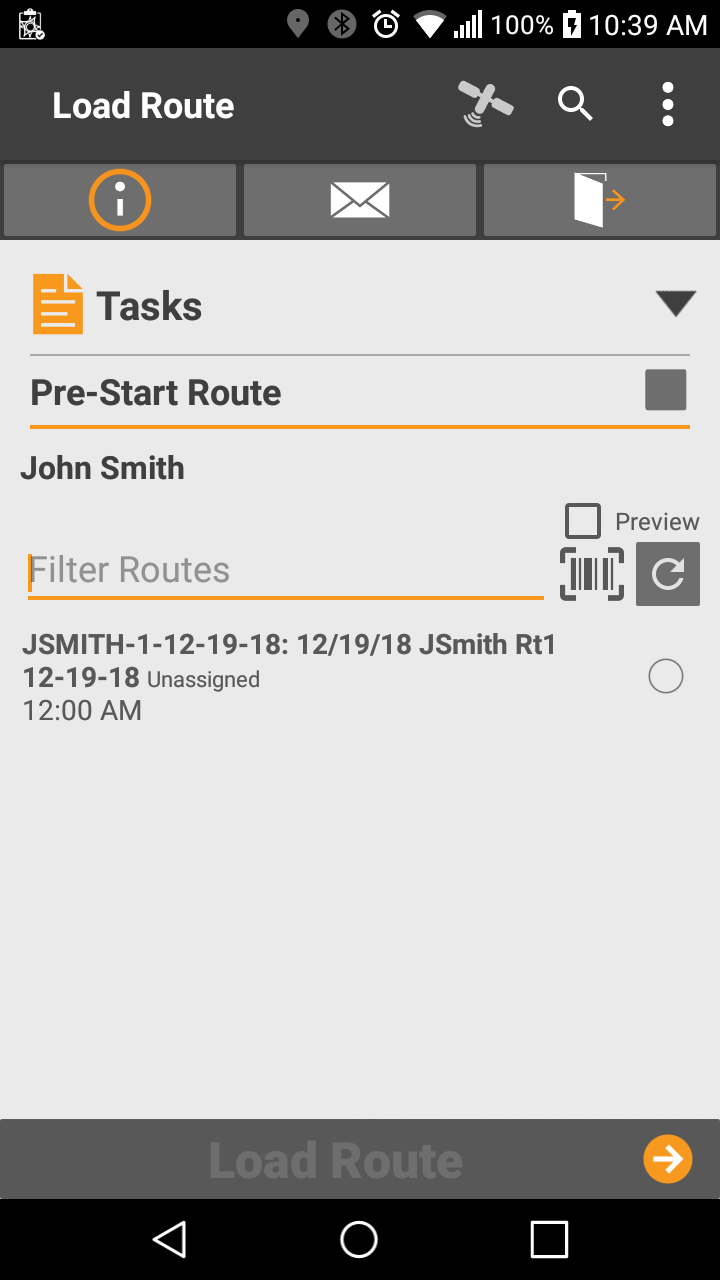
After the route is completed and the worker presses the Logoff button, if there are any Pre-Logoff mobile forms, the Pre-Logoff Tasks screen displays. The worker simply checks the mobile form box and the form displays for the worker to complete. If the form is required, the worker cannot log out of Roadnet Mobile until the form is completed.
Synchronized Trailer Drop/Hook in RDC Mobile
Found in Routing Dispatching Compliance Mobile for Android
If you use RDC, your workers will now notice that when a trailer is dropped or hooked up in Schedule or Hours of Service, that the drop or hook up information is automatically sent to the other application. This ensures that the Trailer Drop/Hook list is always accurate, no matter which application the worker is using. For example, if the worker hooks up a trailer in Hours of Service, the trailer can be dropped in Schedule, while running the route.
Dropping and Hooking Up Trailers at a Route's Origin
Found in Roadnet Anywhere and Roadnet Mobile Android
When the Drop/Hook Trailer option was added to Roadnet Mobile, it was designed to let the worker drop off and pick up trailers at a stop on the route. But, if the worker needed to drop off or pick up a trailer at the origin of the route, it could not be done. Drop/Hook Trailer has been enhanced to allow workers to drop off and pick up trailers at the route's origin. The worker can now choose the drop/hook option from the Menu on the Depart Route screen.
Selecting Trailers to Hook
Found in Roadnet Mobile for Android
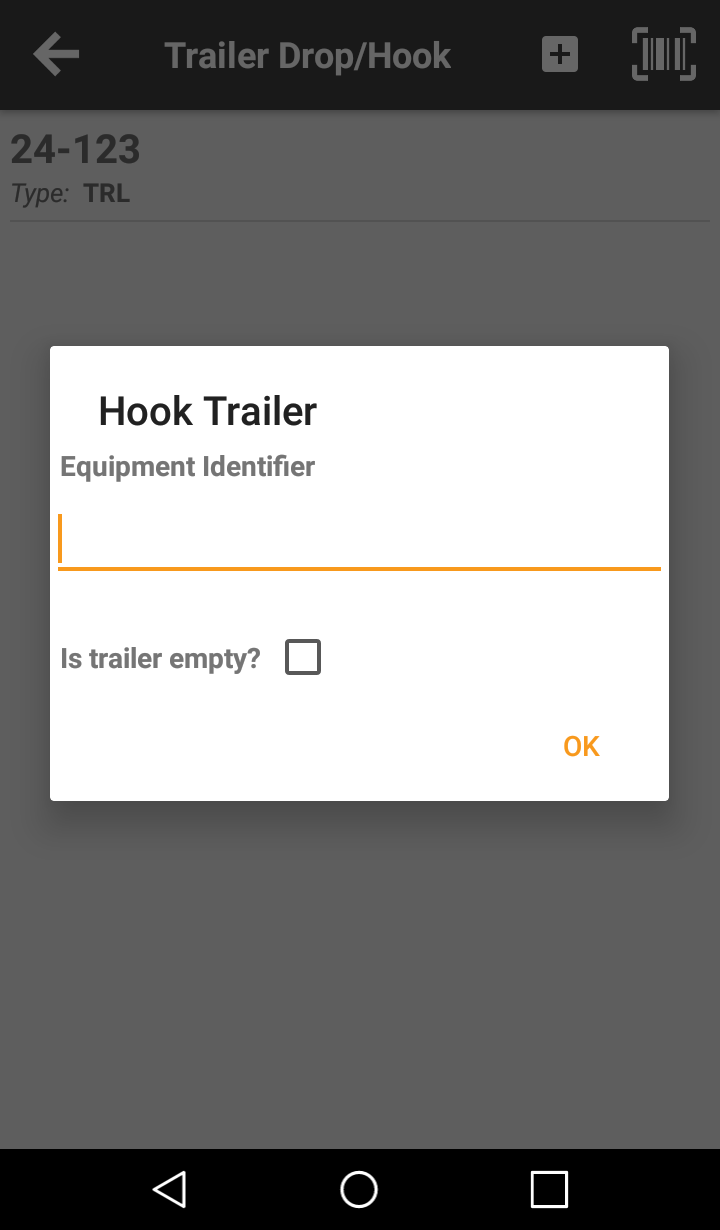
If your workers use the Trailer Drop/Hook feature on the Android mobile device, currently when hooking a trailer on the route, they are required to enter the complete Equipment ID of the trailer. To make the experience a bit more user friendly, a few changes were made. Now, the worker first chooses if an existing trailer is being hooked up or if it is one that is not in the system. If the trailer exists in the system, the worker types in a part of the Equipment ID and chooses the correct one from a list of trailers. If the trailer is not in the system, the worker types in the complete Equipment ID of the unlisted trailer.
Note: Compliance customers can not hook unlisted trailers.
When the worker presses the Add button on the Trailer Drop/Hook screen, there is now the option to choose to look up and hook an existing trailer by name or to hook an unlisted trailer to the route.
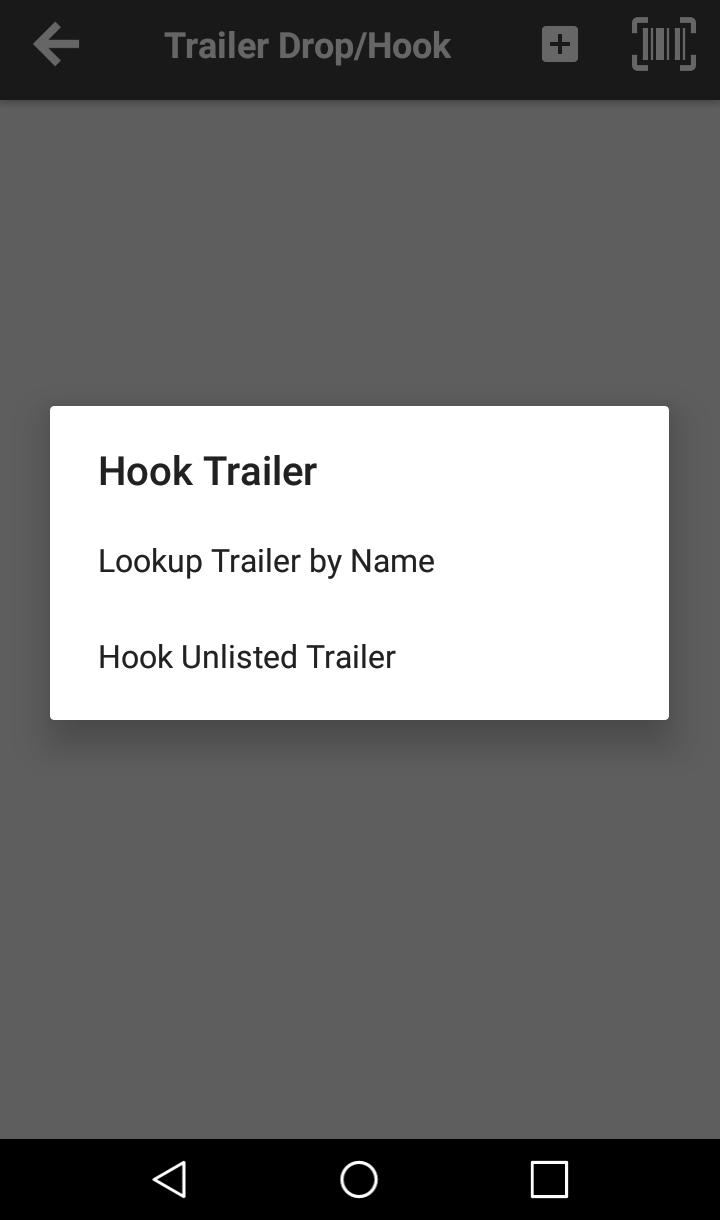
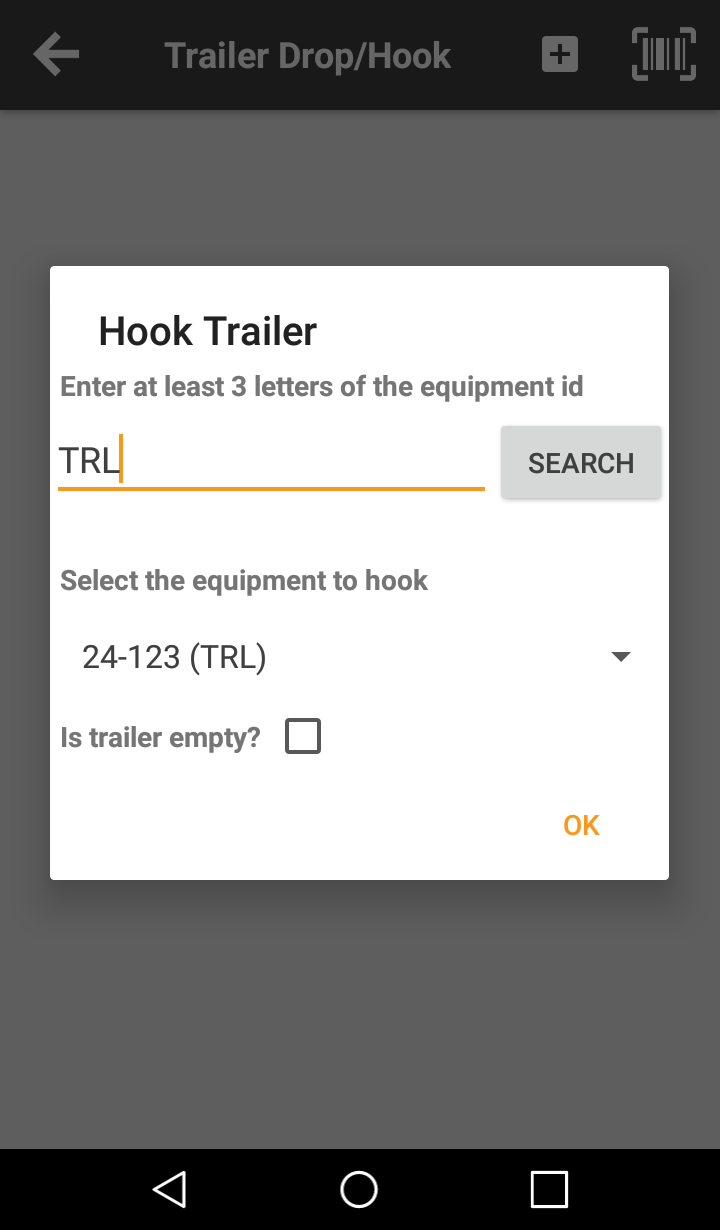
When the worker chooses Lookup Trailer by Name, a screen displays on which the worker can search and see a list of existing trailers.
The worker must enter three or more characters of the trailer's Equipment ID and presses Search. Then, the worker presses the arrow to see all the equipment that meets the criteria entered. The appropriate equipment is then selected from the list.
The worker checks the Is trailer empty? box, if the trailer does not have items in it, then presses OK to return to the list of trailers. The trailer displays in the Trailer Drop/Hook list.
Note: The Worker no longer needs to choose an Equipment Type ID.
When the worker chooses Hook Unlisted Trailer, a screen displays on which the worker can enter an Equipment ID and choose to mark the trailer as empty.
The worker presses Yes to the equipment not found message to continue with the addition of the trailer to the route. The hooked trailer displays in the Trailer Drop/Hook list.
Identifier Field Quickly Shows Form Results through Web Services
Found in Roadnet Anywhere Web
If you base employee actions off of form responses, such as making repairs to a vehicle or having marketing representatives visit a customer, and you integrate those responses with a system outside of Roadnet Anywhere, you know how important it is that the question matches with the proper answer. You also know that if someone changes a form control or form after an integration is created, it causes those matches to break and results in the integration no longer working.
Because there is no simple way to keep form questions and responses matched together outside of Roadnet Anywhere, an identifier has been added to the add/edit form control window. The new Web Services property FormControl.Identifier provides an easy and clear field with which you can match both the question and answer when integrating with outside systems.
Notes: Once the form control is saved, the identifier cannot be changed.
Existing form controls will be assigned a Form Control Identifier by Roadnet Anywhere. When you create a new form control you are required to enter an identifier in the Form Control Identifier field.
To create a form control in Roadnet Anywhere Web:
1. Go to Mobile Workflow, then click Mobile Forms at the top of the screen.
![]()
2 To add a new form control, click the ![]() [Add] button. The Add/Edit Form Control window opens.
[Add] button. The Add/Edit Form Control window opens.
3. In the Form Control Identifier field, enter an ID. The ID can be up to 32 alpha-numeric characters. You cannot enter special characters in the Form Control ID field.
4. In the Form Control Text field, enter the text as you want it to appear on the customized form.
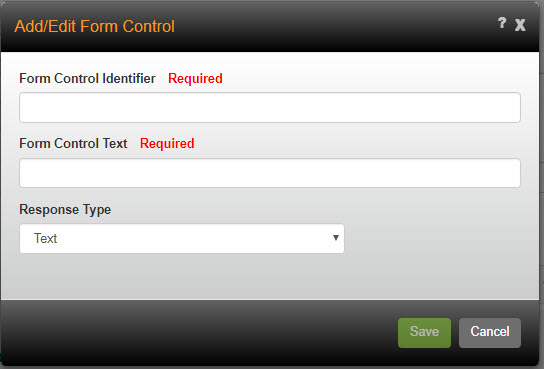
5. Click the Response Type arrow and select the type of response the worker will provide.
6. Complete any additional fields related to the chosen Response Type.
7. Click the [Save] button to save the form control.
Note: The Form Control Identifier cannot be changed once the form control is saved.
The worker will not see any changes on the mobile device in relation to the new Form Control Identifier field.
Ordering Mobile Forms Within the Tasklist
Found in Roadnet Anywhere Web and Roadnet Mobile for Android
When your workers are out in the field, you may want them to follow standard procedures and complete tasks in a specific order. Previously, you were able to use Mobile Screen Configuration to place items on the At Stop screen in a specific order so when the worker looked at the tasklist or the menu, the workers could move down the list to complete tasks. Mobile forms could be customized, but the whole list of forms showed rather than the single form that needed to be completed at that specific moment. Now, you can place individual mobile forms in the tasklist or menu and specify their placement within the list. This lets the worker access the form that is needed at that specific time.
When you modify the At Stop screen on the Mobile Screen Configuration window, individual mobile forms with at least one assignment of At Stop or At Group Stop show in the new Mobile Forms list on the right side of the page, at the bottom of the window. Dragging and dropping forms from this list to an item location window allows you to control how the worker accesses a specific form and in what order the forms are listed on the mobile device's screen. When you move an individual form to an item location window, you can also move the form up or down in the list so it displays in a specific place when the worker sees it on the mobile device.
Notes: You cannot add individual mobile forms to the Quick Action Items window.
Customized forms are still subject to assignment rules. If an assignment rule doesn't allow a form to be on the route then it won't display, regardless of the list it is in.
Customizing an individual form found in the new Mobile Forms list allows the worker direct access to a single form from the menu or tasklist. Customizing the Mobile Forms item in the Default Display list provides the worker access to a list of the forms that weren't placed individually in the tasklist or menu, but still need to be available to the worker.
To show individual mobile forms in the mobile device's tasklist, in Roadnet Anywhere Web:
1. Go to Mobile Workflow, then click Mobile Screen Configuration at the top of the screen. The Mobile Screen Configuration window dsplays.
![]()
2. Click At Stop in the Screens list. The Default Display list shows all the actions that can be performed while on that screen in Roadnet Mobile.
3. In the Default Display list, drag and drop an individual mobile form, found under Mobile Forms at the bottom of the list, to an item location window. The window represents where and how the worker will access the item. The order in which the item appears in the list is the order in which it will display in Roadnet Mobile. You can change where an item is positioned in the list by dragging and dropping it above or below other items.
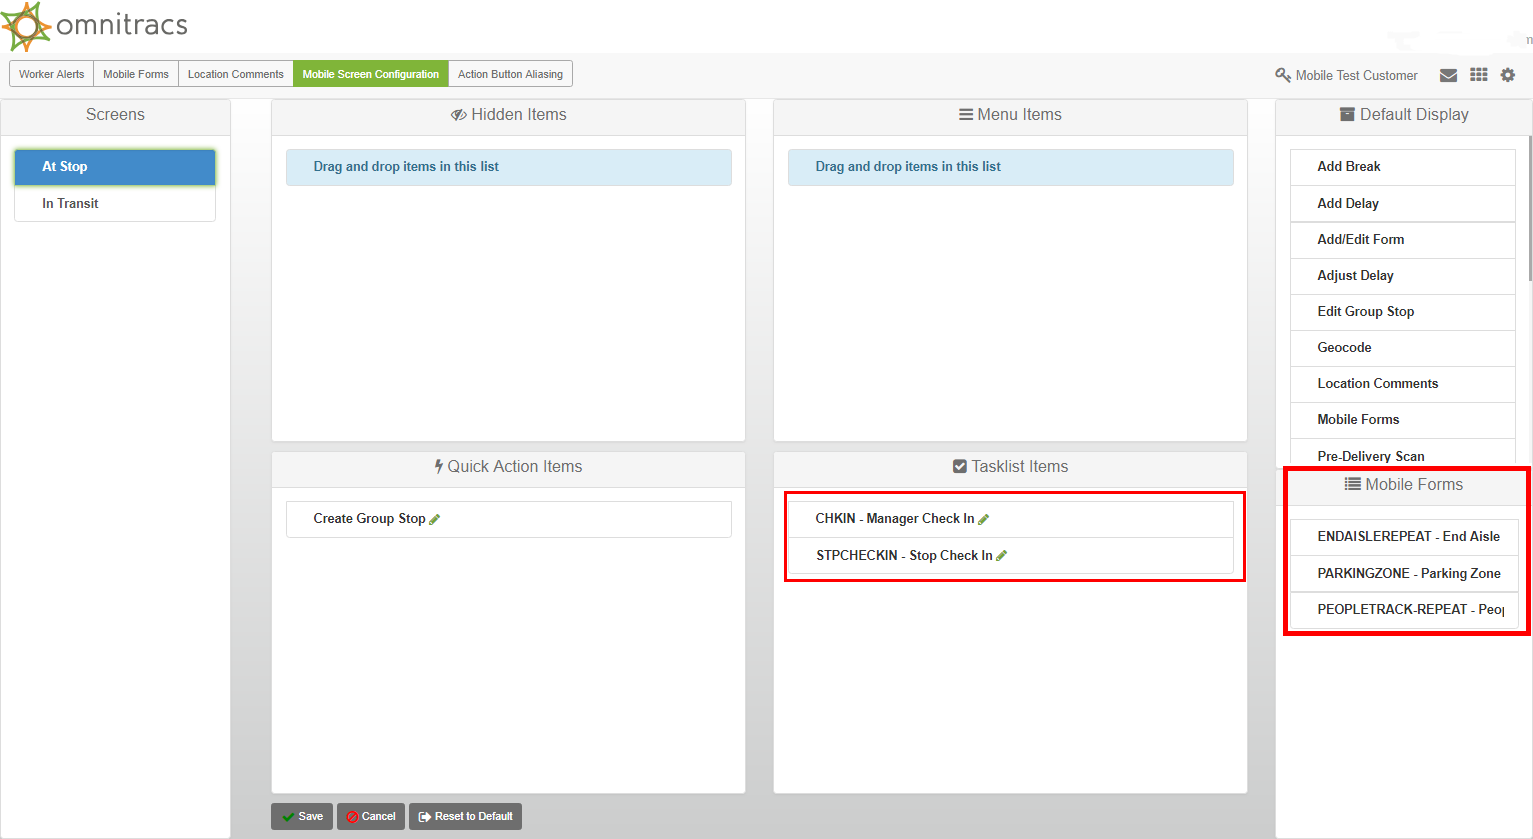
Notes: You cannot add individual mobile forms to the Quick Action Items window.
You can rename an individual mobile form, simply click the Edit icon next to the form and type the new name in the Custom label field. The custom label will replace the default name on the mobile device.
4. Complete any additional customizations.
5. Click the [Save] button to save the screen customization.
On the Android mobile device, the worker will see the individual mobile forms where you placed them in the tasklist or menu.
Verifying Items Before Delivery
Found in Roadnet Mobile for Android
You know workers can verify quantities before the route is departed and before the route is completed, as well as the quantities that are delivered to the customer. This enables them to track movement of the items in and out of the vehicle throughout the route. But, previously there was no way to track movement of items out of the vehicle at the stop, before they were handed off to a helper and delivered to the customer.
Now, the worker can perform a pre-delivery scan as items are removed from the truck for delivery, adding one more layer of accuracy to the chain of custody. The worker is able to keep track of items as they come off the vehicle and see what is being or has been given to the helper to deliver to customers.
To allow workers to scan items off the vehicle, you must turn on the Enable Pre-Delivery Scan region setting. You can also require workers to perform the pre-delivery scan by enabling the Pre-Delivery Scan Required region setting. When you require the pre-delivery scan, workers cannot depart the stop until the scan has been completed.
Notes: You can choose how Pre-Delivery Scan displays on the mobile device, as a Quick Action button, in the Menu list, or in the Tasks list. Pre-Delivery Scan has been added to the Mobile Screen Configuration tab in Mobile Workflow.
Pre-Delivery Scan can also be used with Route Sharing and Group Stops.
To turn on Pre-Delivery Scan in Roadnet Anywhere Web:
1. Go to Administration, then click the green button and scroll to Region.

2. Click the [Add] button or the Edit icon for the region with which you want to work. The Add/Edit Region window opens.
![]()
3. Click on the Phone Settings - Smart Phone - General tab.
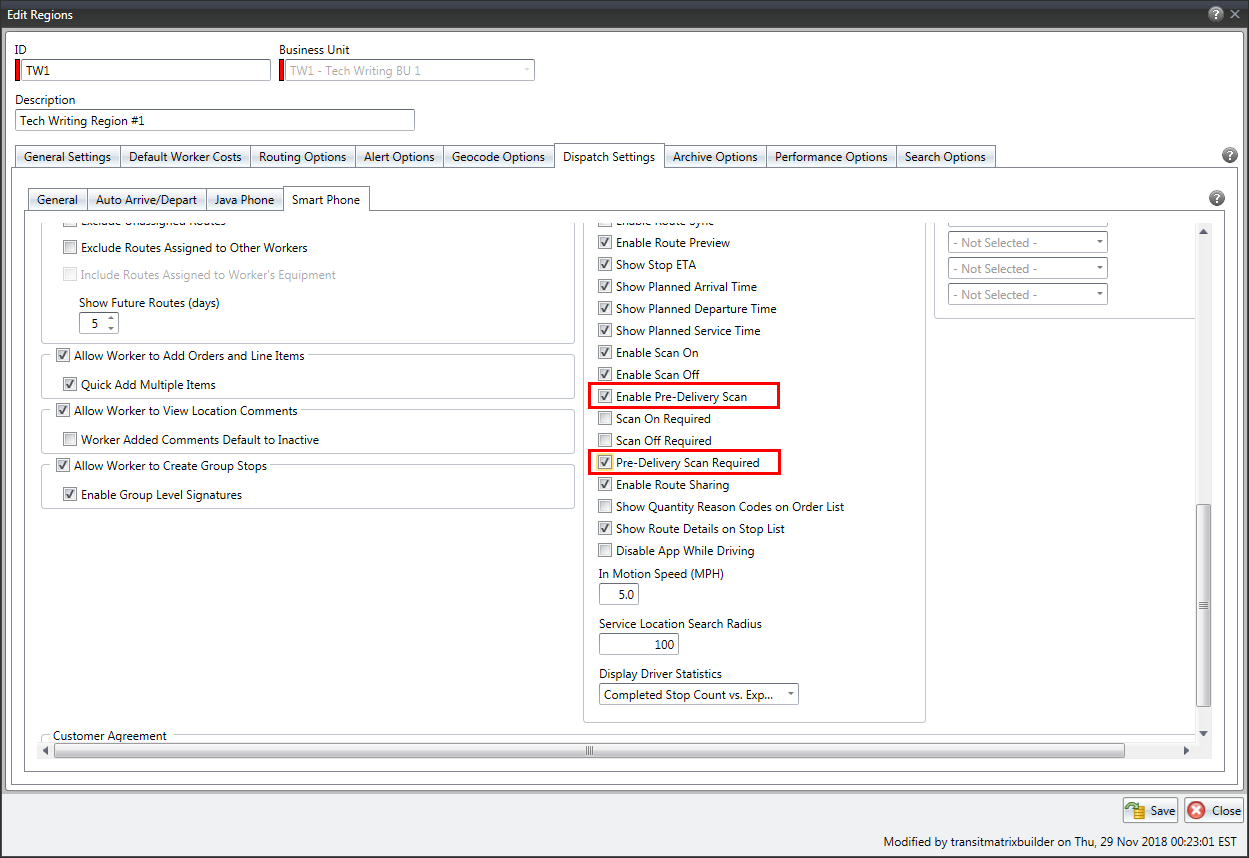
4. Check Enable Pre-Delivery Scan to allow workers to see and verify the delivery items while unloading them at a stop. Workers can complete the delivery without verifying the pre-delivery load.
5. Check Pre-Delivery Scan Required if you want to require the worker to verify the delivery items before departing the stop. The worker can scan stop/order/line items using the scanner on the mobile device or manually check them off on the Pre-Delivery screen. The worker will not be able to depart the stop until the pre-delivery scan is performed. If unchecked, the worker can still verify the pre-delivery items, but it will not be required to depart the stop. If Enable Pre-Delivery Scan is not selected, this option will not be available.
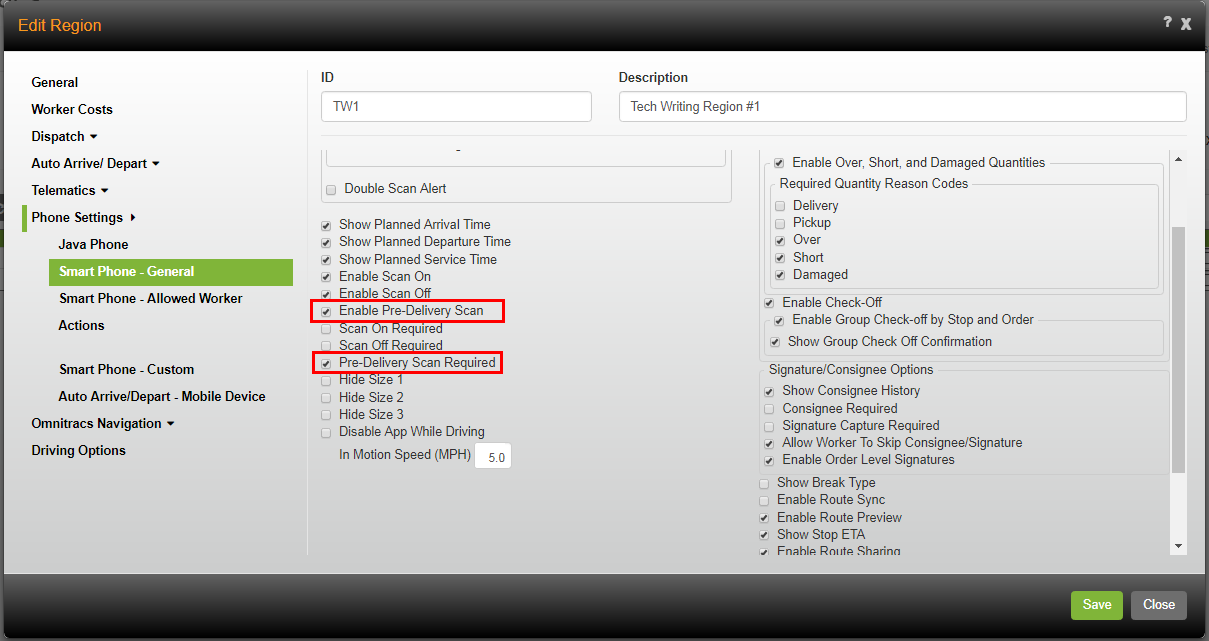
6. Click the [Save] button.
To turn on Pre-Delivery Scan in Roadnet Anywhere Client:
1. Click on the Administration menu and select Regions.
2. To add a new region, click the Add icon.

To edit an existing region, double-click on the appropriate region.
3. Click on Dispatch Settings, and then click on the Smart Phone tab.
4. Check Enable Pre-Delivery Scan to allow workers to see and verify the delivery items while unloading them at a stop. Workers can complete the delivery without verifying the pre-delivery load.
5. Check Pre-Delivery Scan Required if you want to require the worker to verify the delivery items before departing the stop. The worker can scan stop/order/line items using the scanner on the mobile device or manually check them off on the Pre-Delivery screen. The worker will not be able to depart the stop until the pre-delivery scan is performed. If unchecked, the worker can still verify the pre-delivery items, but it will not be required to depart the stop. If Enable Pre-Delivery Scan is not selected, this option will not be available.
6. Click the [Save] button.
Scanning Items Off the Truck Before Delivery
Note: Depending on settings, the worker may access this feature by pressing a Quick Action button at the top of the screen, pressing Menu and choosing it from the list that pops up, or pressing the Tasks arrow and finding it in the list.
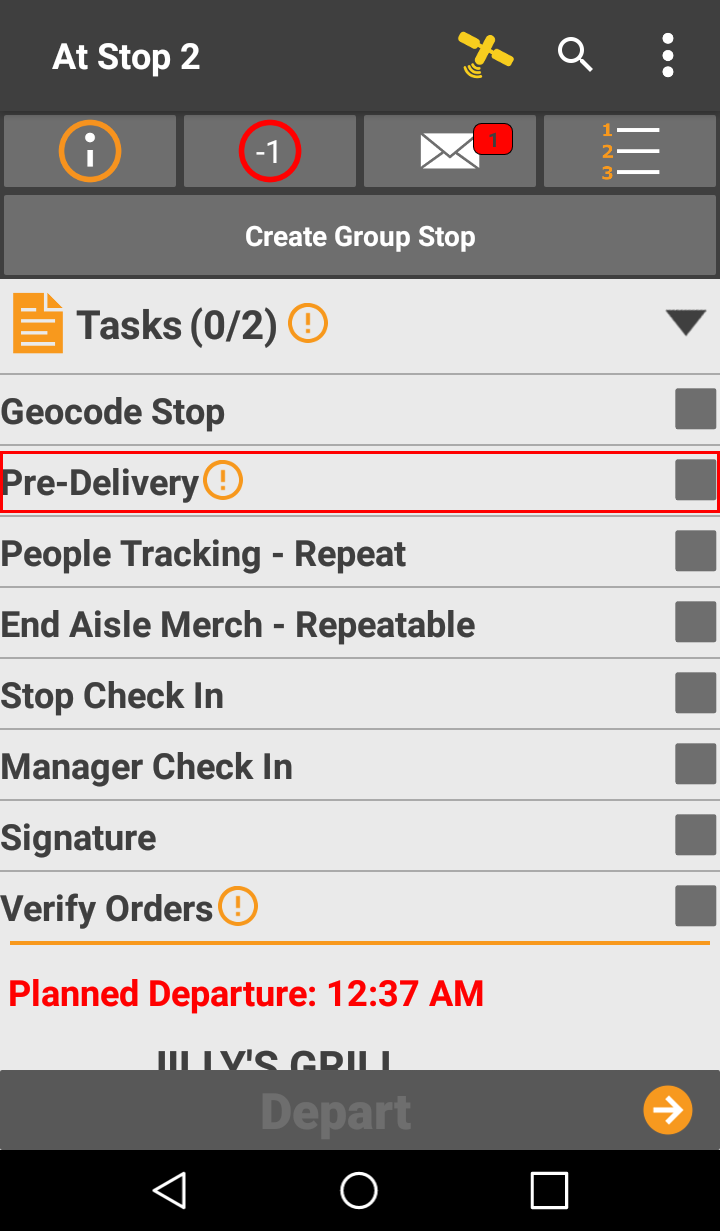
On the mobile device, the pre-delivery scan is found in the Task list, along with other things that may need to be done at the stop.
1. On the At Stop screen, the worker presses the Tasks arrow, then checks Pre-Delivery. A list of all the stops/orders/items that are to be delivered at the stop displays.
2. The worker can then manually check the stop/order/item box, or scan or take a picture of a barcode. The stop/order/item quantity increases by one or the box is checked. The worker can continue to scan until all the orders/items are scanned.
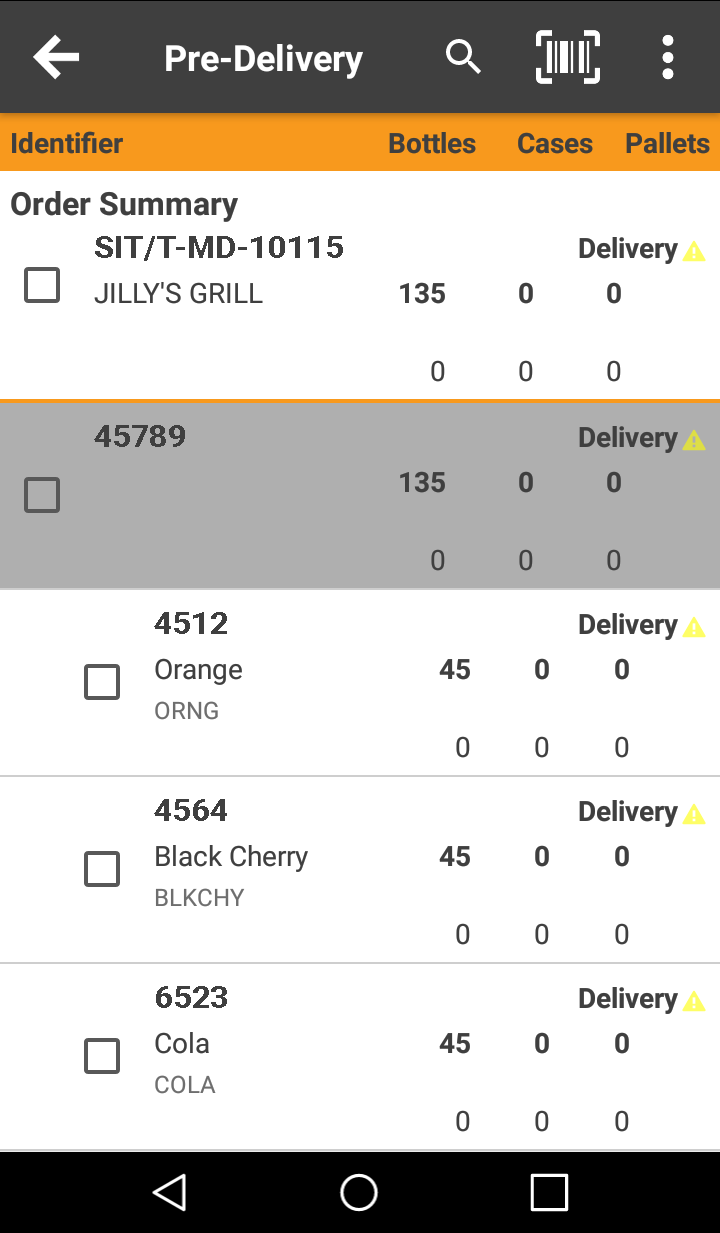
Notes: If the worker is are manually checking off stops/orders/items, simply tap the box associated with the stop/order/item to check off. Depending on settings the worker may need to check off each item individually or check them all off at the summary level by checking the stop or order summary box.
Each time an order/item is scanned that goes over the planned delivery or expected quantity, the device makes a sound, and depending on settings, the quantity may increase, the check may be removed, or an alert may display and the scan is ignored.
If a barcode that is not part of the route or is not expected to be on the truck is scanned, the device makes a sound and a message displays.
When Verify By Exception is used, all items in the list are checked when the list first displays. The worker need only remove checks from the boxes, if necessary.
3. The worker presses Back to save the pre-delivery scan.
If the worker is required to complete a pre-delivery scan, Depart Stop will not be available until the pre-delivery scan has been completed.
Note: The pre-delivery scan can also be used when the worker shares a route with helpers or creates a group stop.
Setting Quantity Input Thresholds
Found in Roadnet Anywhere Web and Roadnet Mobile for Android
Maybe you want your workers to enter actual quantities for orders and line items because you want accurate delivery quantities for every service location. But, if a worker adds one to many fives or zeros when pressing the numbers on the keyboard, actual quantities can become grossly inflated. Quantity Input Thresholds have been introduced so that you can limit how far over an actual quantity is from a planned quantity when the worker inputs a quantity on the mobile device.
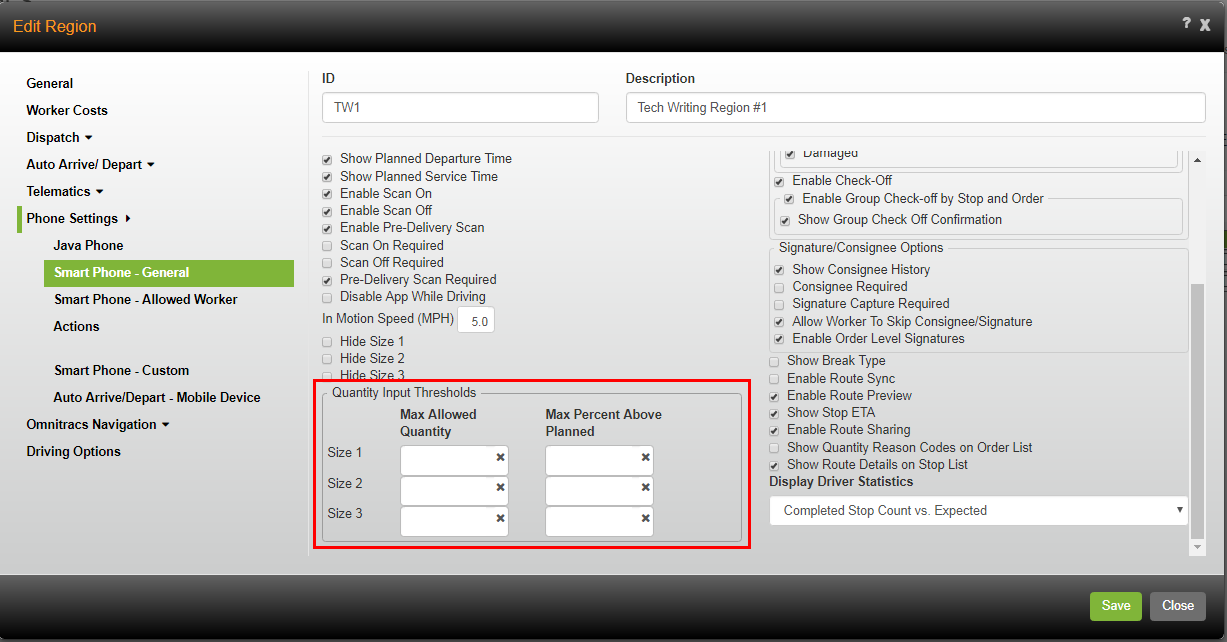
Two new region settings, Maximum Allowed Quantity and Max Percent Above Planned, make up the Quantity Input Thresholds. Maximum Allowed Quantity is the maximum amount that an actual quantity can exceed the planned quantity, while Max Percent Above Planned is the maximum percentage that the actual quantity can exceed the planned quantity.
When the worker enters a quantity on the mobile device that exceeds the maximum quantity or percentage above planned, an error displays and the worker cannot continue until the actual quantity is corrected.
For example, if the planned quantity is 100 and the Max Percent Above Planned is 10%, the worker can only enter a number within the range of 1 to 110. If the worker enters 111 or higher, a message displays on the mobile device.
Notes: If you use both the Maximum Allowed Quantity and the Max Percent Above Planned, whichever setting is met first triggers the error on the mobile device.
To enable Quantity Input Thresholds in Roadnet Anywhere Web:
1. Go to Administration, then click the green button and scroll to Region.

2. Click the [Add] button or the Edit icon for the region with which you want to work. The Add/Edit Region window opens.
![]()
3. Click on the Phone Settings - Smart Phone - General tab.
4. Enter the maximum difference allowed between the planned and actual quantities, when the worker enters actual quantities on the mobile device. Quantity Input Thresholds prevent the worker from entering an actual quantity that overly exceeds a planned quantity.
When the worker exceeds the maximum quantity or percentage above planned, an error displays on the mobile device and the worker cannot continue until the entered quantity is corrected. This option works with Roadnet Mobile for Android.
Maximum Allowed Quantity—The maximum amount that the actual quantity can exceed the planned quantity.
Max Percent Above Planned—The maximum percentage that the actual quantity can exceed the planned quantity.
Notes: If you use both the Maximum Allowed Quantity and the Max Percent Above Planned, whichever limit is met first will trigger the error on the mobile device.
To clear a threshold entry, click the X in the appropriate field.
If Hide Size 1, 2, or 3 is enabled, the threshold entries for the hidden size(s) will be ignored.
5. Click the [Save] button.
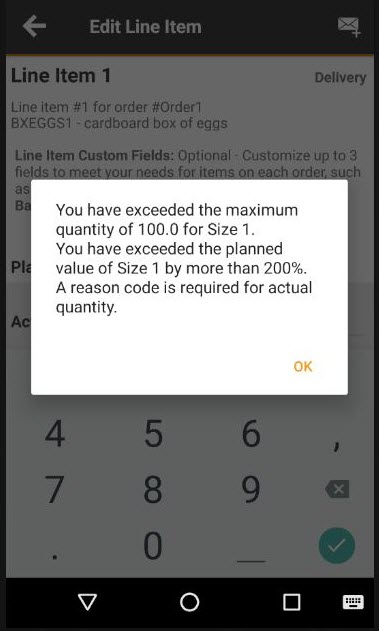
On the Android mobile device, when the worker enters an actual quantity that exceeds a Quantity Input Threshold, an error message displays. This message shows that the quantity the worker input exceeded both the Maximum Allowed Quantity and the Max Percent Above Planned Quantity Input Thresholds. The worker must change the actual quantity to one that falls within the allowed thresholds before being able to leave the order or line item details page. As well, you can see that the worker must enter a reason code for actual quantity.
Adding Multiple Orders at One Time
Found in Roadnet Mobile for Android
If your workers create orders when they are at a stop and they need to add more than one order, it can increase service time for the stop, since they must add each order separately. To make the process of adding multiple orders quicker and easier, a quick add screen has been added to Roadnet Mobile for Android. The quick add screen allows your workers to add as many orders as they need, one after the other, simply by entering an ID and pressing Done on the mobile device.
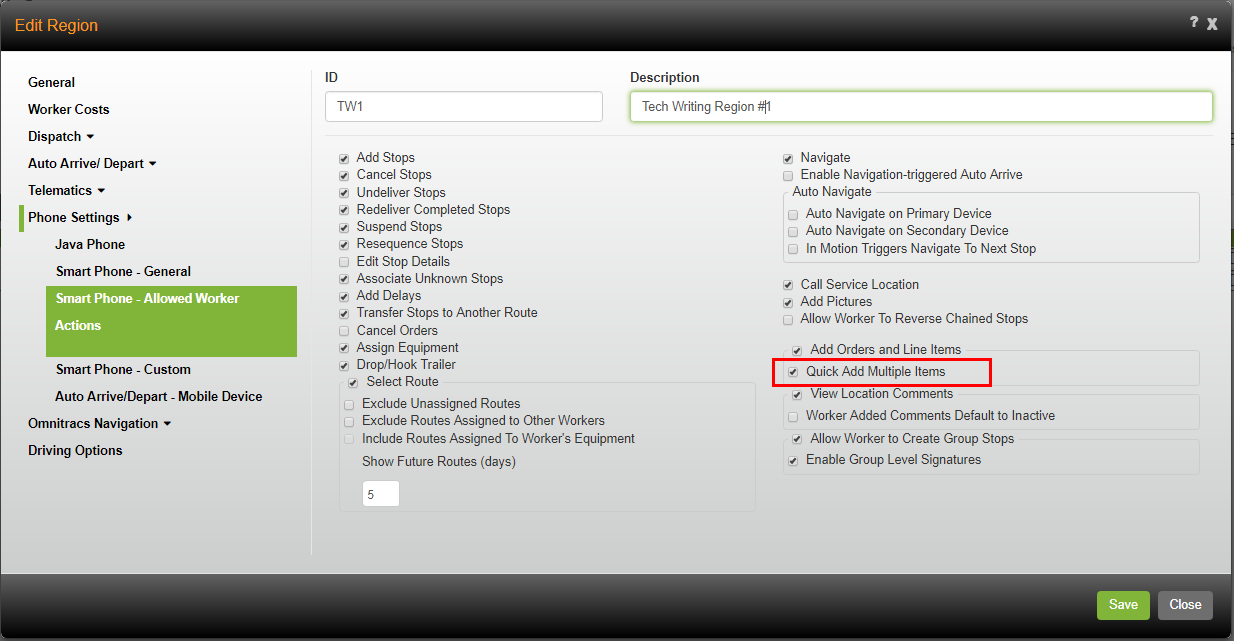
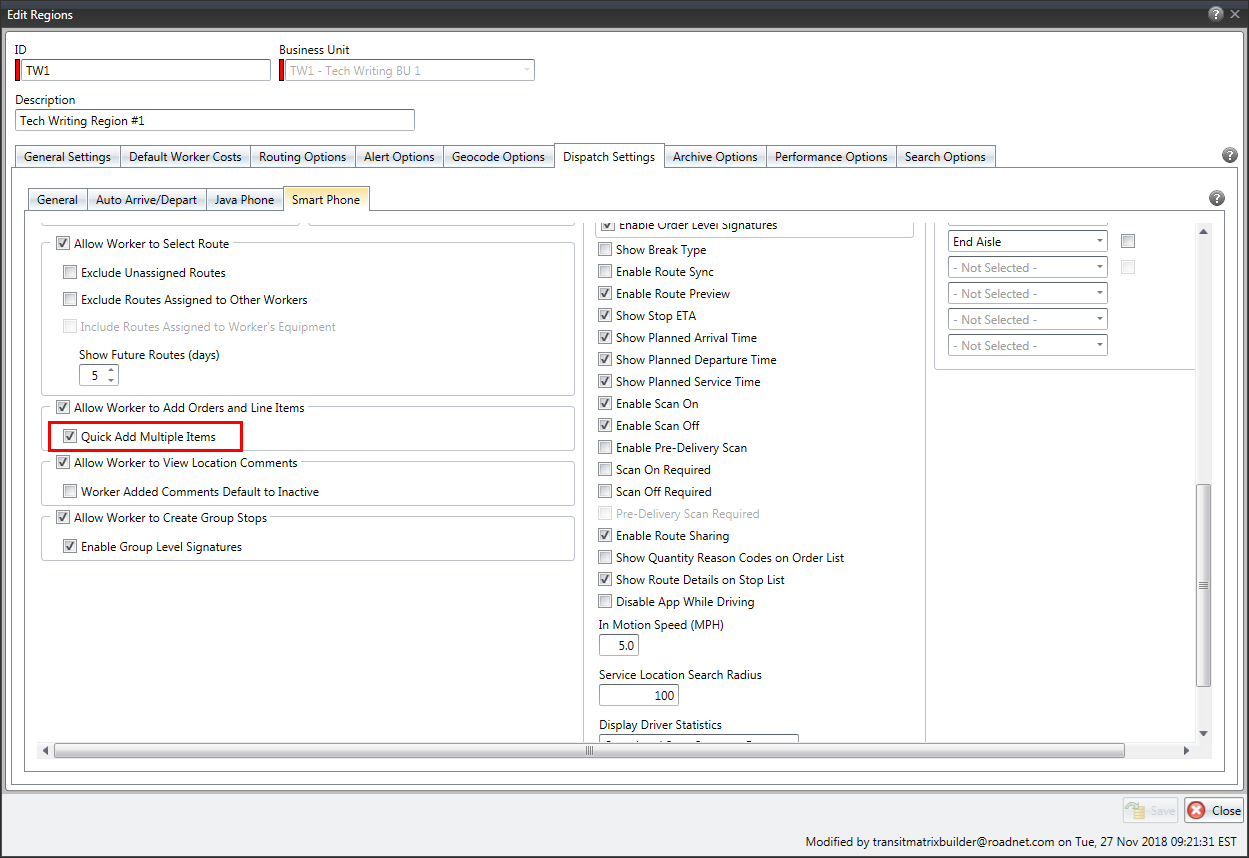
To allow your workers to see the quick add screen, you must enable the Quick Add Multiple Items region setting. This setting was previously only used for line items, but it is now also used to enter multiple orders.
Notes: Quick Add Multiple Items is only available if Add Orders and Line Items in Roadnet Anywhere Web or Allow Workers to Add Orders and Line Items in Roadnet Anywhere Client is selected.
If your company is set to use line items detail level, when Quick Add Multiple Items is enabled, the worker will be able to quick add orders as well as quick add line items on the mobile device.
To turn on Quick Add Multiple Items in Roadnet Anywhere Web:
1. Go to Administration, then click the green button and scroll to Region.

2. Click the [Add] button or the Edit icon for the region with which you want to work. The Add/Edit Region window opens.
![]()
3. Click on the Phone Settings - Smart Phone - Allowed Worker Actions tab.
4. Check Add Orders and Line Items.
5. Check Quick Add Multiple Items.
6. Click the [Save] button.
To turn on Quick Add Multiple Items in Roadnet Anywhere Client:
1. Click on the Administration menu and select Regions.
2. To add a new region, click the Add icon.

To edit an existing region, double-click on the appropriate region.
3. Click on Dispatch Settings, and then click on the Smart Phone tab.
4. Check Allow Worker to Add Orders and Line Items.
5. Check Quick Add Multiple Items.
6. Click the [Save] button.
Adding Multiple Orders at the Same Time on the Android Mobile Device
The worker can now add more than one order to a stop on the mobile device. When adding multiple orders, the orders must have different IDs.
To add more than one order to a stop at a time, the worker will do the following:
1. On the Verify Orders screen for a stop, the worker presses the Add New icon. The Add Orders screen displays.
2. On the Add Orders screen, the ID for the new order is scanned or manually entered.
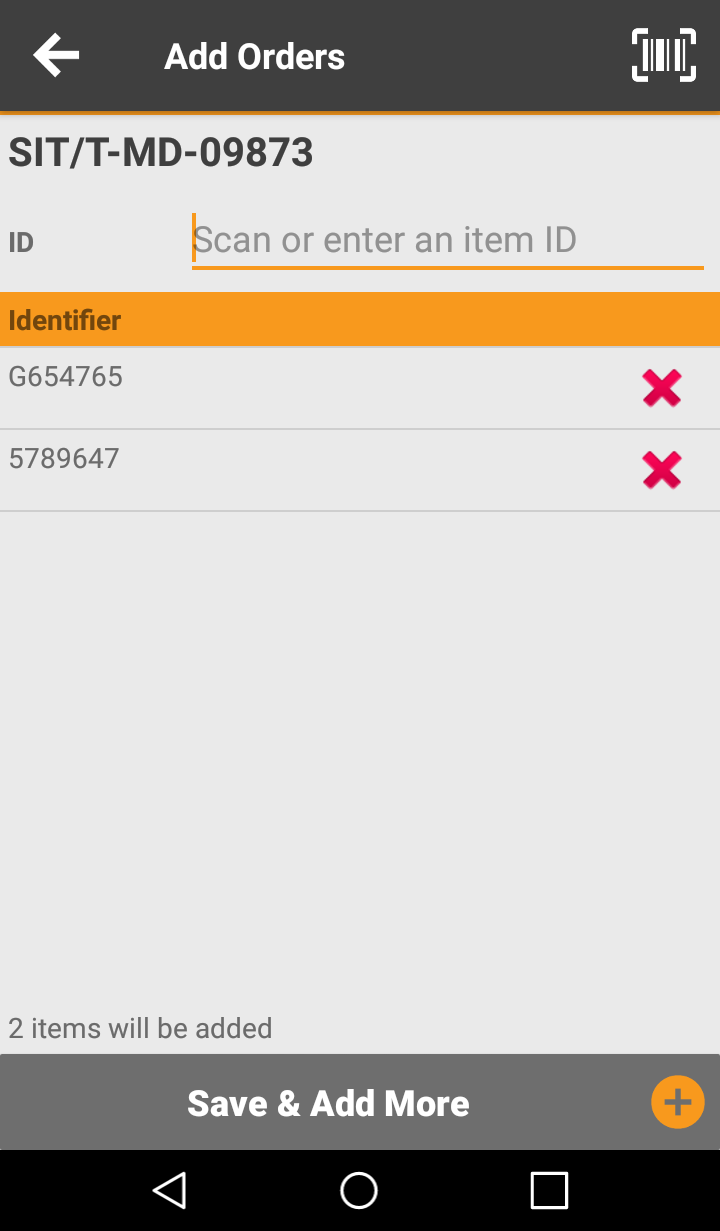
Notes: If the ID is scanned, the worker places the cursor in the ID field and scans the barcode or presses the barcode icon and takes a picture of the barcode.
If the ID is entered manually, the worker places the cursor in the ID field and enters the ID using the keyboard. Then, the worker presses Done or Enter to add the ID.
3. The worker then scans or enters all the order IDs that need to be added.
Note: If your company uses Order as the detail level and you scan an ID more than once, the order quantity is incremented by 1 each time the ID is scanned.
4. To save the IDs that have been entered and clear the screen so more IDs can be added, the worker presses Save & Add More. The worker continues to enter and save IDs until all the orders are added. When done, the worker presses Back to return to the Verify Orders screen.
To save the IDs that have been entered and return to the Verify Orders screen, the worker presses Back.
5. The worker should press Save if asked if the added items should be saved.
If you use line items, once an order is added, the worker can select that order from the Verify Orders screen and add one or more line items to it.
Updating Equipment Before Loading a Route
Found in Roadnet Mobile for Android
You allow your workers to update the equipment they use for their routes because you want to make sure the proper equipment and worker are assigned to the routes being run. This allows you to track not only the piece of equipment a worker is using, but also the distance the equipment is traveling and other important information your company uses to analyze the business.
Update Equipment was previously only available after a route was loaded onto the mobile device. This enhancement allows the worker to update equipment after logging into Roadnet Anywhere for Android, even before loading a route onto the mobile device.
Notes: To allow your workers to update equipment before a route is loaded, the Assign Equipment region setting must be enabled in Roadnet Anywhere Web or Client.
For RDC users, you can now update equipment before loading a route in both Hours of Service and Schedule.
When the worker logs in to Roadnet Anywhere, equipment can be updated on the Load Route screen by simply pressing Menu and then Update Equipment.
Changing the Word Route to Trip on the Mobile Device
Found in Roadnet Mobile for Android
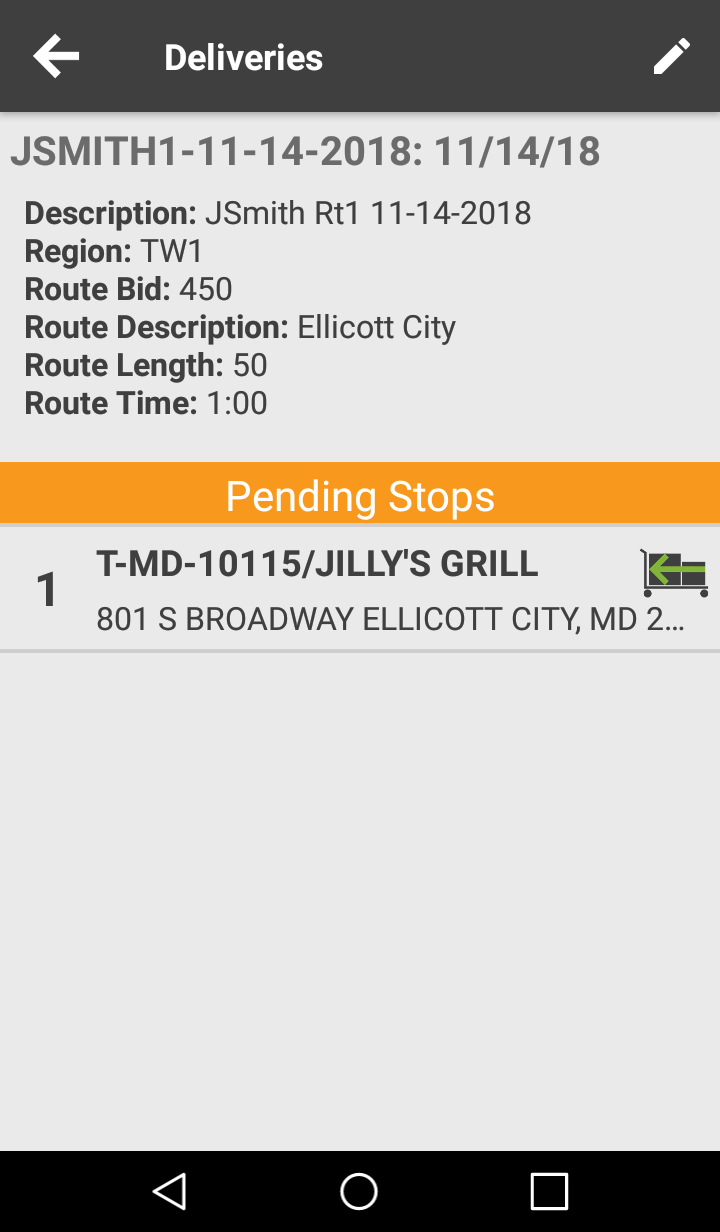
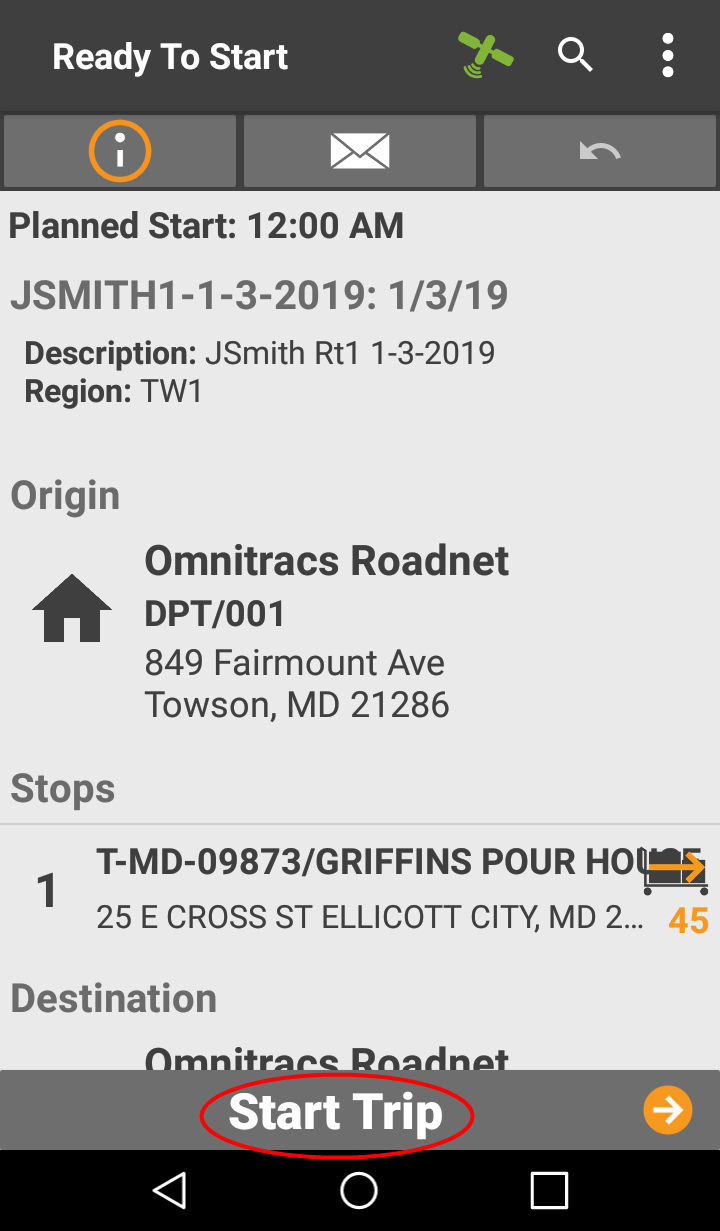
If you use the word "Trip" instead of the word "Route" when talking to your workers, you can reduce worker confusion by changing what is seen on the mobile device. A new region setting lets you determine if the worker sees the word "Route" or the word "Trip" throughout Roadnet Mobile for Android. Where once the worker saw Load Route or Depart Route on an action button or Suspend Route or Route Sharing in the menu, you can now change it so the worker sees Load Trip or Trip Sharing on the mobile device.
Notes: You can not mix and match. The worker will see either all Route or all Trip on the mobile device.
Items that you create, such as forms and line items, will not change. Only system items, such as action buttons and menu options, change.
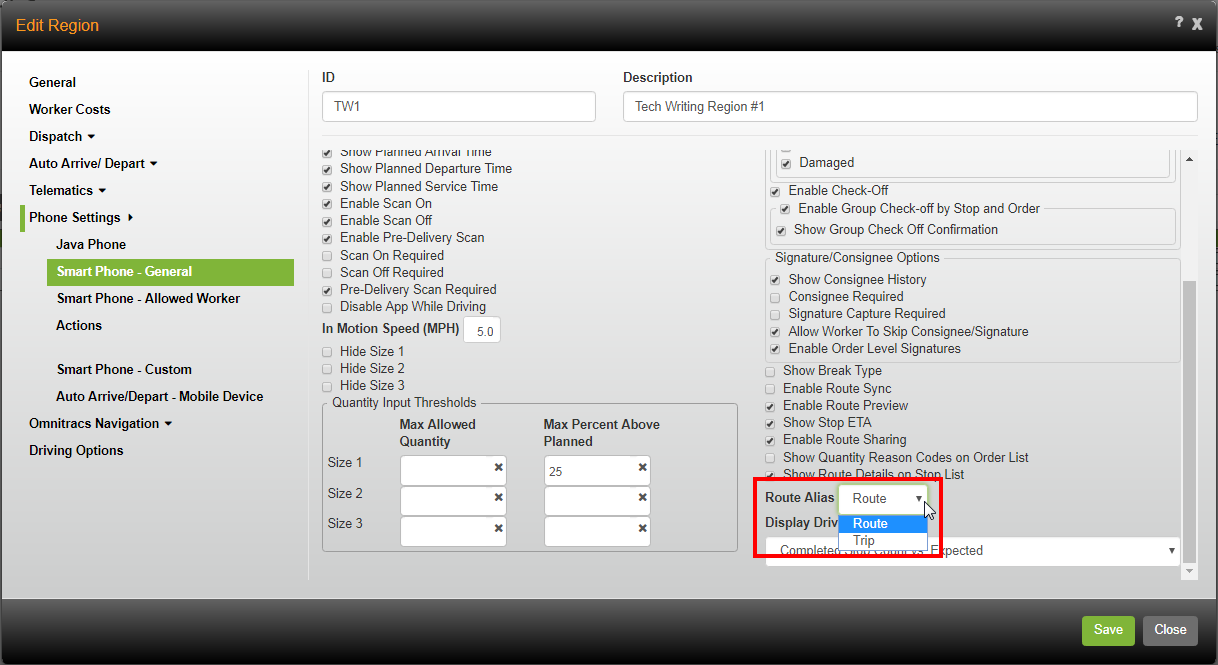
To have Trip appear on the mobile device, in Roadnet Anywhere Web:
1. Go to Administration, then click the green button and scroll to Region.

2. Click the [Add] button or the Edit icon for the region with which you want to work. The Add/Edit Region window opens.
![]()
3. Click on the Phone Settings - Smart Phone - General tab.
4. Click the Route Alias arrow and select Trip.
5. Click the [Save] button.
To have Trip appear on the mobile device, in Roadnet Anywhere Client:
1. Click on the Administration menu and select Regions.
2. To add a new region, click the Add icon.

To edit an existing region, double-click on the appropriate region.
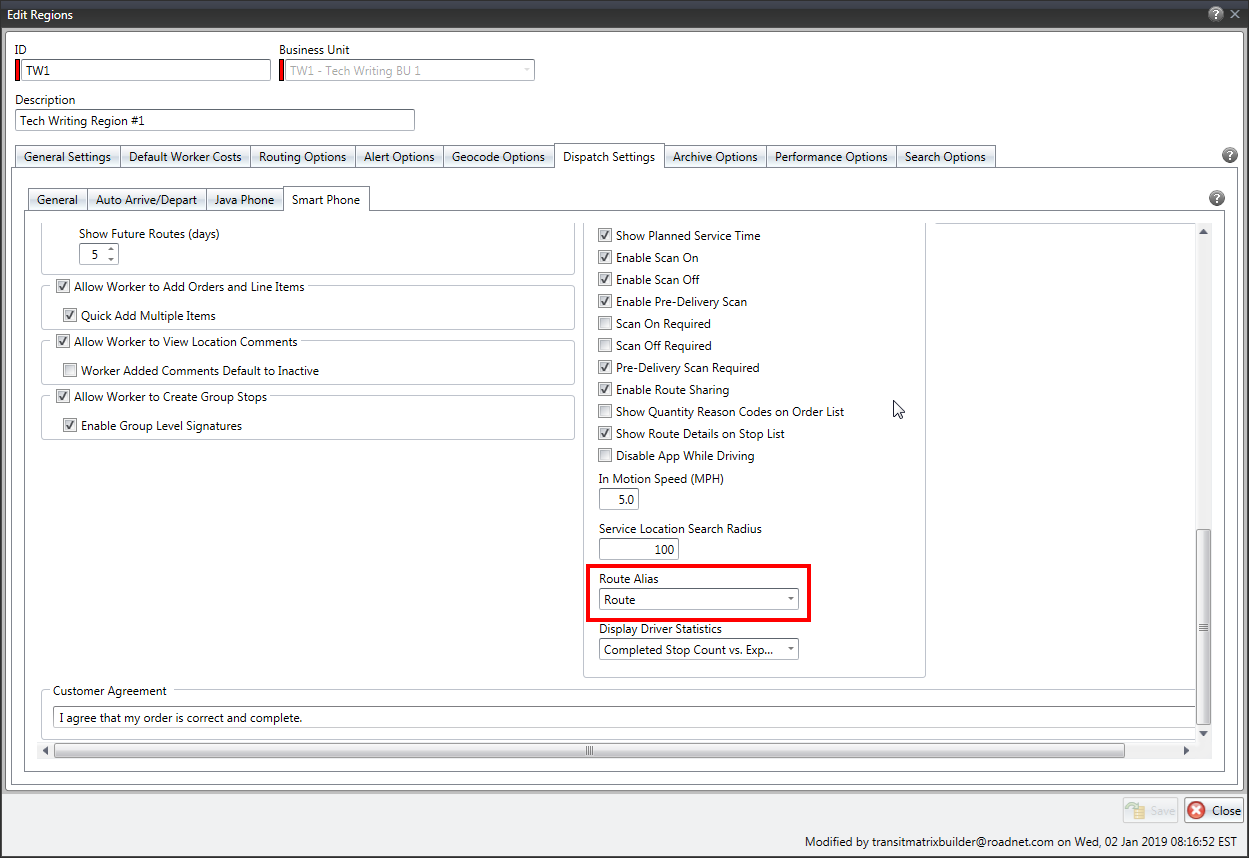
3. Click on Dispatch Settings, and then click on the Smart Phone tab.
4. Click the Route Alias arrow and select Trip.
5. Click the [Save] button.
Viewing Route versus Trip on the Android Mobile Device
When the worker opens Roadnet Mobile for Android, depending on how you defined the region setting, Route or Trip will display. In the past and the default for the setting is Route. If you change it to Trip, the worker will see that action buttons, such as Start Route and Complete Route, now read Start Trip or Complete Trip. Menu options that were once Route Sharing and Suspend Route, now say Trip Sharing and Suspend Trip.
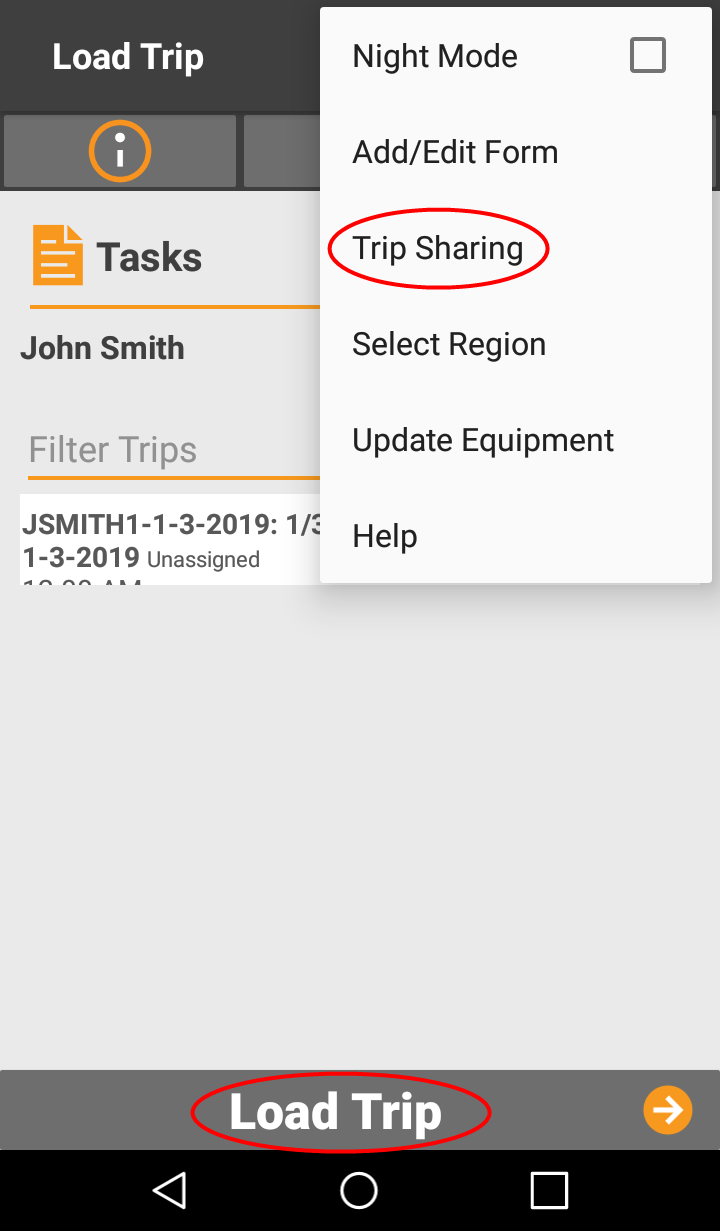
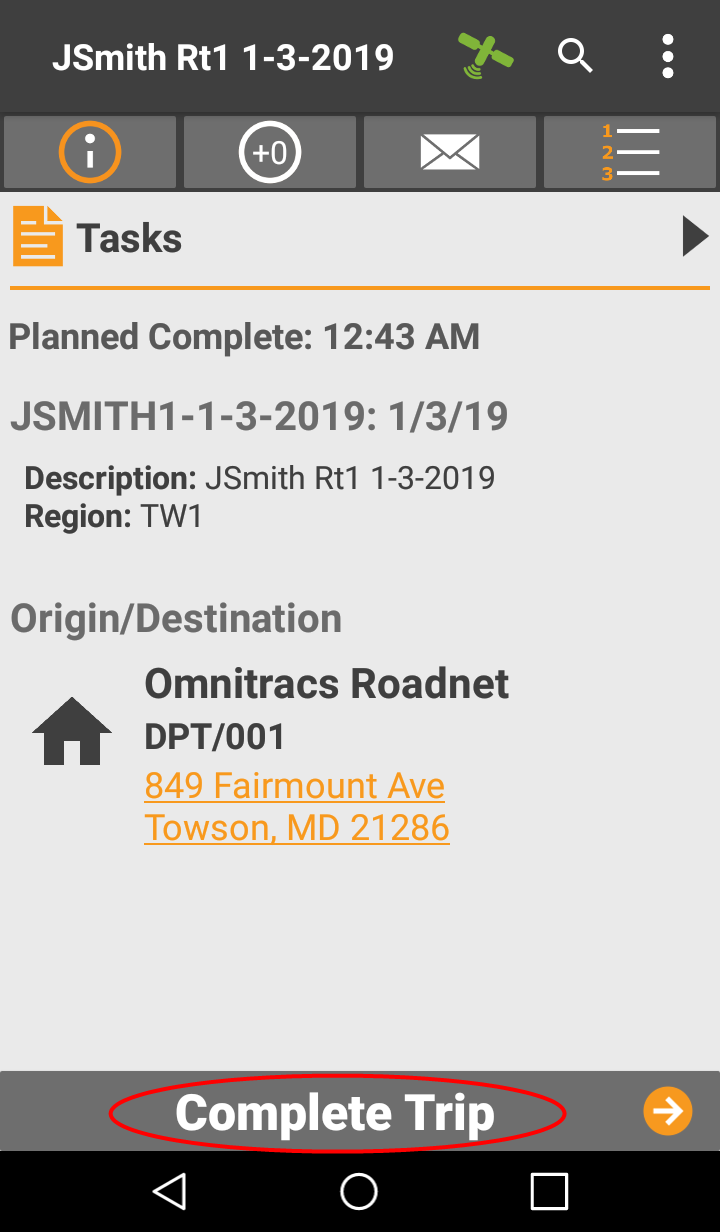
Showing Route Information on the Stop List
Found in Roadnet Mobile for Android
Once your worker loads a route, the details about the route, are no longer readily available to view. If the worker needs this information, it must be supplied by the dispatcher. Now, the Route ID and Date, Region ID, and up to six of the available route custom properties can be seen at the top of the Stop List.
Note: The custom properties you want to display on the mobile device are selected in the Region settings for Smart Phone. If no route custom properties are selected, then no custom properties display at the top of the Stop List screen on the mobile device.
To turn on Show Route Details on Stop List in Roadnet Anywhere Web:
1. Go to Administration, then click the green button and scroll to Region.

2. Click the [Add] button or the Edit icon for the region with which you want to work. The Add/Edit Region window opens.
![]()
3. Click on the Phone Settings - Smart Phone - General tab.
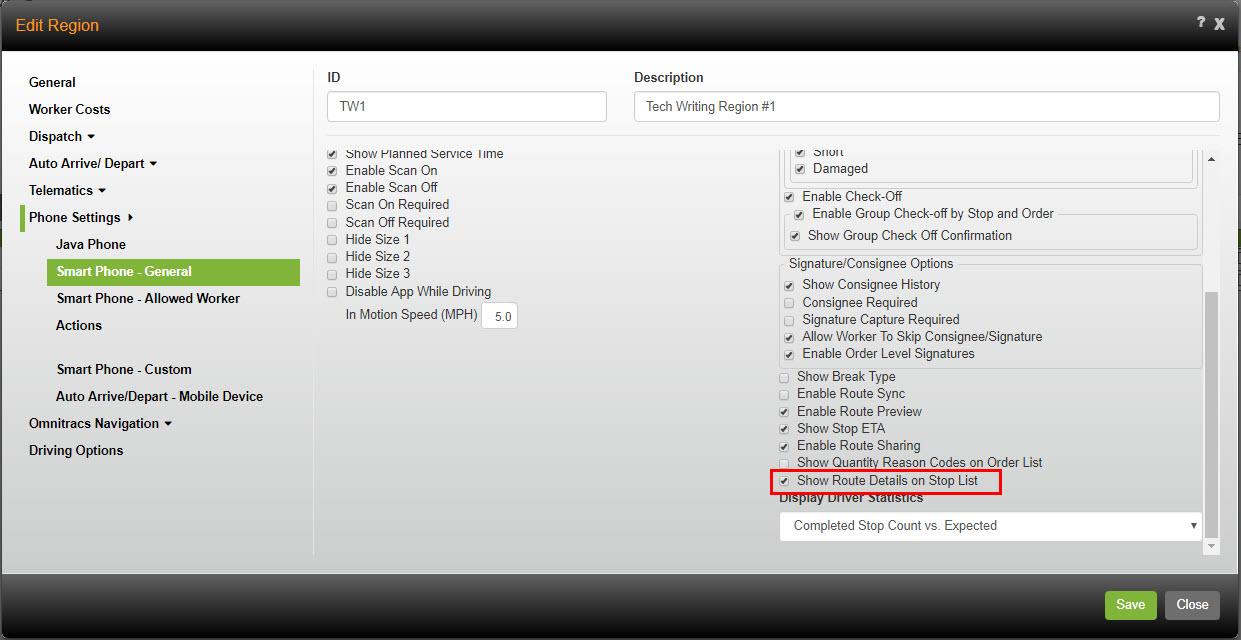
4. Check Show Route Details on Stop List.
5. Click the [Save] button.
To turn on Show Route Details on Stop List in Roadnet Anywhere Client:
1. Click on the Administration menu and select Regions.
2. To add a new region, click the Add icon.

To edit an existing region, double-click on the appropriate region.
3. Click on Dispatch Settings, and then click on the Smart Phone tab.
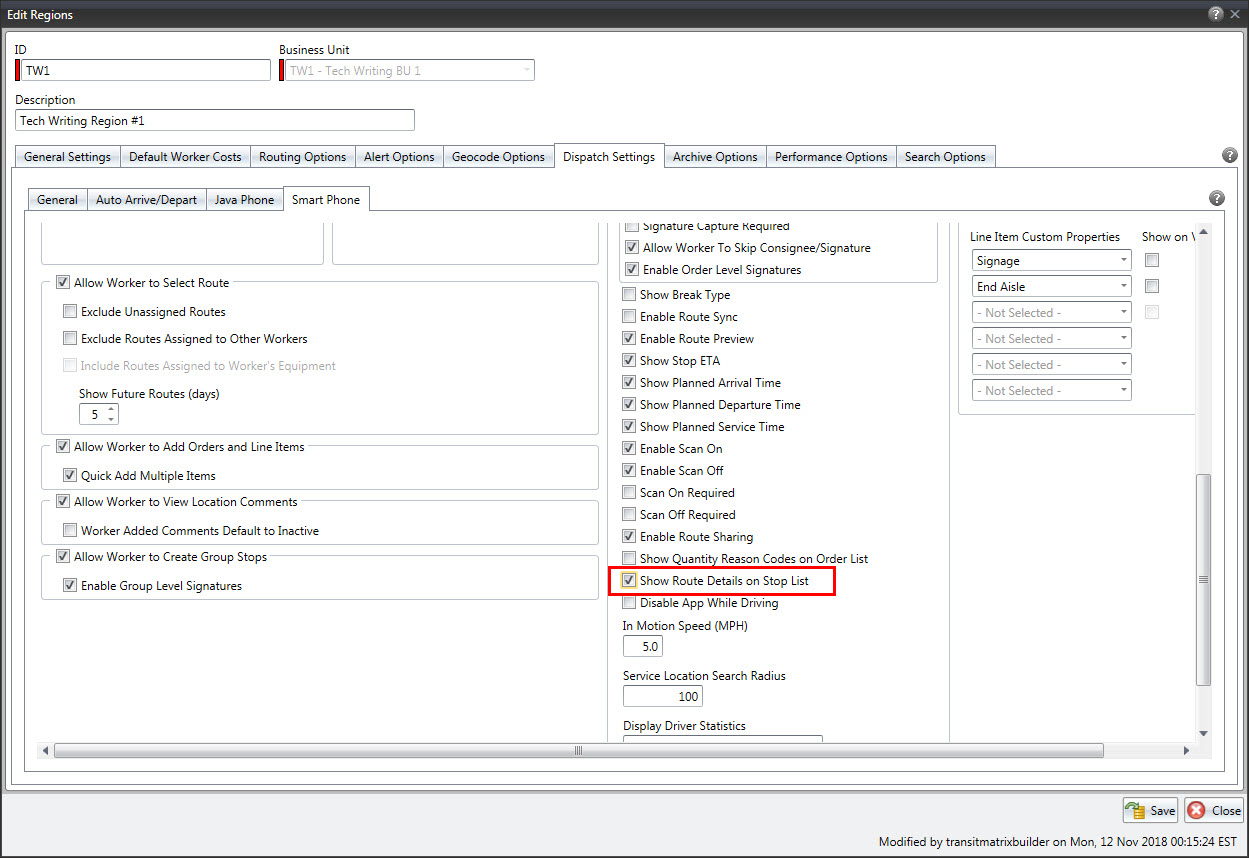
4. Check the Show Route Details on Stop List box.
5. Click the [Save] button.
Viewing Details about the Route on the Stop List on the Android Mobile Device
When the worker presses Stop List, the Route ID and Date, Region ID, and up to six route custom properties display at the top of the screen. Stops on the list display under the route information. If necessary, the worker can scroll down to see all the stops on the list.

Validating Form Responses on the Mobile Device
Found in Roadnet Anywhere Web and Roadnet Mobile for Android
You have workers fill out mobile forms because you want to use their answers to analyze parts of your business or to better know your customer's needs. But when the worker enters answers that don't make sense into a form, it is a missed opportunity to gather useful information. Now, you can choose to validate text and numeric responses to mobile form questions on the mobile device so you can prevent workers from entering invalid data.
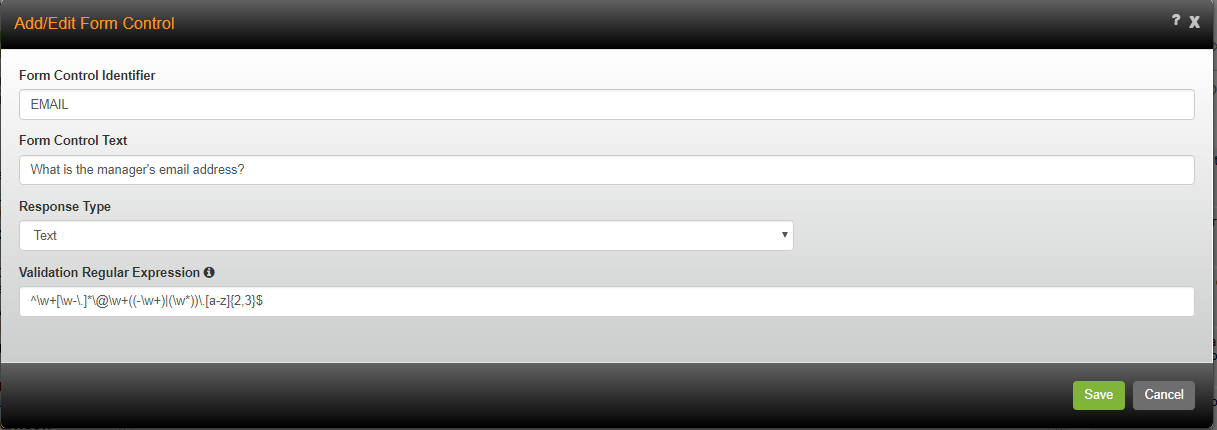
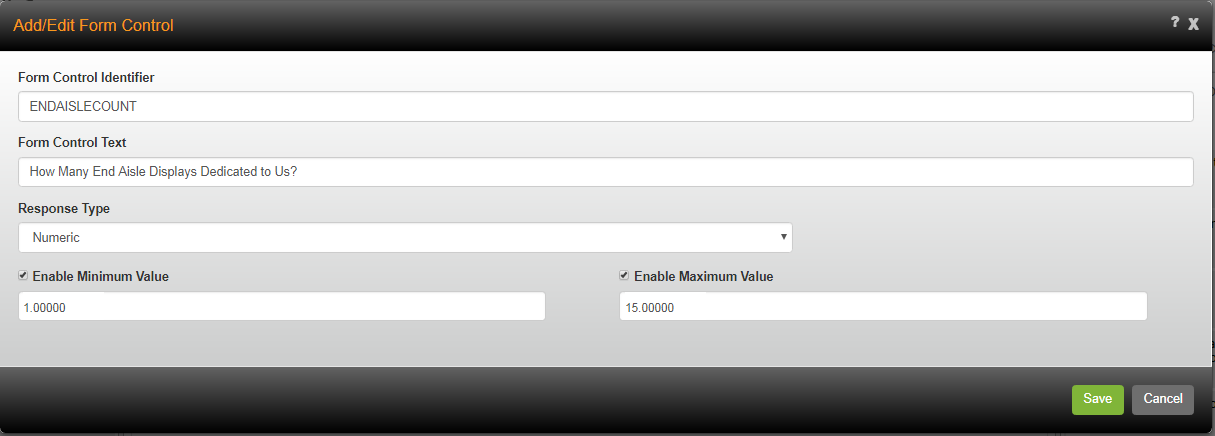
When you create a text form control, you can now complete a Validation Regular Expression field that can be set to require that the worker's entry matches a given pattern. The numeric form control now has a Minimum and Maximum value field that can be set to limit input to a given range. When the worker enters an incorrect answer, an error message displays and Roadnet Mobile for Android does not let them save the response to the question.
Form Controls are created in Mobile Workflow on the Mobile Forms window.
Note: If the worker turns off Notifications for Roadnet Mobile on the mobile device, the worker won't receive error messages saying that the answer is not valid.
To create a form control with validation, in Roadnet Anywhere Web:
1. Go to Mobile Workflow, then click Mobile Forms at the top of the screen.
![]()
2. Click the [Add] button, to create a new form or click on the form you want to edit on the left side of the screen to make changes to an existing form.
3. Enter an ID and Description for the form.
4. Click the [Add Form Control] button. The Add/Edit Form Control window displays.
5. In the Form Control Identifier field, enter an ID. The ID can be up to 32 alpha-numeric characters. You cannot enter special characters in the Form Control ID.
6. In the Form Control Text field, enter the text as you want it to appear on the customized form.
7. Click the Response Type arrow and select the type of response the worker can provide, Text or Numeric.
Note: Only the Text and Numeric Response Type have validation available.
8. If you choose a Text Response Type, enter a Validation Regular Expression to limit what the worker enters in the response field on the mobile device.
Notes: The Validation Regular Expression field can be left blank. If you don't have experience with Validation Regular Expressions, you can search the Internet to learn how to create them.
If you choose a Numeric Response Type, define a minimum and maximum value that the worker cannot exceed in the response field on the mobile device. Check the Enable Minimum Value and/or Enable Maximum Value box if you want to enter a value that limits what the worker can enter. Enter the lowest value that the worker can enter as the minimum value and/or enter the highest value that the worker can enter as the maximum value.
9. Click the [Save] button to save the form control.
10. Add the form control to the form in the Assigned Form Controls area.
11. Add and Save an Assignment Rule.
12. Click the [Save] button to save the form.
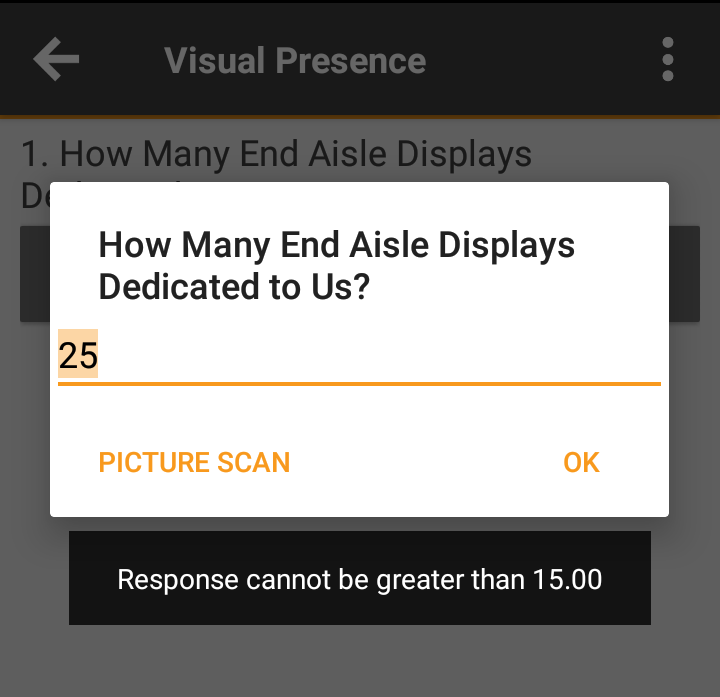
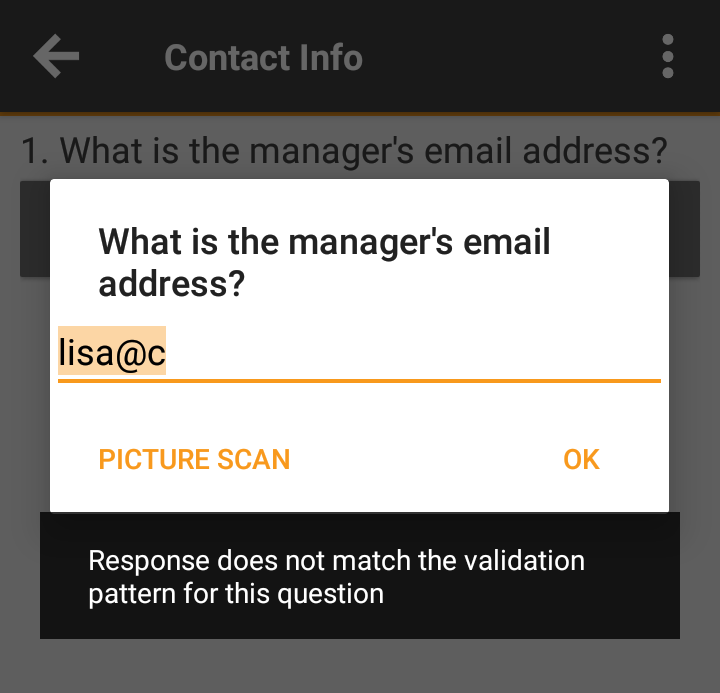
On the Android mobile device, when the worker enters a response to a question that must have a valid entry; if the entry doesn't meet the criteria in the expression or if the value entered exceeds the minimum or maximum limit, a message displays stating that the response doesn't match the expected pattern or that the number is not within a specific range.
Marking Messages as High Priority
Found in Roadnet Anywhere Web and Roadnet Mobile for Android
You send important messages to workers everyday, but there is no way to let them know that a message needs extra attention. Messages that need to be read immediately can go unread, such as one that tells the worker a report needs to be handed in by the end of the day or a meeting is scheduled for tomorrow and you need to know who is attending.
An enhancement to Centralized Messaging now allows the dispatcher or the worker to mark a message as High Priority. When a message is high priority, a visual indicator is added to it so that the recipient knows that it should be read right away.
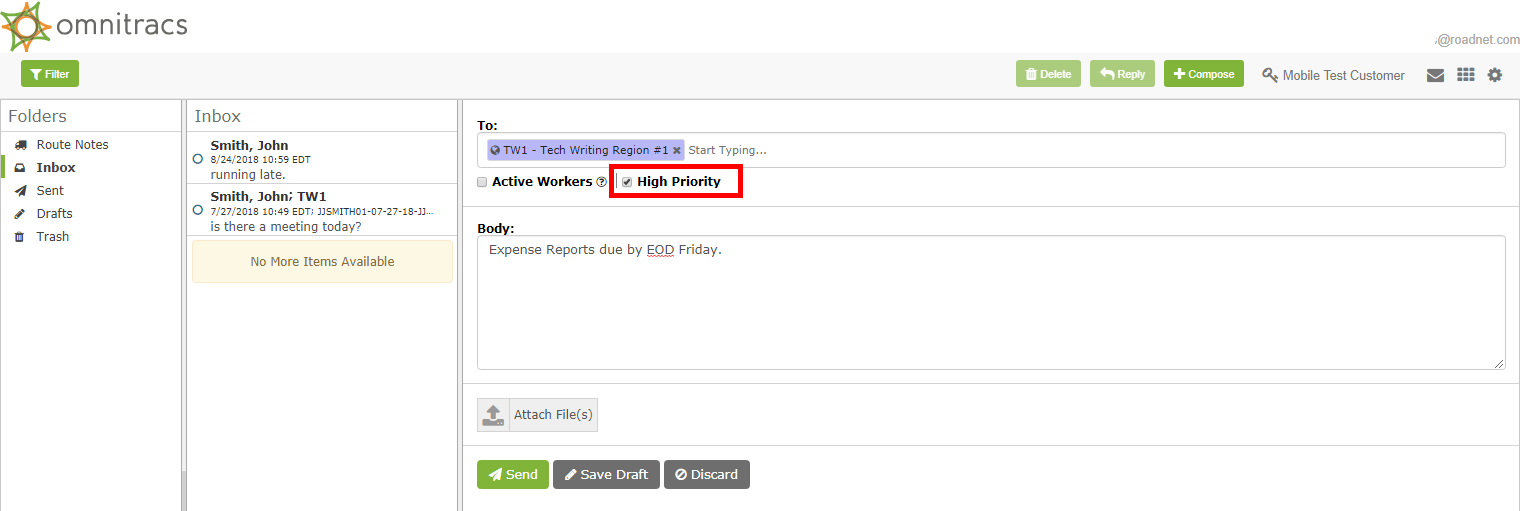
In Roadnet Anywhere Web, when composing a message in the Inbox, check the High Priority box.
On the Android mobile device, when the worker receives a High Priority message, the Inbox badge displays as red. When the worker opens the Inbox, a red exclamation point displays next to the message.
Note: When only normal priority messages are in the Inbox, the badge displays as orange.
The worker can also send a message that is marked as High Priority. When the worker presses Menu, a Priority list displays from which the worker can choose Normal or High. To mark the message High Priority, the worker chooses High. When the worker presses Send, the message displays on the mobile screen as well as being sent to the dispatcher.
Note: All messages that the worker creates after setting the Priority to High are also set to High until the worker changes the Priority back to Normal or exits the Inbox.
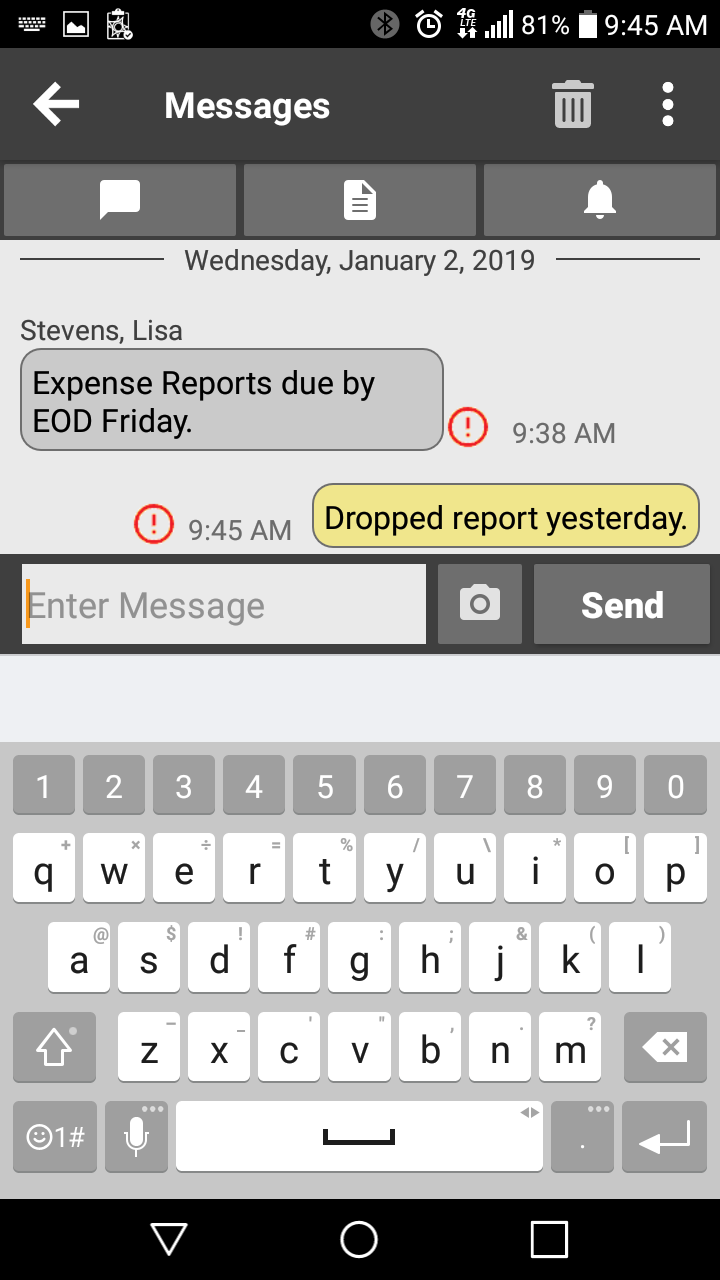
When the dispatcher receives a message that is marked as High Priority, the message displays in the Inbox list with an exclamation point in a red circle.

Validating Custom Property Data Entries
Found in Roadnet Anywhere Client and Roadnet Mobile for Android
You use custom properties to collect and save information that you want to store, about things such as routes, service locations, orders, and equipment, but Roadnet Anywhere does not have a place to save it, by default. When data that doesn't make sense is entered by the worker, it is a missed opportunity to gather useful information. Now, you can choose to validate text, integer, and decimal data types so you can prevent the entry of invalid data on the mobile device.
When you create a custom property with text as the data type, you can now complete a Regular Expression for Validation field that can be set to require that the data entry matches a given pattern. The integer and decimal data types now have a Minimum and Maximum value field that can be set to limit input to a given range. When incorrect data is entered, an error message displays on the mobile device and the entry cannot be saved.
Notes: Custom properties are created in Roadnet Anywhere Client.
Custom property entries are only validated in Roadnet Mobile for Android.
If the worker turns off Notifications for Roadnet Mobile on the mobile device, the worker will not receive error messages saying that the entry is not valid.
To create a custom property with validation, in Roadnet Anywhere Client:
1. Click the Administration menu and select Custom Properties. The Custom Properties list opens, listing all existing custom properties.
2. To add a new custom property, click the ![]() New item icon.
New item icon.
To edit an existing custom property, click on the custom property you want to edit and click the ![]() Edit icon.
Edit icon.
The Add Custom Properties window opens.
3. Click the Object to Customize arrow and select the object you want to add a custom property to. The options are Route, Order, Line Item, Service Location, Depot, Layover Location, Equipment, Equipment Type, and Worker.
4. Click the New item icon. The Add Custom Property Detail window opens.
5. Enter a name for the custom property detail you are adding in the Name field. The Display Name field automatically populates with the same characters entered in the Name field.
Note: If you are sending custom properties to the mobile device, the workers will only see the first 30 characters of the Display Name and any information recorded for the property.
6. Enter a description of the custom property in the Description field. This field is not required.
7. Click the Data Type arrow and select the format that will be used for the custom property's data. You will only be allowed to enter data for the custom property using the format selected here. Also, if you import data for custom property fields, the imported data must follow the format selected here. The options that can be validated are:
Text - any text including letters, numbers, and special characters. You can set the maximum allowable length, up to 999,999 characters.
Integer - any whole number; the maximum allowed value is 999,999,999.
Decimal - a number expressed with two decimal places, for example 1286.84; the maximum allowed value is 999,999,999.99.
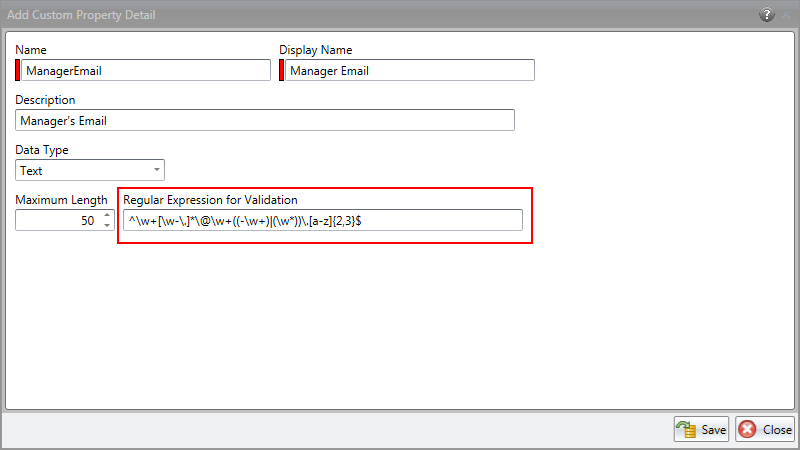
8. If you select Text as the Data Type, enter the maximum number of characters to be allowed in the Maximum Length field. You can enter the maximum length manually, or click the up and down arrows to increase and decrease the number. The maximum allowable length is 999,999 characters.
You can also enter a Regular Expression for Validation to limit what is entered for each data entry.
Note: The Regular Expression for Validation field can be left blank. If you don't have experience with Regular Expressions for Validation, you can search the Internet to learn how to create them.
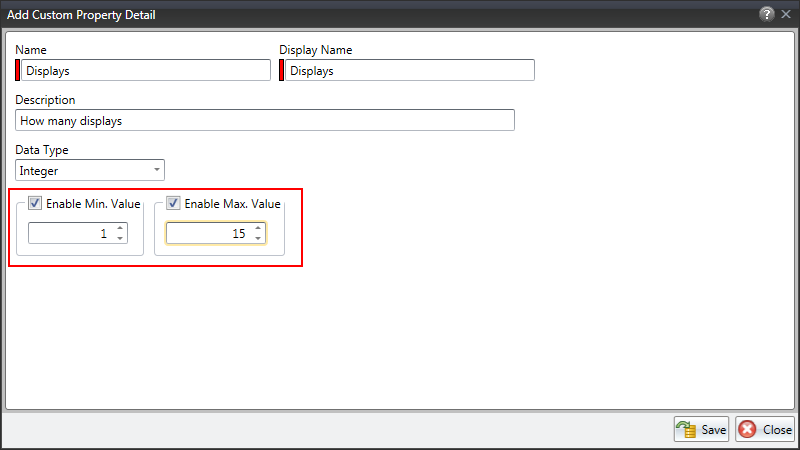
If you select Integer or Decimal for the Data Type, you can define a minimum and maximum value that cannot be exceeded for each data entry. Check the Enable Min. Value and/or Enable Max. Value box if you want to enter a value that limits what can be entered. Enter the lowest value that can be entered as the minimum value and/or enter the highest value that can be entered as the maximum value.
9. Click the [Save] button.
On the Android mobile device, when the worker enters data for a custom property that must have a valid entry; if the entry doesn't meet the criteria in the expression or if the value entered exceeds the minimum or maximum limit, a message displays stating that the response doesn't match the expected pattern or that the number is not within a specific range.
Setting Yard Move Termination Options
Found in Roadnet Anywhere Web and Roadnet Anywhere Client
A yard move occurs when piece of equipment is moved in a non-road space, like around a warehouse or distribution center. As long as the equipment remains inside the location's geofence and does not exceed a predetermined speed limit, the movement does not count towards a worker's drive time. Roadnet Anywhere gives you the ability to customize the criteria for a yard move, not only by setting a speed limit but also by determining what will terminate the yard move. Previously, a yard move ended only when the ignition was turned off. Now, you can choose to end a yard move when the ignition is turned off, when the vehicle reaches 20 MPH, or both. This option can be set at the Region level and for individual workers.
You can chose from three yard move termination options:
Power Cycle: Yard move termination will occur when the ignition is off.
Speed (20 MPH): Yard move termination will occur when speed reaches 20 MPH
Power Cycle & Speed (20 MPH): Yard move termination will occur when the ignition is off or the speed reaches 20 MPH.
Notes: Power Cycle will be the default option.
Yard Move Termination Options must be set in the software, they cannot be imported or set through web services.
To Set Yard Move Termination Options for a Region in Roadnet Anywhere Web
1. Go to Administration and select Region.

2. To add a new region, click the [Add] button. The Add Region window will appear.

To edit an existing region, click the edit icon. The Edit Region window will appear.
![]()
3. In the Add or Edit Region window, click HOS Settings then click Rules and Options.
4. Use the arrow to select the criteria for Yard Move Termination: Power Cycle, Speed (20 MPH), or Power Cycle & Speed (20 MPH).
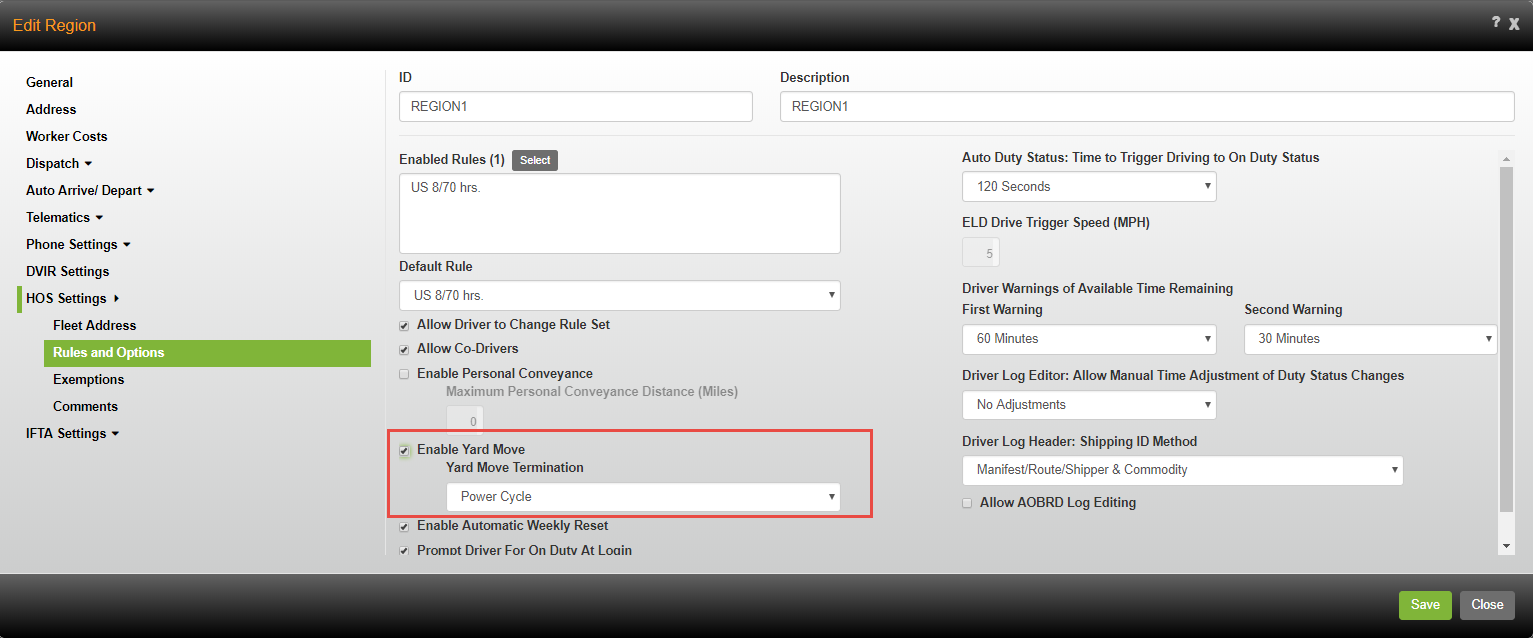
Note: Enable Yard Move must be checked in order to select a yard move termination option.
5. Click [Save].
To Set Yard Move Termination Options for a Worker in Roadnet Anywhere Web
1. Go to Maintenance and select Workers.

2. To add a new worker, click the [Add] button. The Add Worker window will appear.

To edit an existing worker, click the edit icon. The Edit Worker window will appear.
![]()
3. In the Add or Edit Worker window, click the Compliance tab.
4. Use the arrow to select the criteria for Yard Move Termination: Power Cycle, Speed (20 MPH), or Power Cycle & Speed (20 MPH).
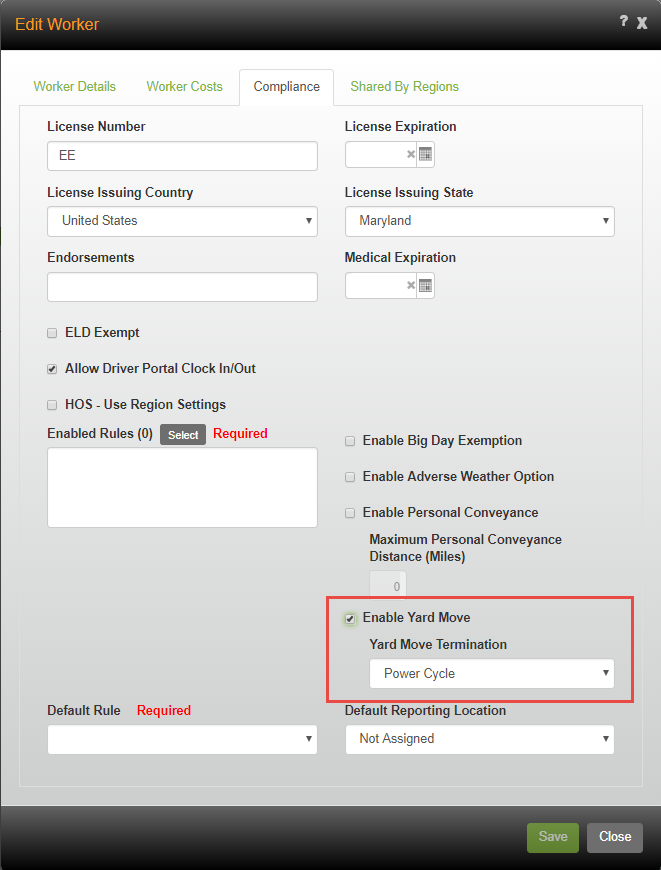
Notes: HOS-Use Region Settings must be unchecked to select a yard move termination option. Setting Yard Move Termination Options for the worker will override the options set for the region.
Enable Yard Move must be checked in order to select a yard move termination option.
To Set Yard Move Termination Options for a Region in Roadnet Anywhere Client
1. Go to Administration and select Region.
2. To add a new region, click the Add icon. The Add Region window will appear.

To edit an existing region, click the edit icon. The Edit Region window will appear

3. In the Add or Edit Region window, click the HOS Settings tab.
4. On the HOS Settings page click the Rules and Options tab.
5. Use the arrow to select the criteria for Yard Move Termination: Power Cycle, Speed (20 MPH), or Power Cycle & Speed (20 MPH).
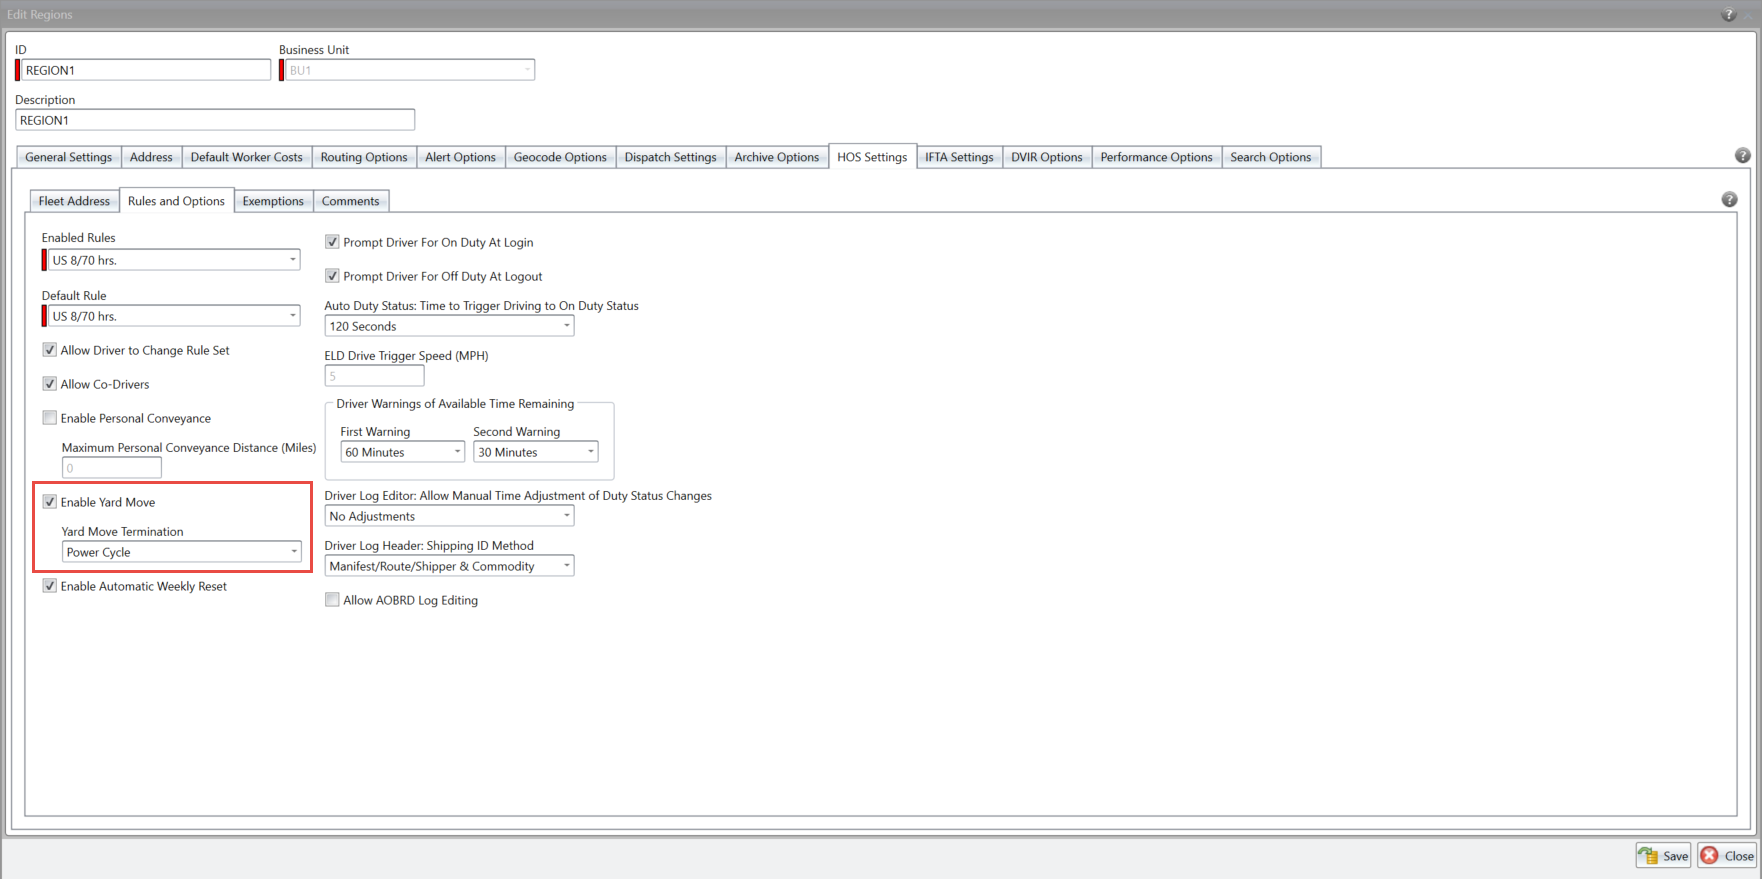
Note: Enable Yard Move must be checked in order to select a yard move termination option.
6. Click the Save button.
To Set Yard Move Termination Options for a Worker in Roadnet Anywhere Client
1. Go to Maintenance and select Workers.
2. To add a new worker, click the add icon. The Add Worker window will appear.

To edit an existing worker, click the edit icon. The Edit Worker window will appear.

3. In the Add or Edit Worker window, click Compliance tab.
4. Use the arrow to select the criteria for Yard Move Termination: Power Cycle, Speed (20 MPH), or Power Cycle & Speed (20 MPH).
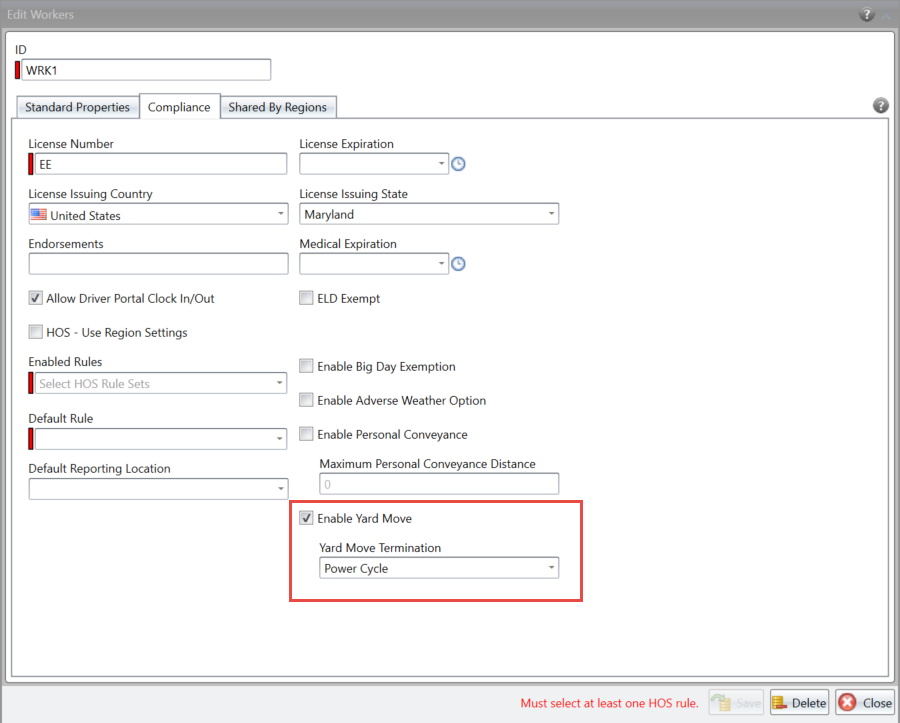
Notes: HOS-Use Region Settings must be unchecked to select a yard move termination option.
Enable Yard Move must be checked in order to select a yard move termination option. Setting Yard Move Termination Options for the worker will override the options set for the region.
5. Click the Save button.
If you want to import the yard move termination criteria with your workers, add the information to your import file and update the data transfer layout.
| Field | Required | Max. Length/Range | Description |
|---|---|---|---|
| Yard Move Termination | No | N/A | Indicates the criteria for the termination of a yard move. The options are PowerCycle, Speed, or Both. You must enter one of these three values exactly as they appear, including capitalization. |
Allowing a Co-Driver to use the Mobile Device on a Vehicle in Motion
If you are using Compliance, you may want to allow co-drivers to use the mobile device while the vehicle is in motion. Previously, this required you to check two separate boxes to indicate that co-drivers were both allowed to sign in to the mobile device and allowed to use the device while the vehicle is in motion. In Roadnet Anywhere Web and Client, you now have to check only one box to allow co-drivers, which also allows them to use the mobile device while the vehicle is in motion.
Allowing a Co-Driver and Enabling a Short Haul Exemption
As a Compliance Customer, you have the ability to allow two drivers to check into a mobile device, and to enable a short haul exception so drivers can opt out of the required 30 minute break. Previously you were unable to use both of these features at once. Now, when adding or editing a region in Roadnet Anywhere Web and Client, you can chose to both allow co-drivers and enable short haul exemptions without receiving an error message.
Adding a Canadian Registration Number
If you operate in both Canada and the United States, you need to be able to provide both the US DOT number, as well as the Canadian Registration Number on the Driver Log report. Now, you can add both a DOT number and a Canadian Registration number for your regions. If you enter a Canadian Registration Number, it will appear under the DOT number on the Driver Log report.
Found in Roadnet Anywhere Web
1. Click on the Administration icon to open Administration.
2. Click the green arrow and scroll to Region. The Region list opens.
3. Click the [Add] button or Edit icon. The Region window opens.
4. Click on Address to open the Address page.
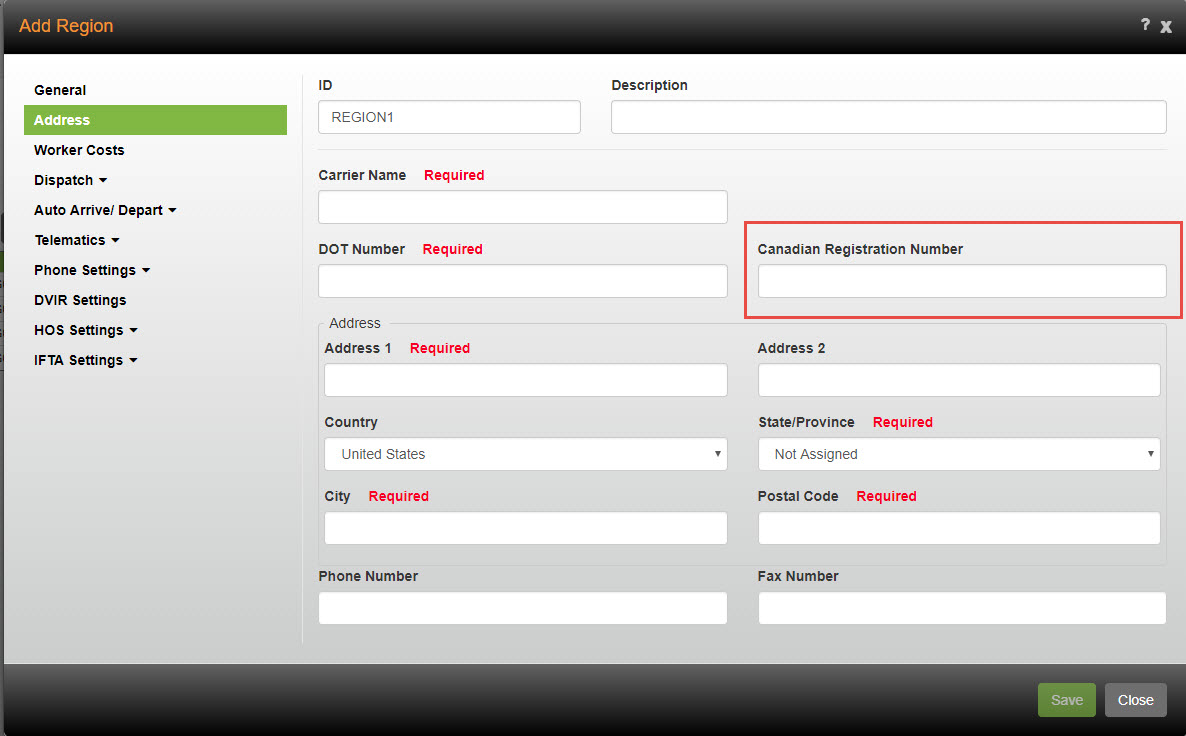
Exempting a Worker from Vehicle Inspections
Found in Roadnet Anywhere Web and Roadnet Anywhere Client
As a Compliance customer, you need to keep track of all of your workers and what the ELD mandate requires of them. When working with regions, the compliance settings allow you to set requirements for pre- and post trip vehicle inspections, but those settings may not be right for every worker. In some cases, you may have a worker that is considered ELD exempt, like a maintenance worker who drives equipment for a minimum amount of time or a yard jockey who only moves equipment within a warehouse yard. These workers do not need pre- or post-trip vehicle inspections, so Roadnet Anywhere now gives you the ability to change that individual worker’s vehicle inspection requirements. When you designate a worker as ELD exempt, you're able to easily choose whether the worker will have to abide by the region settings for vehicle inspections, or if vehicle inspections aren't necessary at all.
To Exempt a Worker from Vehicle Inspections in Roadnet Anywhere Web
1. Go to Maintenance and select workers.

2. To add a new worker, click the [Add] button. The Add Worker window opens.

To edit an existing worker, click the Edit icon. The Edit Worker window opens.
![]()
3. Open the Compliance tab.
4. If you would like the worker to be ELD exempt, check ELD Exempt.
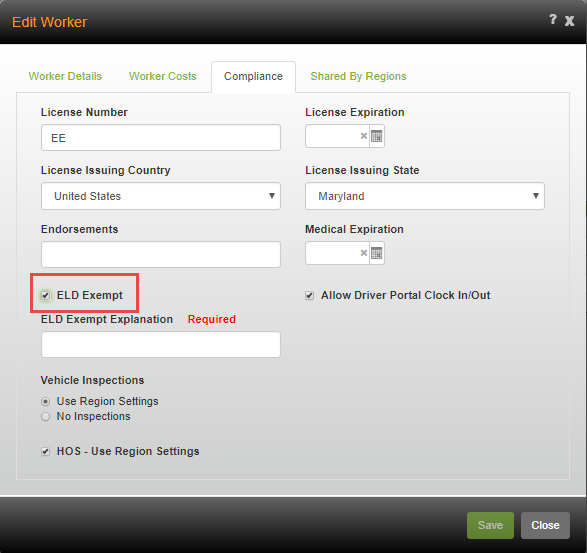
Note: If a worker is not designated as ELD exempt the Region settings will be used to determine whether the driver should perform a vehicle inspection.
5. Enter an explanation for the exemption using 60 characters or less in the ELD Exempt Explanation field. This is a required field.
6. To defer to region settings for vehicle inspection requirements, check Use Region Settings.
To exempt the worker from vehicle inspections, check No Inspections.
7. Click [Save].
To Exempt a Worker from Vehicle Inspections in Roadnet Anywhere Client
1. Go to Maintenance and select Workers.
2. To add a new worker, click the add icon. The Add Worker window opens.

To edit an existing worker, click the edit icon. The Edit Worker window opens.

3. Open the Compliance tab.
4. If you would like the worker to be ELD exempt, check ELD Exempt.
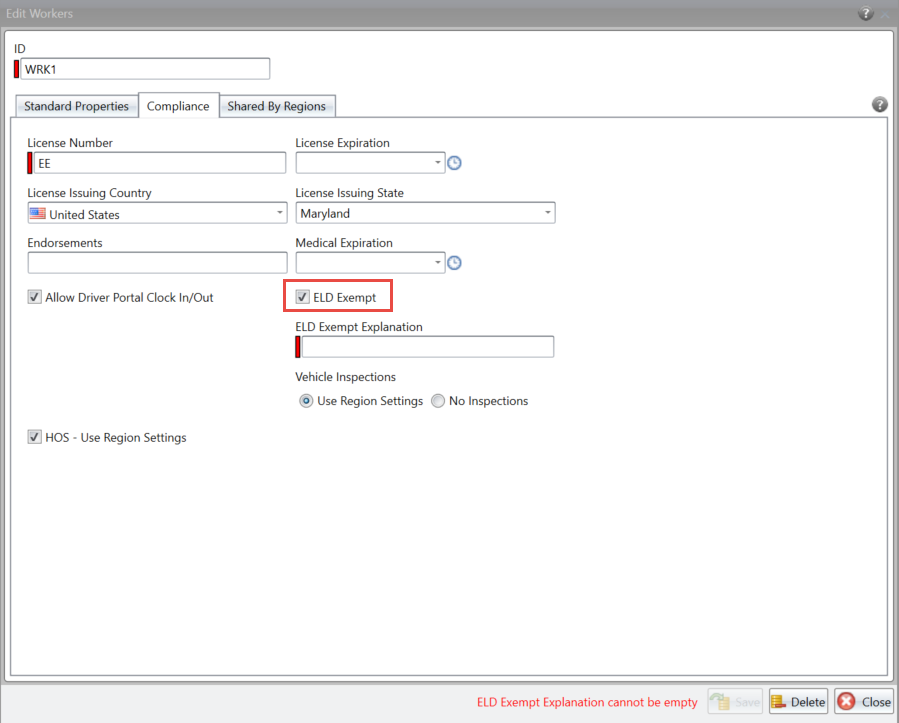
Note: If a worker is not designated as ELD exempt the Region settings will be used to determine whether the driver should perform a vehicle inspection
5. Enter an explanation for the exemption using 60 characters or less in the ELD Exempt Explanation field. This is a required field.
6. To defer to region settings for vehicle inspection requirements, check Use Region Settings.
To exempt the worker from vehicle inspections, check No Inspections.
7. Click the Save button.
Setting a Time Limit for In Motion Warnings on a Mobile Device Screen
Note: Some of the options described are purchasable and may not appear. Contact your Omnitracs sales representative for more information about acquiring additional features.
Found in Roadnet Anywhere Web and Roadnet Anywhere Client
As a Compliance customer, you need to keep track of your drivers and what the ELD Mandate requires of them. Throughout the day, drivers may need to be alerted to potential duty status issues, even while the vehicle is in motion. For instance, if a worker is approaching a low drive time while still out on the road, a warning will appear on the screen of the mobile device. Now, you have the ability to decide how long that message will be on the screen. You can choose from time intervals between five and sixty seconds, giving you the opportunity to decide how long it is appropriate for a message to appear on the screen while the vehicle is in motion so that the driver has enough time to see it, but is not distracted from the road.
1. Go to Administration. Click on Region.

2. To add a new region, click the [Add] button. The Add Region window will appear.

To edit an existing region, click the edit icon. The Edit Region window will appear.
![]()
3. In the Add or Edit Region window, select HOS Settings then open the Roles and Options tab.
4. Use the arrow to select the amount of time you want a warning to appear on a mobile device screen while the vehicle is in motion. The default option is 15 seconds.
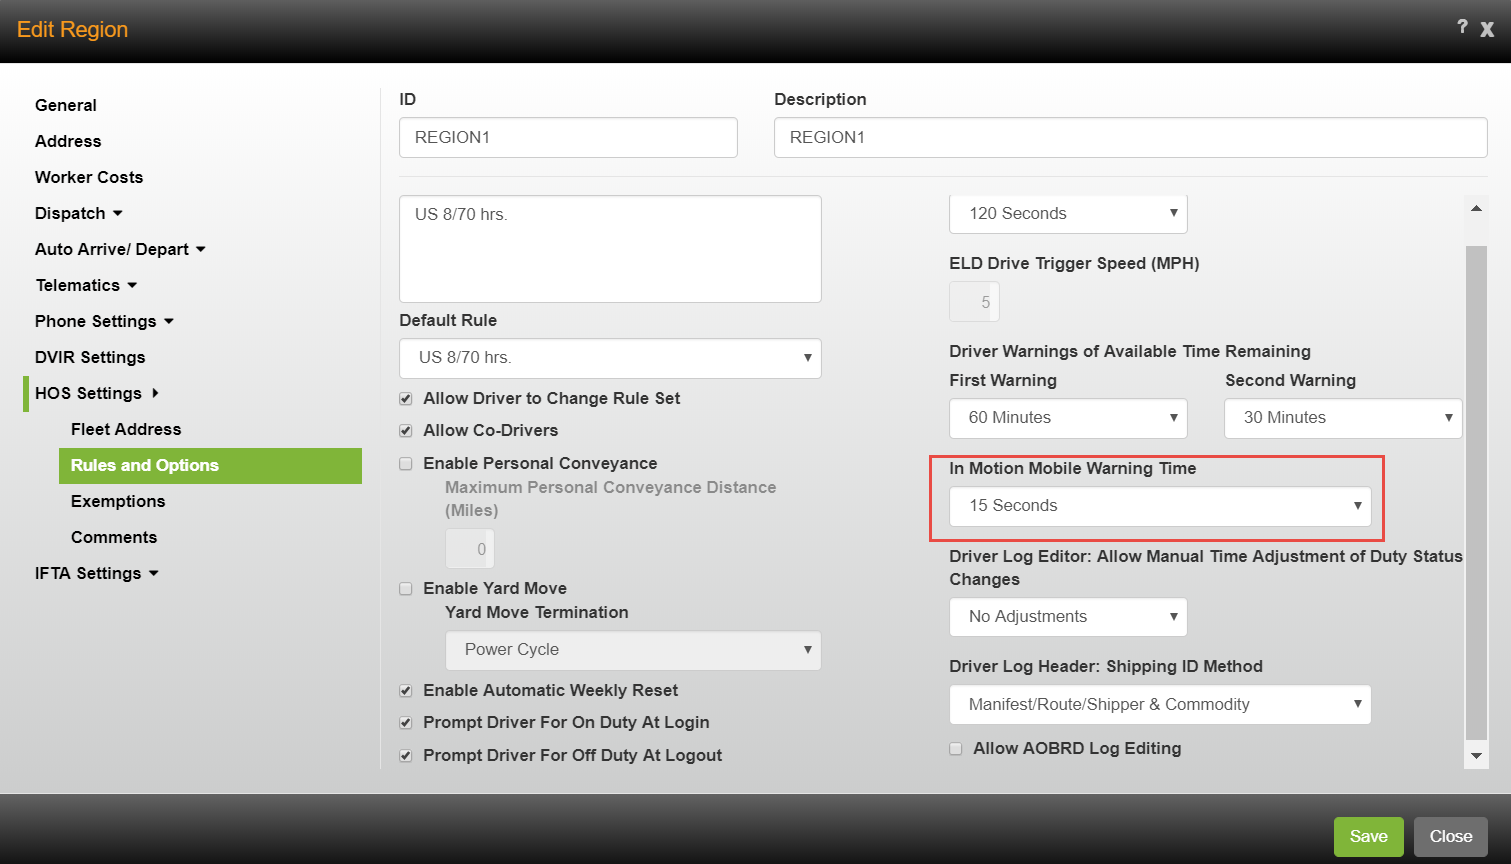
Note:This setting will only apply when the vehicle is in motion.
5. Click [Save].
In Roadnet Anywhere Client:
1. Go to Administration and select Region.
2. To add a new region, click the Add icon. The Add Region window will appear.

To edit an existing region, click the edit icon. The Edit Region window will appear

3. In the Add or Edit Region window, select HOS Settings then open the Roles and Options tab.
4. Use the arrow to select the amount of time you want a warning to appear on a mobile device screen while the vehicle is in motion. The default option is 15 seconds.
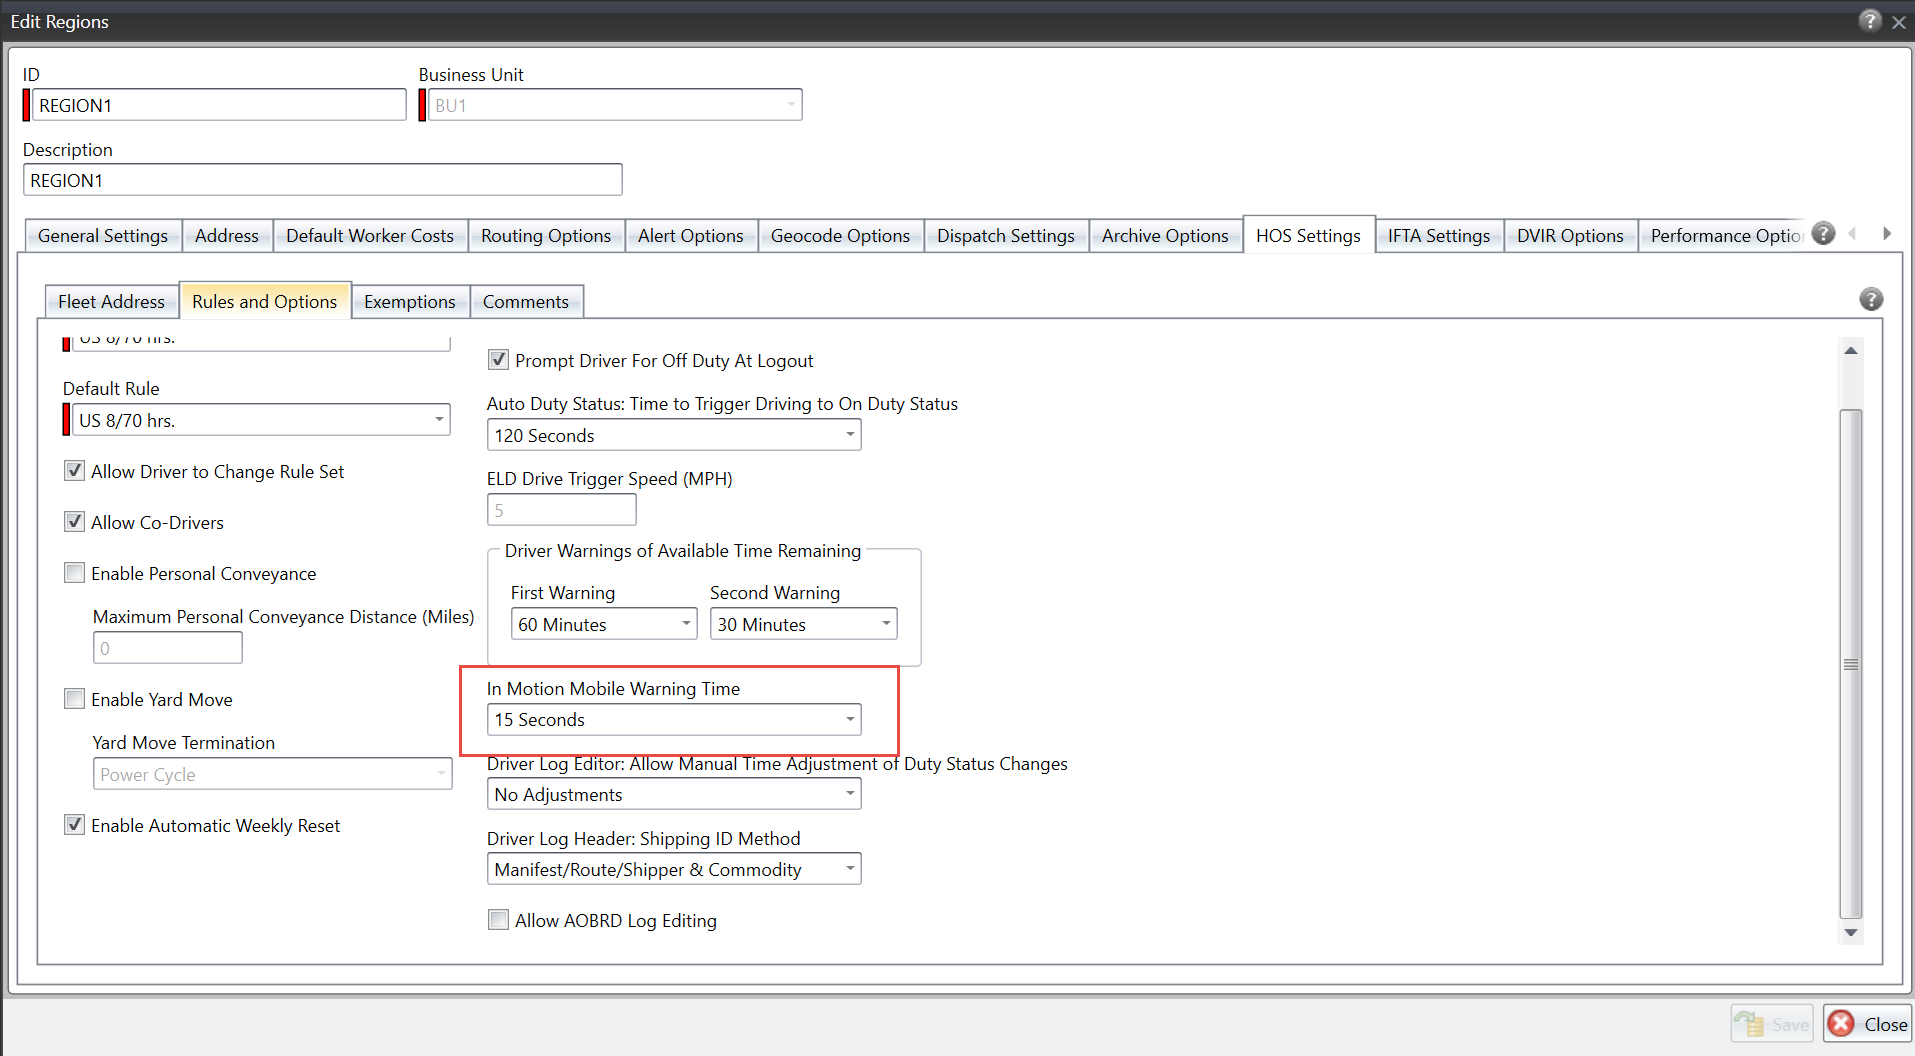
Note:This setting will only apply when the vehicle is in motion.
5. Click the Save button.
Software Corrections
The following is a list of the software corrections that were made in the Roadnet Anywhere 5.3 release.
|
Issue ID |
Read Me Notes |
|
Admin |
|
|
The "Allow Co-Driver Use While Vehicle is in Motion" option has been removed from the Region editor and this action will always be allowed. |
|
|
The Speed Buzzer Threshold on the Region's Dispatch Settings->Telematics dialog now enforces the users measurement settings so it will display in either imperial or metric values. |
|
|
The Dispatch->Stationary Position->Minimum Transit Speed field and the Omnitracs Navigation->User Speed Alerts->Speeding Threshold have been changed to measurement fields. These fields will not reflect the imperial or metric settings configured for the user. |
|
|
There was an issue preventing the success message from appearing when admin roles were added in Roadnet Anywhere Web. This has been corrected. |
|
|
There was an issue that was preventing some users from resetting their password. This issue has been corrected. |
|
|
There was an issue where the In Motion Speed region option was grayed out for some users. This has been corrected. |
|
|
A typographical error for "Geocode Service Locations" within the product has been identified and resolved. |
|
|
Android Mobile |
|
|
A defect causing Roadnet Mobile for Android stops to be departed before all required tasks were completed by driver has been identified and resolved. |
|
|
Customers using Roadnet Mobile for Android can now choose whether "Route" or "Trip" appears on the mobile device. See the What's New guide for more information. |
|
|
High priority centralized messages are now marked on the mobile device. |
|
|
Roadnet Mobile for Android now supports service location form control on Anytime Forms. See the What's New guide for more information. |
|
|
When configured to do so, the Route ID, Region, and Custom properties are visible on the stop list in Roadnet Mobile on Android. See the What's New guide for more information. |
|
|
A Roadnet Mobile for Android defect which could prevent forms being checked off has been identified and resolved. |
|
|
There was an issue where the mobile application would crash when the driver tried to edit a line item. This has been corrected. |
|
|
There was an issue where drivers could not preview routes they were not assigned to. This has been corrected and drivers can now preview routes that they are not assigned to. |
|
|
The defect preventing Roadnet Mobile for Android routes from being loaded has been identified and resolved. |
|
|
XRS-6368 |
Am issue where log edits made using the Hours of Service application Log Editor may not display on the Driver Log Editor in Roadnet Anywhere Web has been resolved. HOS log edits made using the mobile device are correctly displayed on the Roadnet Anywhere Web Log Editor. |
|
XRS-5348 |
An issue where the hoststatus API call may return incorrect DRIVE left (lefdtime) or Duty Left (leftdaily time) values has been corrected. |
|
XRS-6357 |
An issue preventing the Roadnet Anywhere Web Driver Log Editor from displaying comment entered using the Hours of Service Log Editor has been corrected. |
|
XRS-6369 |
The Hours of Service application has been updated to properly enforce minimum character length requirements for all Comments fields. |
|
Dispatching |
|
|
In some scenarios in Fleetview, the Transfer Stops menu option was not available even though two routes were selected. This has been corrected. |
|
|
Stop and Stop Group mobile forms can be configured to appear in the task list or menu or be hidden when at a stop through the Mobile Screen Configuration in Roadnet Anywhere Web. See the What's New guide for more information. |
|
|
Previously, trying to drag/drop an unassigned order for a deleted service location onto a route in Roadnet Anywhere Web did not prompt a reason for not completing the insertion. Now the user is prompted that the order cannot be inserted because the service location has been deleted. |
|
|
In some scenarios, the sorting and paging controls on FleetView's Route Grid view did not display correctly. This has been corrected. |
|
|
There was an issue where white boxes were appearing on the map in FleetView. This has been corrected. |
|
|
In some scenarios in FleetView, dragging and dropping a canceled stop onto a cluster of stops did not prompt to adjust the stop. This has been corrected. |
|
|
There was an issue where driver directions in FleetView would print blank pages. This has been corrected. |
|
|
There was an issue where the depot filter would disappear in FleetView if the user chose to filter on a child region that had no siblings. This has been corrected. |
|
|
There was an issue where drivers would not be able to unload a route from the mobile device if the route used a form with a data/time control. This has been corrected. |
|
|
There was an issue that was causing not completed stops in FleetView's Timeline view to appear as completed. This has been corrected. |
|
|
The type ahead search in FleetView was replaced with a search icon to prevent searches was failing because only part of the entry was being searched if there was a very large amount of data. |
|
|
A new 'No GPS Feed' status has been introduced for equipment. In FleetView - Overview it is indicated by a red circle with question-mark on the map and black circle in the vehicle list. |
|
|
There was an issue where a route was being created even though the equipment did not leave the depot's service radius as defined for the region. This has been corrected, and the system should now adhere to the service radius that is set on your region. |
|
|
There was an issue where exceptions were being sent, even after a route was completed. This has been corrected. |
|
|
An issue that caused certain exception rules from being updated has been identified and fixed. |
|
|
Driver Log Editor |
|
|
XRS-4494 |
When transferring a DRIVE segment from one driver to another, the HOS ELD Driver Log Report may display the incorrect log graph, while the DRIVE time details below the graph are correct. This has been corrected. |
|
XRS-5133 |
There was an issue where the HOS Log graph lines did not match the values displayed in the Total Hours fields on the right side of the HOS graph. This has been corrected. |
|
XRS-5373 |
An issue where the HOS Driver Log Editor – Date Selection field left arrow would remain enabled when the previous day was outside the selected date range has been corrected. |
|
XRS-6729 |
There was an issue where pending or inactive events could be duplicated when generated the ELD Driver Log report. This has been corrected. |
|
Insight |
|
|
There are two new measures in Insight for stop run time and engine run time. See the What's New guide for more information. |
|
|
There was an issue where users were unable to go back to a previous level in the Insight KPIs. This has been corrected. |
|
|
There was an issue where Compliance customers would receive an error when adding user groups in Insight. This has been corrected. |
|
|
There was an issue that was causing the data displayed in Insight to be different than the exported data. This has been corrected. |
|
© 2019 Omnitracs, LLC. All rights reserved.
Omnitracs is a trademark of Omnitracs, LLC. All other trademarks are the property of their respective owners.
Omnitracs endeavors to ensure that the information in this document is correct and fairly stated, but Omnitracs is not liable for any errors or omissions. Published information may not be up to date, and it is important to confirm current status with Omnitracs. Specifications subject to change without notice.
This technical data may be subject to U.S. and international export, re-export or transfer (export) laws. Diversion contrary to U.S. and international law is strictly prohibited.