Roadnet Anywhere 5.4 - New Features and Enhancements in Roadnet Anywhere
Note: Some of the options described are purchasable and may not appear. Contact your Omnitracs sales representative for more information about acquiring additional features.
Roadnet Anywhere version 5.4 contains several new features that make it easier for you to plan and monitor your routes throughout the day, as well as analyze your overall transportation operation.
FleetView
- You can enter the specific latitude/longitude of your destination when using Shortest Path on a map.
- Additional sorting options in Fleetview now give you the ability to sort your routes based on criteria like Projected Missed Service Windows, Departure or Arrival Times, Route State, and many others.
- You can edit orders from the stop lists even after the route has been dispatched.
Miscellaneous
- You can now specify the format of the data if you are exporting raw GPS data from Roadnet Anywhere.
Compliance
- Compliance customers can declare specific vehicles as HOS Exempt.
- Compliance customers can now allow drivers to enter a second comment when changing their duty status.
- Compliance customers can now print a report summarizing time spent in special driving conditions.
- Compliance customers can now see which driver is currently driving in FleetView.
Routing
- You can create planned routes where the origin is determined when the driver loads the route onto the mobile device.
- You can define a maximum travel time for planned routes.
- You can now more efficiently route alternative delivery vehicles, like bikes.
- You can choose not to have the order's line items totaled to use as the order quantity.
- The Order End Date is now considered more heavily when routes are created.
Roadnet Active Alert
- Voice Messaging is no longer supported for Active Alert notifications. For each Active Alert recipient type and template you can now send notifications by email, SMS message, or both.
Mobile
- The worker can call a service location using the alternate phone number, if one exists in Roadnet Anywhere. This option works in Roadnet Mobile Android.
- You can have Roadnet Mobile automatically mark a stop for redelivery when the worker undelivers a stop.
- You can require workers to assign reason codes when cancelling an order.
- You can choose one route custom property to display with the route information, when the worker is looking at available routes on the mobile device's Load Route screen.
- You can choose up to three order custom properties to display with the order, when the worker is on the Verify Orders screen.
- The worker can now see how far away the first stop on a route is when previewing available routes or viewing route information for tendered routes. Dead head miles only display with routes that do not have a planned origin.
- You can require your workers to get a new signature if they change quantities after collecting a signature from the customer.
- You now have more control over what workers are allowed to add to a stop on the mobile device. You can let workers only add orders, only add line items, or you can continue to allow them to add both.
- You can offer routes to specific workers, and they can accept or decline tendered routes on the mobile device.
- You can now let your workers add stops, find points of interest, send and receive messages, and much more, in Roadnet Anywhere Tracking for Android.
Roadnet Mobile Manager
- You can see which orders were cancelled, why they were cancelled, who cancelled them, and information about the stops for which the orders were cancelled, on the new Cancelled Orders tab in Roadnet Mobile Manager.
- You can view all of your equipment or a filtered list of your equipment on a single map in Roadnet Mobile Manager.
- You can see where the equipment is on a route, the sequence of stops on the route, and the progression of the route, on the map in Roadnet Mobile Manager
- You can see unstarted planned routes on the map in Roadnet Mobile Manager
- Drivers can now alert the dispatcher to an emergency by pressing a panic button.
- You can now define restricted equipment operating hours for a region.
Insight
- You can add up to seven Group By levels to a KPI in Insight.
- You can see more detailed information on the screen, by adding multiple Group By choices in Insight.
- The Treemap visualization has been removed from Insight. Existing KPIs with Treemap assigned will no longer work.
Entering a Coordinate to Generate the Shortest Path on a Map
Note: Some of the options described are purchasable and may not appear. Contact your Omnitracs sales representative for more information about acquiring additional features.
Found in Roadnet Anywhere Web
When viewing a map in FleetView or the Map Editor, you are able to easily find the shortest path between two places by using address mode. Previously, you've been able to generate that path by entering an address, city, or postal code as an origin and destination point. Now, if your origin or destination is a bit off the beaten path or in a very congested area, you can enter latitude and longitude coordinates to generate the shortest path that gets you exactly where you need to be.
Note: Map Editor is only available for Omnitracs Navigation customers.
1. Go to FleetView and select Routes, then Map mode.

OR
If you are a Navigation customer, go to Map Editor.

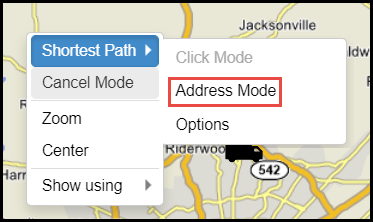
2. Right click on the map, and select Shortest Path from the menu that pops up.
Note: You can do this from any map in FleetView.
3. Select Address Mode.
4. To enter a coordinate as the origin point, click on the Origin tab and check coordinate. Enter exact latitude and longitude coordinates in the corresponding fields.
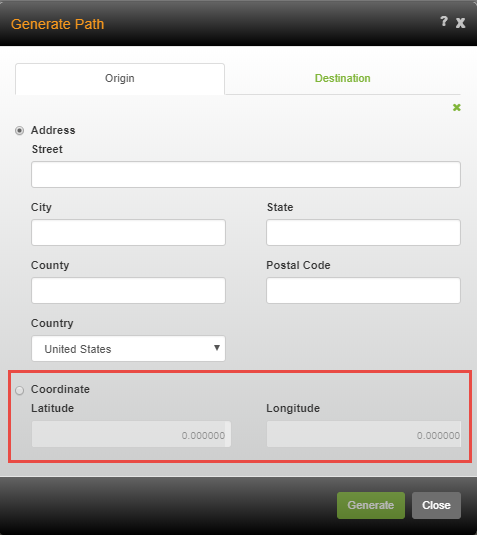
To enter a coordinate as the destination point, click on the Destination tab and check coordinate. Enter exact latitude and longitude coordinates in the corresponding fields.

5. Click [Generate]. The path is generated and shown on the map.
Additional Sorting Options in FleetView
Note: Some of the options described are purchasable and may not appear. Contact your Omnitracs sales representative for more information about acquiring additional features.
Found in Roadnet Anywhere Web:
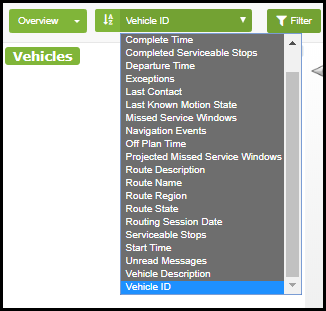
As a dispatcher, you often need to view routes based on specific criteria. For instance, you may need to see which vehicles are projected to miss a service window so that you can contact the drivers and make changes to your routes. This can be extremely difficult if you are looking at a list of dozens of route cards or a map cluttered with vehicles. In order to make specific information much more accessible, FleetView now gives you new sorting options when working in Overview or any of the routes views. So, in addition to sorting by Vehicle ID, Vehicle Description, Active Exceptions, Navigation Events, Unread Messages, Last Contact, or Last Known Motion State, you can now sort your routes based on criteria like Projected Missed Service Windows, Departure or Arrival Times, Route State, and many others.
You can now sort routes and vehicles by:
Route Region
Route State
Exceptions
Route Name
Route Description
Serviceable Stops
Completed Serviceable Stops
Projected Missed Service Windows
Missed Service Windows
Off Plan Time
Routing Session Date
Start Time
Departure Time
Arrival Time
Complete Time
To Use the New Sorting Options in Overview:
Use the arrow to select a sorting option.
To Use the New Sorting Options in any of the Routes Views:
Use the arrow to select a sorting option.

Declaring a Vehicle HOS Exempt
Found in Roadnet Anywhere Web and Roadnet Anywhere Client
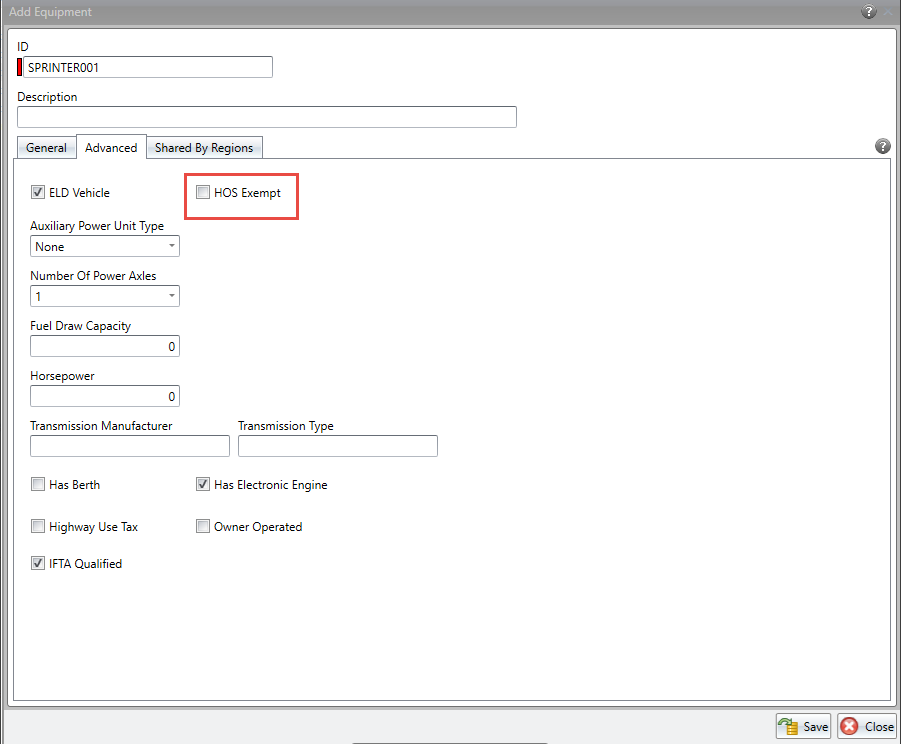
As a Compliance customer, you may have non-commercial vehicles or pieces of equipment under 10,000 pounds that are not subject to Hours of Service (HOS) rules. For instance, there may be a maintenance vehicle that needs to be moved around a yard. When a worker moves that vehicle you need to be sure that their time is not recorded as drive time. Roadnet Anywhere now gives you the ability to designate a piece of equipment as ELD exempt so that any movement won’t affect a worker's drive time.
Note: This feature is only available for Compliance customers.
When a vehicle is designated as ELD exempt, Hours of Service on the mobile device will not auto-change a duty status to Drive.
Making a Vehicle HOS Exempt in Roadnet Anywhere Web
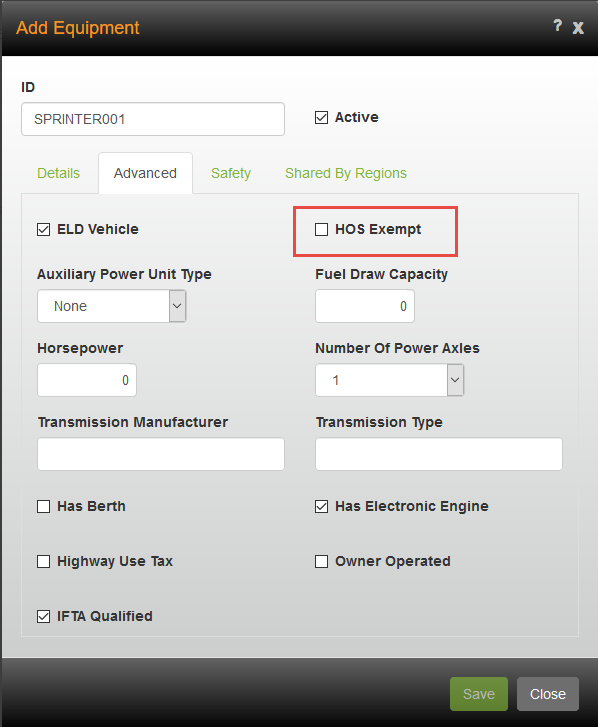
Go to Maintenance and select Equipment, the equipment list opens. Select the edit icon to make a change to an existing piece of equipment, or the add icon to create a new one. In the Add or Edit Equipment window, go to the Advanced tab and check HOS Exempt.
Making a Vehicle HOS Exempt in Roadnet Anywhere Client
Go to Maintenance and select Equipment, the equipment list opens. Select the edit icon to make a change to an existing piece of equipment, or the add icon to create a new one. In the Add or Edit Equipment window, go to the Advanced tab and check HOS Exempt.
If you want to import HOS Exemptions with your equipment, add the information to your import file and update the data transfer layout.
| Field | Required | Max. Length/Range | Description |
|---|---|---|---|
| HOS Exempt | No | N/A |
Indicates if the piece of equipment is a non-commercial vehicle or a vehicle that weights under 10,000 pounds and doesn't need to follow HOS rules. When this option is enabled, any movement of the vehicle will not count towards a worker's drive time. Enter T, True, Y, Yes, or 1 to indicate that the piece of equipment is HOS Exempt; enter F, False, N, No, 0, or leave blank if the equipment is not HOS Exempt. Leave the field blank if the equipment is not a power unit.
|
Multiple Comments Now Supported For HOS Log Events
Found in Roadnet Anywhere Web and Roadnet Anywhere Client
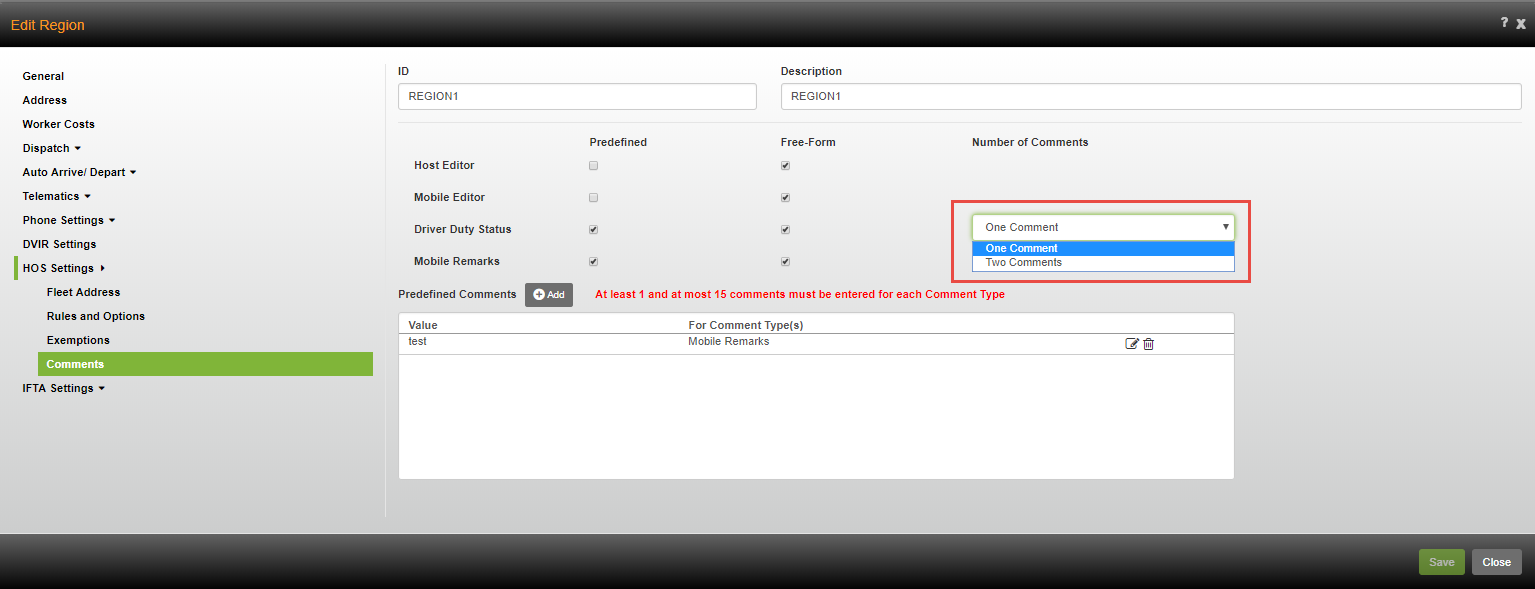
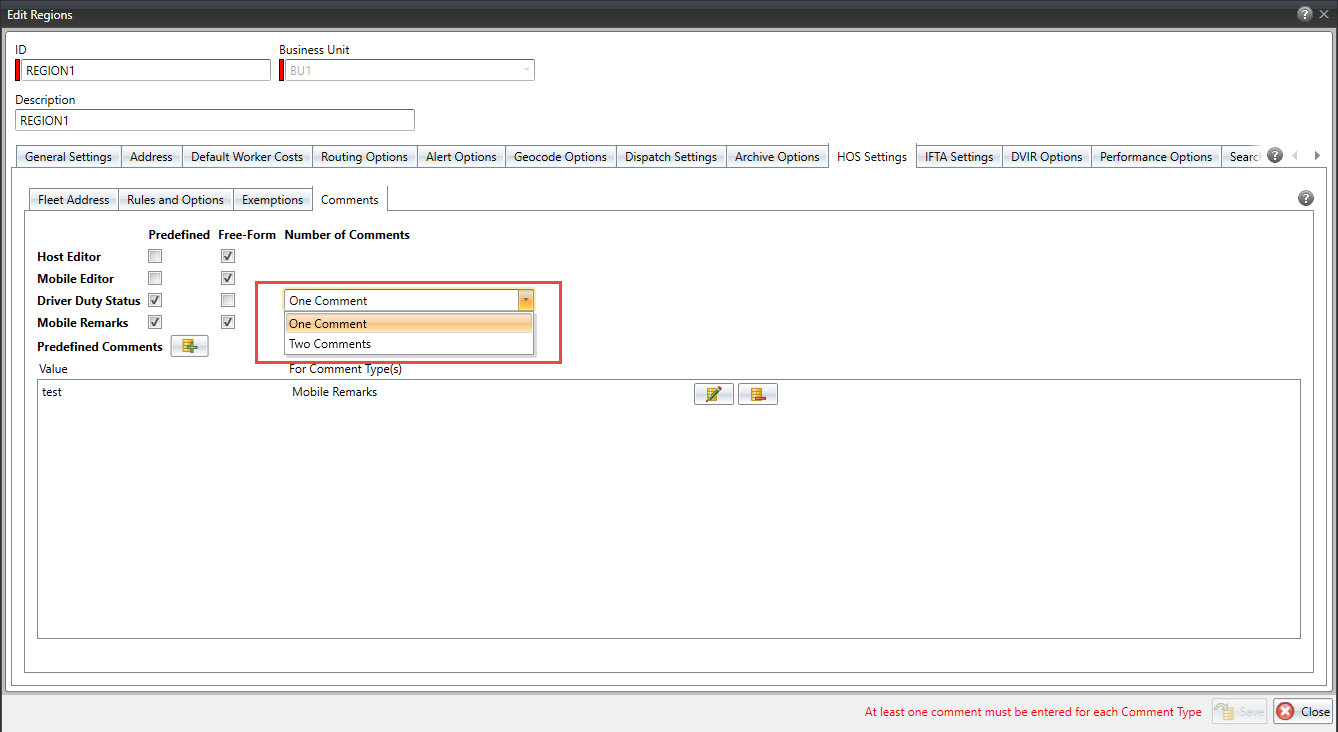
As a Compliance Customer, your drivers have the ability to enter comments when manually changing their duty status. Now, not only can you select whether a driver can enter a predefined comment, a free-form comment, or both, you can also give drivers access to an additional comment field by choosing to allow two comments instead of one. The new Number of Comments drop-down box is located in the Comments section of the region settings.
Multiple comment fields are now supported for:
eRODS Files and Reports
Driver Log Editor
Unassigned Vehicle Activity Editor
ELD Driver Log Report
Duty Status Changes
Timeclock
Driver Portal
HOS Log Inspector Mode
The Hours of Service Application Mobile Log Editor
To Select the Number of Comments that a Driver can Enter in Roadnet Anywhere Web
1. Go to Administration and select Region.

2. To add a new region, click the [Add] button. The Add Region window will appear.

To edit an existing region, click the edit icon. The Edit Region window will appear.

3. In the Add or Edit Region window, click HOS Settings and then Comments.
4. When you enable Predefined or Free-Form comments for Driver Duty Status, the Number of Comments field will appear.
5. Use the arrow to select One Comment or Two Comments.
Note: The second comment will be in the same format you chose for the first comment, Predefined, Free Form, or both.
6. Click [Save].
To Select the Number of Comments that a Driver can Enter in Roadnet Anywhere Client
1. Go to Administration and select Region.
2. To add a new region, click the Add icon. The Add Region window will appear.

To edit an existing region, click the edit icon. The Edit Region window will appear

3. In the Add or Edit Region window, click the HOS Settings tab.
4. In the HOS Settings tab, click the Comments tab.
5. When you enable Predefined or Free-Form comments for Driver Duty Status, the Number of Comments field will appear.
6. Use the arrow to select One Comment or Two Comments.
Note: The second comment will be in the same format you chose for the first comment, Predefined, Free Form, or both.
7. Click the Save button.
Special Driving Conditions Report
Found in Roadnet Anywhere Web and Roadnet Anywhere Client
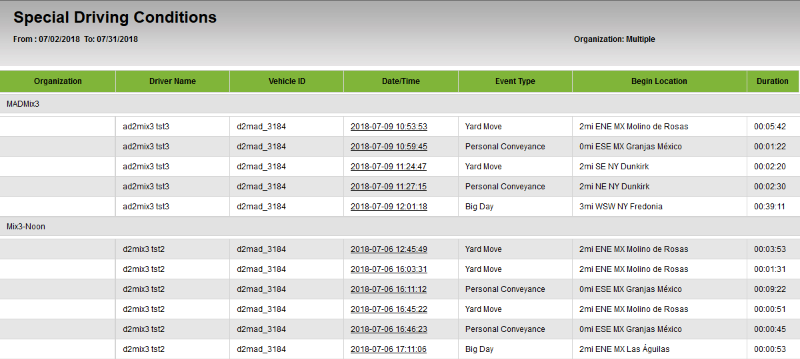
Roadnet Anywhere gives you many reporting options to help keep track of Hours of Service (HOS) information so that you can be sure that every movement of a vehicle and every hour spent behind the wheel is documented. Sometimes, there are specific situations when a vehicle can move without it counting against a drivers HOS time. These are known as special driving conditions events. If a vehicle is driven across a lot for maintenance as a yard move, or a driver uses personal conveyance time to drive a vehicle from the yard to his home, or a driver needs to extend their day with the Big Day exception, you will be able to keep track of that time using the new Special Driving Conditions report. The report allows you to see all special driving conditions events within a set time period and includes the location of the vehicle when the event began and the duration of the event. You can group the report by organization or driver and filter the report by specific events or drivers. This report is very useful as a tool to track every moment of vehicle movement and make sure that a driver’s time is accurately accounted for.
Note: This feature is only available for Compliance customers.
Granting Permissions to Use the Special Driving Conditions Report in Roadnet Anywhere Web
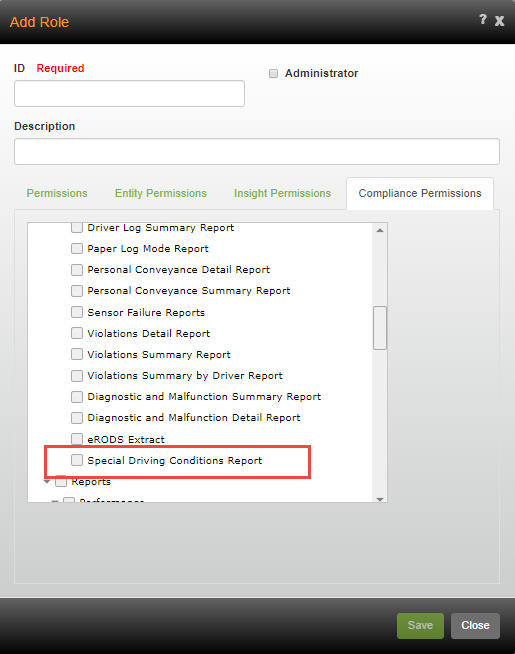
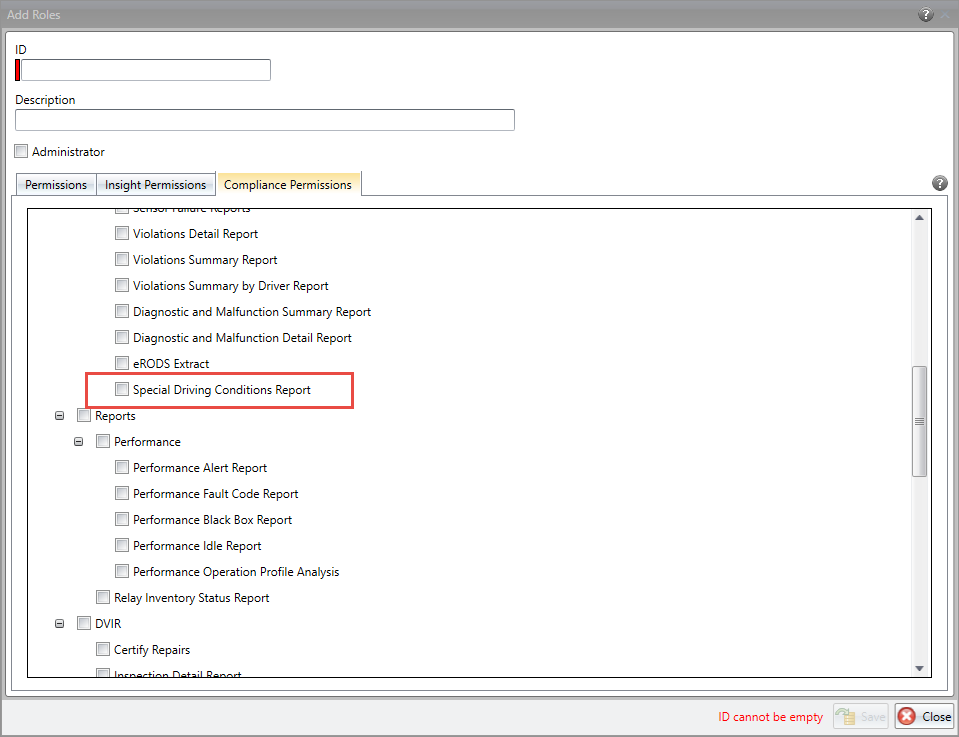
To give a role access to the Special Driving Conditions Report, go to Administration and select Roles. To add a role, click the [Add] button. To edit a role click the edit icon. Click on the Compliance Permissions tab. The Special Driving Conditions Report will be listed under Reports. Check Special Driving Conditions Report and any other report that you want to the role to have access to. If you want to give access to all reports, check Reports. Click [Save].
Note: Even if Reports is checked, permissions for the Special Driving Conditions Report will be off by default. You will need to manually check Special Driving Conditions Report for every preexisting role, even if they currently have access to all reports. Administrators will have access to the report automatically.
Granting Permissions to Use the Special Driving Conditions Report in Roadnet Anywhere Client
To give a role access to the Special Driving Conditions Report, go to Administration and select Roles. To add a role, click the add icon. To edit a role click the edit icon. Click on the Compliance Permissions tab. The Special Driving Conditions Report will be listed under Reports. Check Special Driving Conditions Report and any other report that you want to the role to have access to. If you want to give access to all reports, check Reports. Click the Save button.
Note: Even if Reports is checked, permissions for the Special Driving Conditions Report will be off by default. You will need to manually check Special Driving Conditions Report for every preexisting role, even if they currently have access to all reports. Administrators will have access to the report automatically.
Running the Special Driving Conditions Report in Roadnet Anywhere Web
1. Open Reporting.
2. Click on the HOS Special Driving Conditions report. The Report Selector opens.

3. In the Group By field, click the arrow and select whether you want to view special driving condition events for each Organization or Driver.
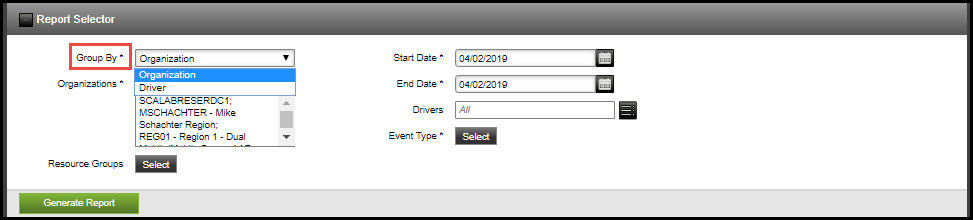
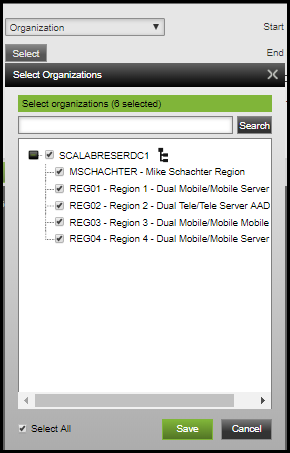
4.If you chose to group the report by Organization, click the arrow next to Organizations and select which organizations you want to include. Chose Select All if you want to include all organizations. Click [Save] to save your selections.
Note: Organizations are your regions added in Administration.
If you chose to group the report by Driver, you can specify which resource groups or individual drivers will be included. Click the select button next to Resource Groups and check the groups from which you want to include data. To specify a Driver, start typing his or her name or ID into the Driver box and select their name from the list that appears. You can also select the menu icon and choose the drivers you want to see from a list by using the arrows to move the names to the Selected Drivers box. Click [Save] to save your selections.

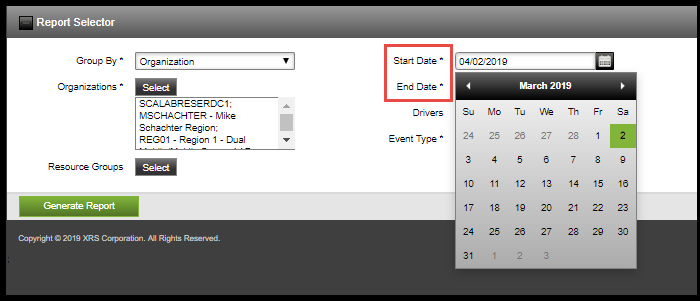
5. In the Start Date box, enter a start date or click on the calendar icon to select a date. In the End Date box, enter an end date or click on the calendar icon to select a date. You can report on data that is up to six months old from the first day of the current month. The date range can be up to 31 days.
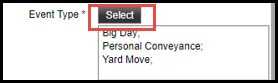
6. To chose an Event Type, click select. Click on the event types that you want to include in the report, or chose Select All. Click [Save] to save your selections.
7. Click Generate Report. The report opens. From the open report you can print or save it to view later.
View and Edit Orders on Planned Stops
Found in Roadnet Anywhere Web and Roadnet Anywhere Client
As a dispatcher, there may be times when you need to edit an order on a stop that has already been dispatched, for instance, if a line item has been removed from a delivery after the vehicle has left the depot or if special instructions need to be updated. Now, whether you're working in Roadnet Anywhere Web or Roadnet Anywhere Client, you can make edits to orders on any planned stop that hasn’t arrived. In Fleetview, you can view and edit orders for a stop while looking at a route in Route Details. To make a quick adjustment to an order, you can simply drill down from the stop, to the order, or even to the line items and make the changes using the Edit Order window. Previously in Roadnet Anywhere Client, you needed to make changes to an order in the orders list, now you can view an order in the stop list, drill down from stop to order to line item and make any necessary changes using the Edit Order window. With this new functionality, you can be prepared for any unexpected update or change to an order on a planned stop until the time it is arrived.
To view and edit orders in Route Details in Roadnet Anywhere Web
To view an order, click the arrow next to the stop that you want to expand, the stop's orders will be listed in the grid. If you use line items, click the arrow next to the order to expand it, the order's line items will be listed in the grid.
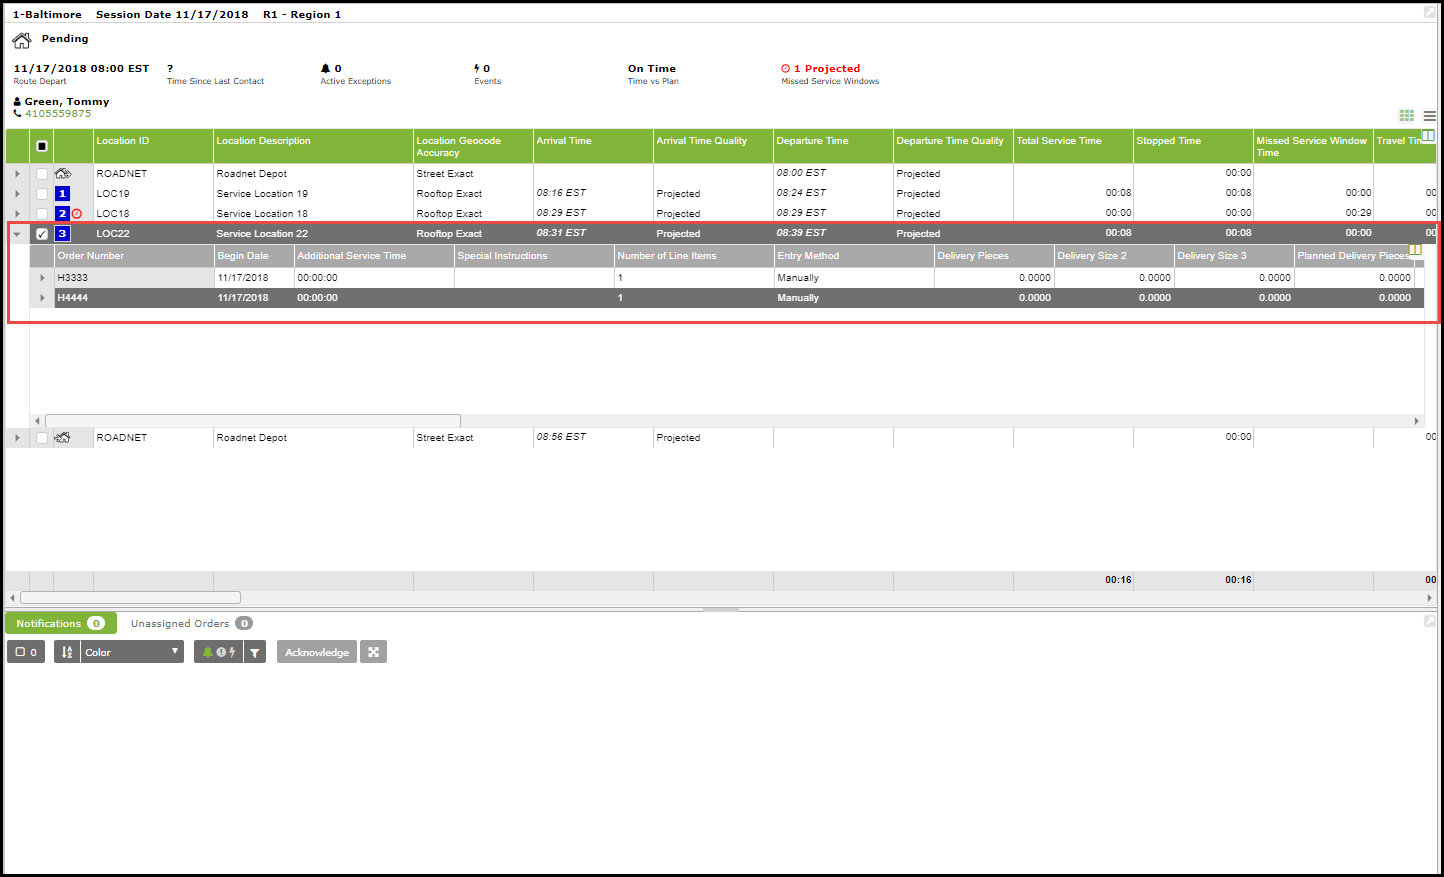
Note: Only serviceable stops are expandable.
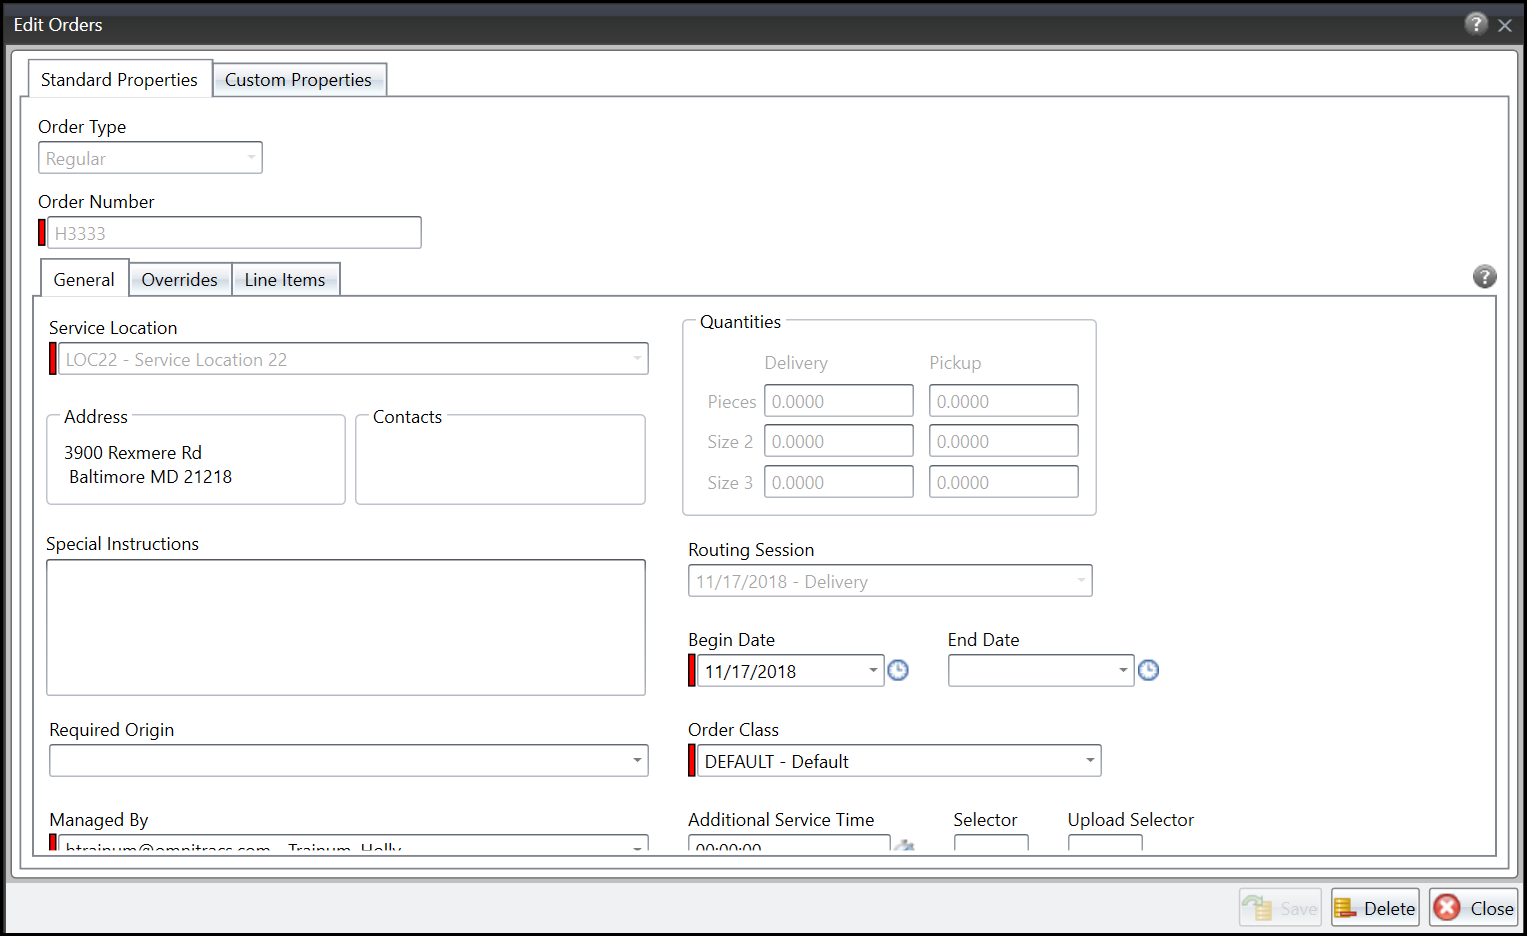
To edit an order or a line item, right click on the order or line item and select Edit .The Edit Order Window will open.

Note: You will not be able to edit Order Number, Service Location or Routing Session.
Click [Save].
To view and edit orders on the Stops Window in Roadnet Anywhere Client
Change your view to Dispatching, if necessary. Select a route, then select a stop. The orders associated with that stop will appear in the orders window.

To edit an order, right click on the order and select "Edit Order". The Edit Order Window opens.
Note: if you are using line items, you can click on an order to view or edit its line items.
Note: You will not be able to edit Order Type, Order Number, Service Location or Routing Session.
Click the Save button.
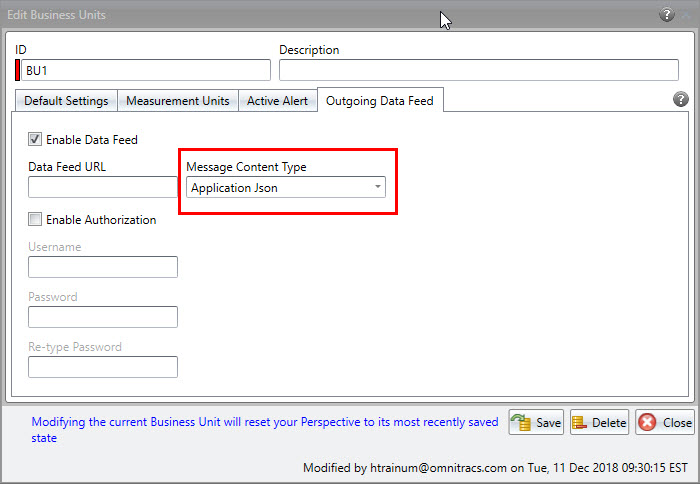
Specifying the Outgoing Data Feed Type
You may want to gather the raw GPS data that Roadnet Anywhere receives from the Telematics devices so that you can use it for data analysis. Previously the only type of message the could be sent was plain text, now you can choose to have the message sent as an application JSON.
To change the setting in Roadnet Anywhere Web:
In Administration, click the green button and scroll to Business Unit. Click the [Add] button to add a new business unit, or the Edit icon to change an existing business unit. The Business Unit window opens. Click Outgoing Data Feed to open the Outgoing Data Feed page. Click the Message Content Type arrow and choose Application JSON, then click the [Save] button.

To change the setting in Roadnet Anywhere Client:
Click on the Administration menu and scroll to Business Unit; the Business Unit list opens. Click the Add icon to add a new business unit, or the Edit icon to change an existing business unit. The Business Unit window opens. Click Outgoing Data Feed to open the Outgoing Data Feed page. Click the Message Content Type arrow and choose Application JSON, then click the [Save] button.
Using Unplanned Route Origins
If you have a for hire portion of your business where you offer drivers planned routes to choose from, you probably won't know where the driver will be when the route starts, so you can not include an origin when creating the route. Your company may handle this situation in a couple of different ways. For instance, you may want the route's origin to be where the driver actually starts driving, so that he is getting credit for those miles and time. Or, your business may not want the driver to get credit for those miles, and to have the route start at the first planned stop. Now you can choose whether to include those deadhead miles as part of the route or not.
This feature is intended for customers who:
- don't use dynamic routing
- do not plan a route origin
- create their routes using import routed solution, web services, or manually creating them in Roadnet Anywhere
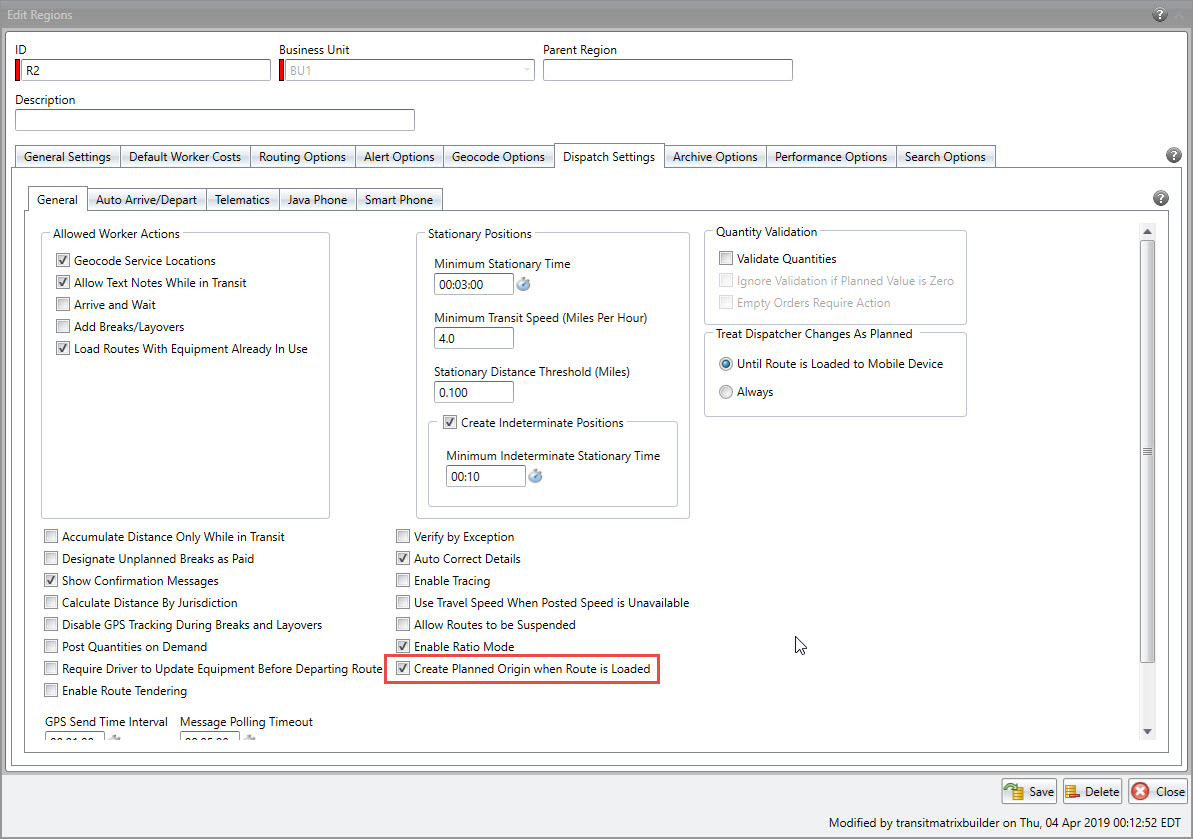
Creating an Unplanned Origin when the Driver Loads the Route
If you want an unplanned origin automatically created when the driver loads the route onto the mobile device, you need to enable the option for the region. If you have the unplanned origin automatically created, it appears in the stop list as an unplanned stop with an address, if Roadnet Anywhere is able to match an address to the coordinates. The unplanned origin will also appear on the map in FleetView as an unplanned stop with a flag, to indicate it is an origin.
In Roadnet Anywhere Client
Click on the Administration menu and select Regions. The Regions list opens. Click the Add icon on select an existing region and click the Edit icon. The Region window opens. Click on Dispatch Settings, then the General tab to open the Dispatch Settings - General page. Check Assign Planned Origin at Route Load.
In Roadnet Anywhere Web
Click on the Administration icon to open Administration. Click on the green button and scroll to Region; the Regions list opens. Click the [Add] button or select a region and then the Edit icon. The Region window opens. Click on Dispatch, then General. The Dispatch General page opens. Check Create Unplanned Origin on Route Load, then click the [Save] button.

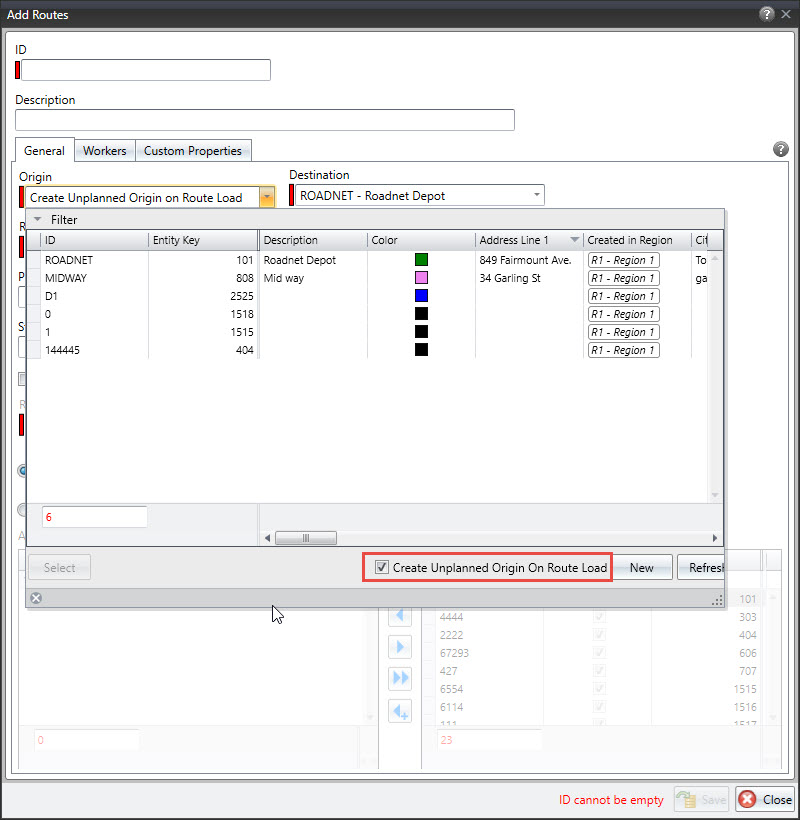
Creating Routes with Unplanned Origin
If you are manually creating routes with an unplanned origin, you need to select the proper way to indicate the unplanned origin, either as the first stop on the route, or when the driver loads the route on the mobile device.
In Roadnet Anywhere Client
In Route Planning, click the Add icon on the Active Routes list. The Add Route window opens. Click the Origin arrow; a list of possible origins opens.
If Create Unplanned Origin on Route Load was selected for the region, check Create Unplanned Origin on Route Load. If this option is selected, an unplanned stop with an address, if Roadnet Anywhere is able to match an address to the coordinates, appears in the stop list in FleetView. The unplanned origin will also appear on the map in FleetView as an unplanned stop with a flag, to indicate it is an origin.
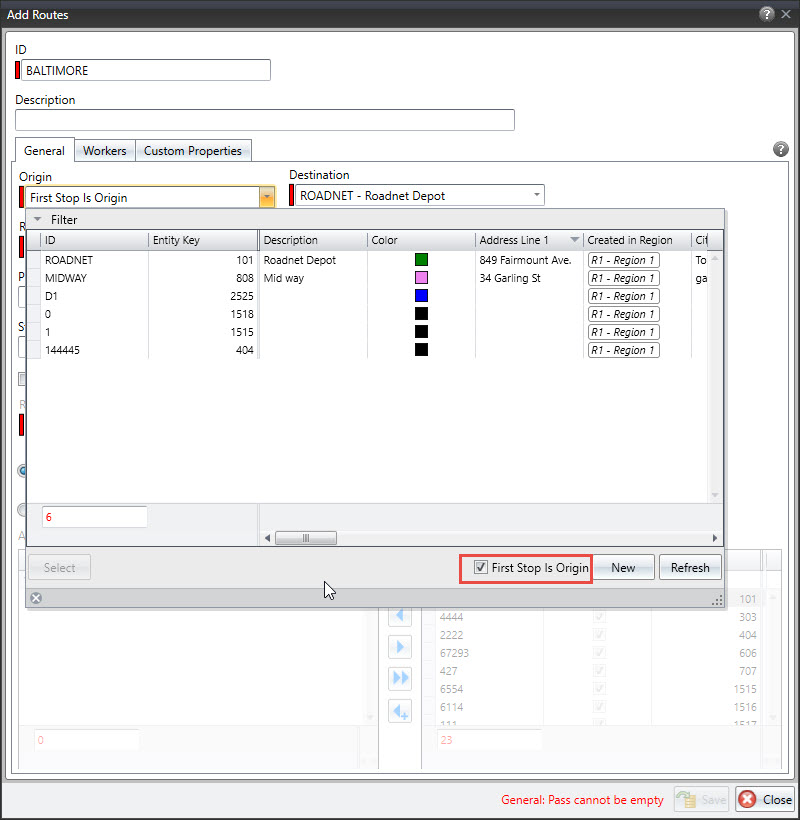
If Create Unplanned Origin on Route Load was not selected for the region, check First Stop is Origin. If this option is selected, an unplanned stop is not added to the stop list or map in FleetView; the first planned stop is the origin for the route. There will be no planned/projected travel time and distance to the first stop/origin, but there will be actual travel time and distance to reflect the driver traveling there once the route started. On the map, the first stop will have a flag to indicate that it is the origin.
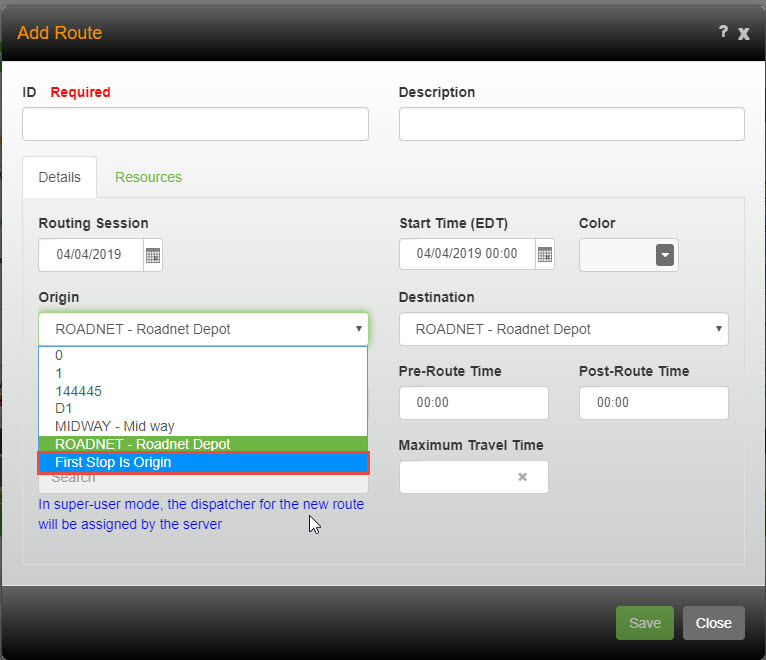
In Roadnet Anywhere Web
Click on the FleetView icon to open FleetView. Make sure you are in one of the Routes views, then click on Route Actions, then Add Route. The Add Routes window opens. Click the Origin arrow, a list of possible origins opens.
If Create Unplanned Origin on Route Load was selected for the region, check Create Unplanned Origin on Route Load. If this option is selected, an unplanned stop with an address, if Roadnet Anywhere is able to match an address to the coordinates, appears in the stop list in FleetView. The unplanned origin will also appear on the map in FleetView as an unplanned stop with a flag, to indicate it is an origin.

If Create Unplanned Origin on Route Load was not selected for the region, check First Stop is Origin. If this option is selected, an unplanned stop is not added to the stop list or map in FleetView; the first planned stop is the origin for the route. There will be no planned/projected travel time and distance to the first stop/origin, but there will be actual travel time and distance to reflect the driver traveling there once the route started. On the map, the first stop will have a flag to indicate that it is the origin.
Importing a Routed Solution
If you route elsewhere and then import a routed solution into Roadnet Anywhere, you need to specify how you want the origin created. The options, First Stop is Origin and Create Unplanned Origin on Route Load, are based on whether Create Unplanned Origin on Route Load is selected for the region.
| Field | Required | Max. Length/Range | Description |
|---|---|---|---|
|
Route - Create Unplanned Origin on Route Load OR Route - First Stop is Origin |
No | N/A |
Indicates how the route's origin should be created, if a route origin is not specified. If the option is Create Unplanned Origin on Route Load, enter 1, Y, T, True, or Yes if the origin should be created based on the driver's position when the route is loaded onto the mobile device. If the option is Route - First Stop is Origin, enter 1, Y, T, True, or Yes if the first stop should be the origin, and include a valid Stop-Service Location ID for a serviceable stop. |
Using Maximum Travel Time when Routing
Found in Roadnet Anywhere Client
When creating routes, you can provide guidelines for how you want the routes to look, such as how long the overall route is, the minimum number of stops, and several other factors. However, there was no way to limit the amount of time the worker spent actually driving. Now, you can specify the maximum amount of time the worker spends driving on a route, or the maximum travel time. Like the maximum time for a route, Roadnet Anywhere will not exceed the maximum travel time you establish for a route, although changes that you manually make to the route can cause the route to exceed the maximum travel time.
There are several pieces to using max travel time while routing, including
- You can define the max travel time for a pass or a route
- You can choose to have Roadnet Anywhere follow the max travel time or ignore it
- You can have the max travel time considered when suggesting routes
- You can choose to have an alert displayed if a route exceeds the max travel time
- You can ignore the max travel time when sequencing, inserting stop, optimizing, or suggesting routes
- You can see a route's maximum travel time in the Routes list
.
Setting the Max Travel Time
There are several places where you can set the max travel time, including:
- a route template
- a route pass template
- a route's properties
- cells
Setting the Maximum Travel Time for a Route Template
When you are creating your route templates, you can define the maximum travel time for that route template. When the template is used to create the daily routes, the maximum travel time restriction will be obeyed.
To set the maximum travel time for a route template, click on the Routing menu and choose Route Template; the Route Template workspace opens. In the route templates list, click the Add icon, or right-click on a route template and choose Edit; the Route Template window opens. Enter the maximum travel time for the route template in hh:mm. Click the [Save] button.

To replace the maximum travel time on several route templates simultaneously, select the route templates you want to update, then right-click and choose Replace. Update the Maximum Travel Time, then click the [Save] button.
Setting the Maximum Travel Time for a Routing Pass Template
When you are creating your routing pass templates, you can specify the maximum travel time for routes created or sequenced using the routing pass.
To set the maximum travel time for a routing pass template, click on the Routing menu and choose Routing Pass Template; the Routing Pass Template list opens. Click the Add icon, or click on a routing pass template and choose the Edit icon; the Routing Pass Template window opens. On the General page, enter the maximum travel time for the route template in hh:mm. Click the [Save] button.

To replace the maximum travel time on several routing pass templates simultaneously, select the routing pass templates you want to update, then right-click and choose Replace. Update the Maximum Travel Time, then click the [Save] button.
Setting the Maximum Travel Time for a Route
If you want to specify or change the maximum travel time for an individual route, you can enter the maximum travel time on the Route window.
In Roadnet Anywhere Client
To set the maximum travel time for a route, click on the Routing menu and choose Route Planning; the Route Plan workspace opens. In the Routes list, click the Add icon, or click on a route and choose the Edit icon; the Route window opens. On the General page, enter the maximum travel time for the route in hh:mm. Click the [Save] button.
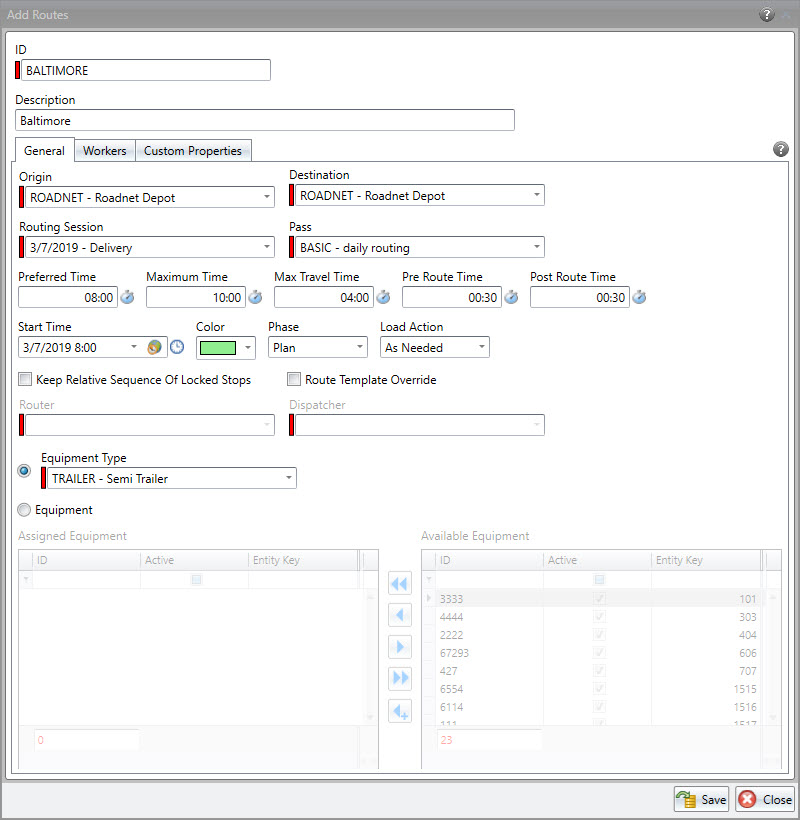
To replace the maximum travel time on several routes simultaneously, select the routes you want to update, then right-click and choose Replace. Update the Maximum Travel Time, then click the [Save] button.
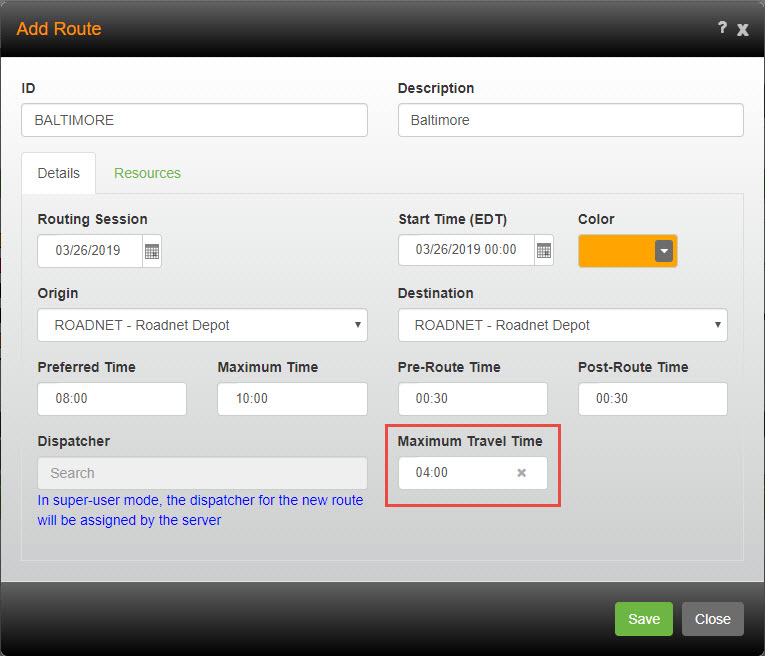
In Roadnet Anywhere Web
To set the maximum travel time for a route in FleetView, click on the Route Actions menu and choose Add Route, or select a route then select Edit Route from the Route Actions menu, while in a Routes view. The Route window opens. Enter the maximum travel time for the route in hh:mm. Click the [Save] button.
Setting the Max Travel Time for a Cell
If you use cells to create your routes, you can specify a max travel time for a cell, so that all routes created within the cell use that max travel time. To set the max travel time for a cell, right click on the cell in the Edit Cell Sets window and choose Edit; the Cells window opens. Enter the Max Travel Time and click the [Save] button.
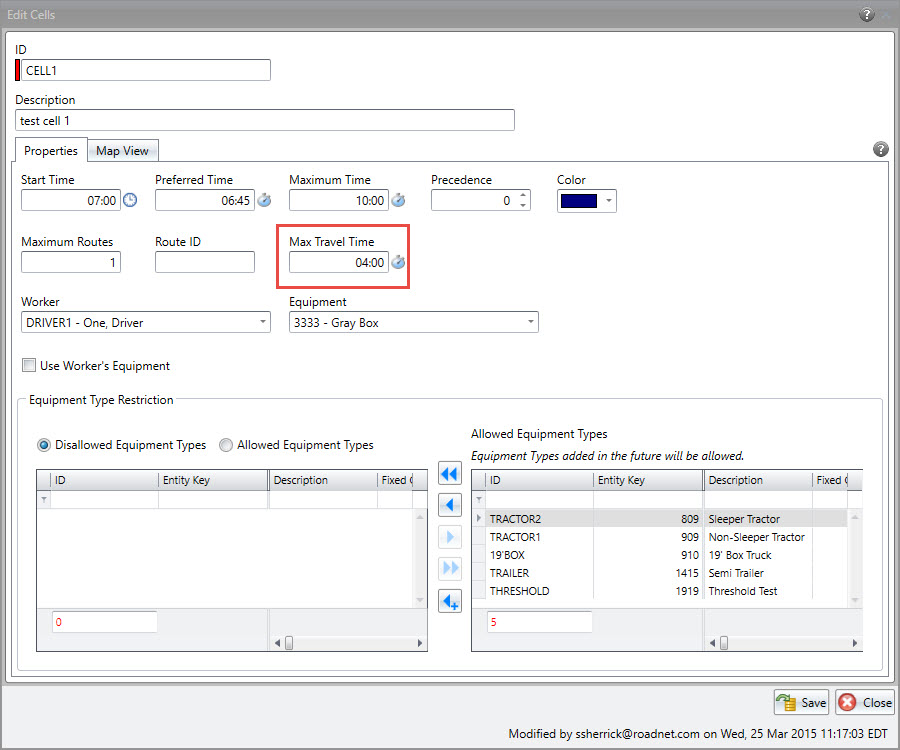
Note: You can also specify the Max Travel Time when creating cells from routes. Simply right-click on the route(s) you want to create cells from and choose Create Cells from Routes; the Create Cells from Routes window opens. Check Max Travel Time to have the newly created cell use the route's Max Travel Time for the cell.

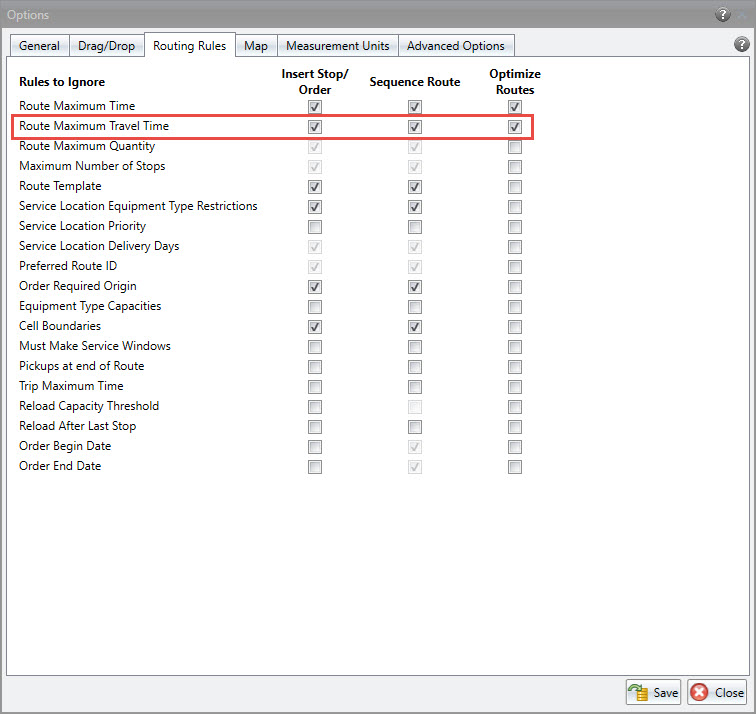
Setting the Routing Rules
You can choose to have Roadnet Anywhere ignore the max travel time when creating or editing routes. Click the Tools menu and scroll to Options; the Options window opens. Click the Routing Rules tab to open the Routing Rules page. Check the appropriate box to have the max travel time ignore when inserting a stop or order on a route, when sequencing routes, or when optimizing routes.
Considering Max Travel Time when Suggesting Routes
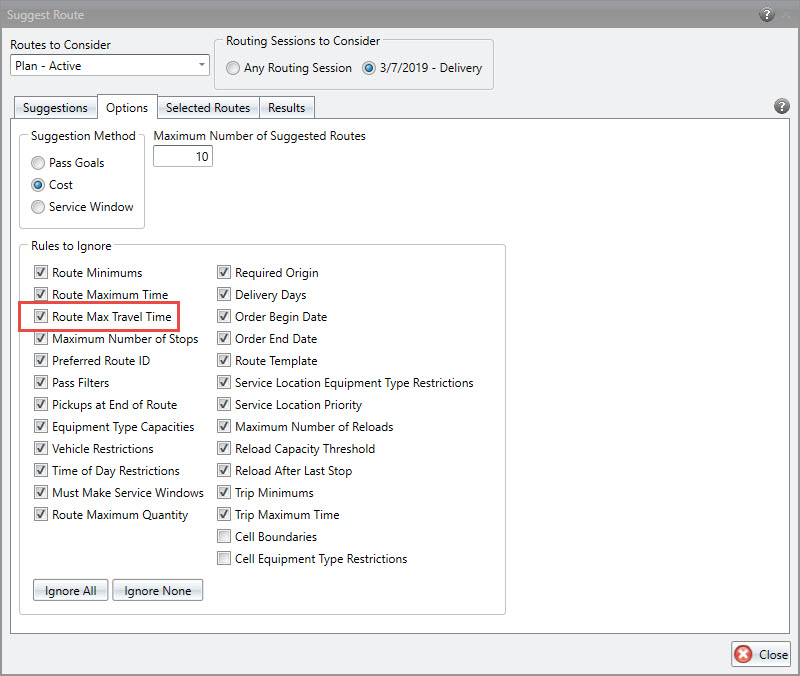
When you have Roadnet Anywhere suggest the best route to add a stop or order, you can choose to consider whether the suggested routes' max travel time should be ignored. If you choose to ignore a route's max travel time, adding the new stop to the route may exceed the route's defined travel time.
Right-click on the unassigned order or stop you want to add to a route and choose Suggest Route; the Suggest Route window opens. In the Rules to Ignore area, check Max Travel Time, then click the [Save] button. When Roadnet Anywhere considers routes to add the unassigned order/stop to, it will not exclude routes where adding the new stop may exceed the route's defined max travel time.
Selecting to Be Alerted when a Route Exceeds the Max Travel Time
You can choose to have an alert displayed in the Routes list when a route exceeds the defined max travel time.
To have an alert displayed when the route exceeds the max travel time, click on the Administration menu and choose Region; the REgion list opens. In the Regions list, click the Add icon, or click on a region and choose the Edit icon; the Region window opens. Click on the Alert Options tab to open the Alert Options page. In the Route Alerts box, scroll to Max Travel Time, and check the Enabled box. Click the [Save] button.

Routing Bikers and Walkers
There are situations where traditional delivery vehicles are not the best method to get product to your customer. For instance, if you are delivering in a crowded metropolitan area, it might be easier if your delivery people meet a truck somewhere, then use bicycles or walk to deliver to your customers. Now, you can specify an equipment type as an alternative delivery vehicle, which will use a different speed and may not follow normal road restrictions.
Some points about this feature:
- A new tab, Travel Rules, was added to the Equipment Type window. All Travel Rules, including the prohibitions for commercially restricted road, height/weight restricted roads, and time of day restrictions, have been moved to this tab.
- Alternative delivery vehicles will not use any of these road restrictions.
- Alternative delivery vehicles may be routed across bridges. If an alternative vehicle type is not allowed on a bridge, the map data must be edited.
- Routes to which an alternative delivery vehicle type is assigned will follow use these different considerations when the routes are created.
The first step in routing for bikers or walkers is to create an equipment type for them.
1. Click on the Maintenance menu and scroll to Equipment Types. The Equipment Types list opens.
2. Click on the Add icon to create a new equipment type. The Equipment Type window opens.
3. Enter an ID and any needed items on the Standard Properties page, such as cost and capacity information.
4. Click on the Travel Rules tab. The Travel Rules page opens.

5. Check Alternative Delivery Vehicle. A new Restrictions group appears.
Note: Alternative delivery vehicles can not use the prohibited options, such as Prohibited from Commercially Restricted Roads. They may be routed on commercially restricted roads.
6. In the Restrictions area, choose the appropriate options.
Fixed Travel Speed - the speed this type travels. This will be the speed used to determine the travel time.
Ignore one-way road restrictions - check to have Roadnet Anywhere ignore one way road restrictions. For instance, if the type is a walker who can walk on sidewalks, one-way road rules would not apply. Turn restrictions will be ignored if this is selected.
Avoid Interstates and Highways - check to have Roadnet Anywhere will attempt to avoid interstates when creating routes for this type.
Allowed to use walkways and passenger ferries - check to have Roadnet Anywhere include walkways and ferries when creating the routes. Selecting this option will allow the type to use paths, such as through a park.
7. Click the [Save] button.
Once the equipment type is set up, you need to assign it, or equipment using that type, to the routes that use bikers or walkers in order for Roadnet Anywhere to use these guidelines when creating routes.
Choosing Whether to Use Line Items to Calculate Order Sizes
If you use line items to detail what is on a customer's order, the total of all the line items is normally the total for the order. However, if your ERP system uses a different equivalency to place and track orders, you may end up with the wrong quantities on the equipment. Now, you can choose not to have the line items rolled up to provide the order quantity, allowing you to enter a separate order quantity that more accurately reflects what is actually on the equipment.
Notes: If you don't select Use Line Items to Calculate Order Sizes, you must enter order quantities as well to create accurate routes.
Existing Roadnet Anywhere customers will automatically have Use Line Items to Calculate Order Sizes selected; if you do not want the line items to calculate the order sizes, follow the directions below.
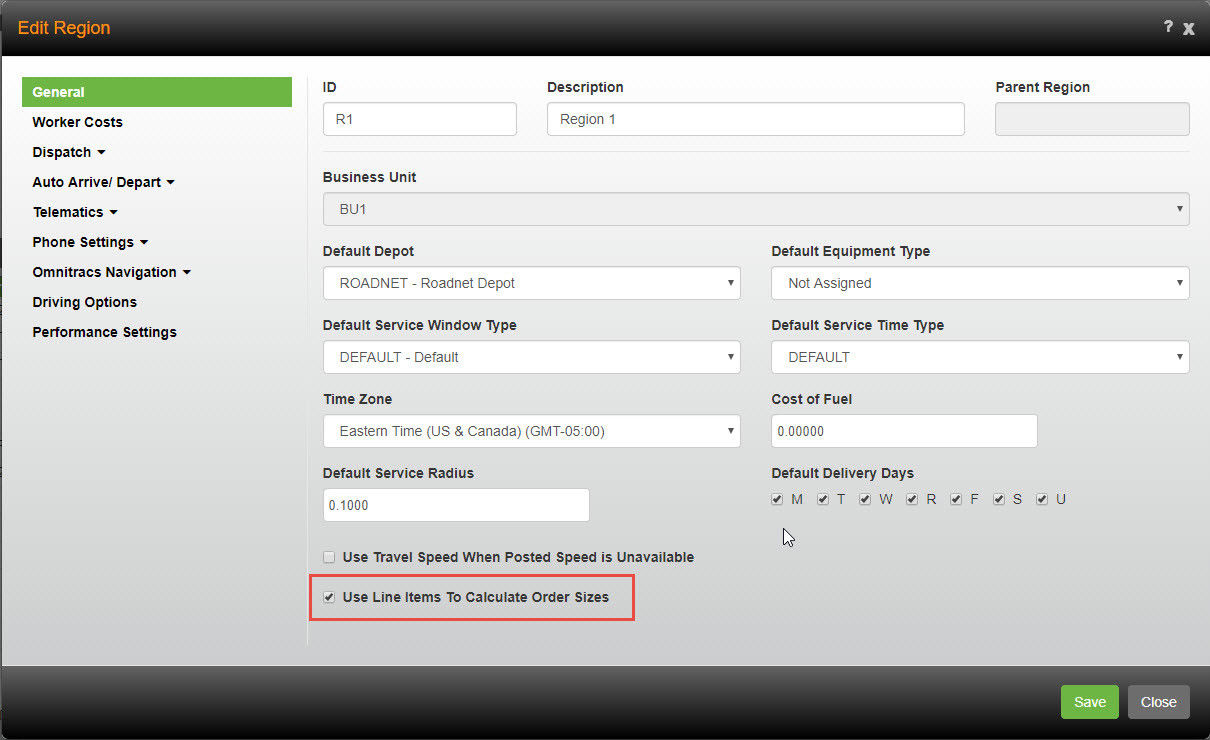
In Roadnet Anywhere Web:
1. Click on the Administration icon to open Administration.
2. Click the green button and scroll to Regions; the Region list opens. Click the [Add] button to add a new region, or the Edit icon to edit an existing region. The Region notebook opens.
3. On the General page, make sure Use Line Items to Calculate Order Sizes, then click the [Save] button.
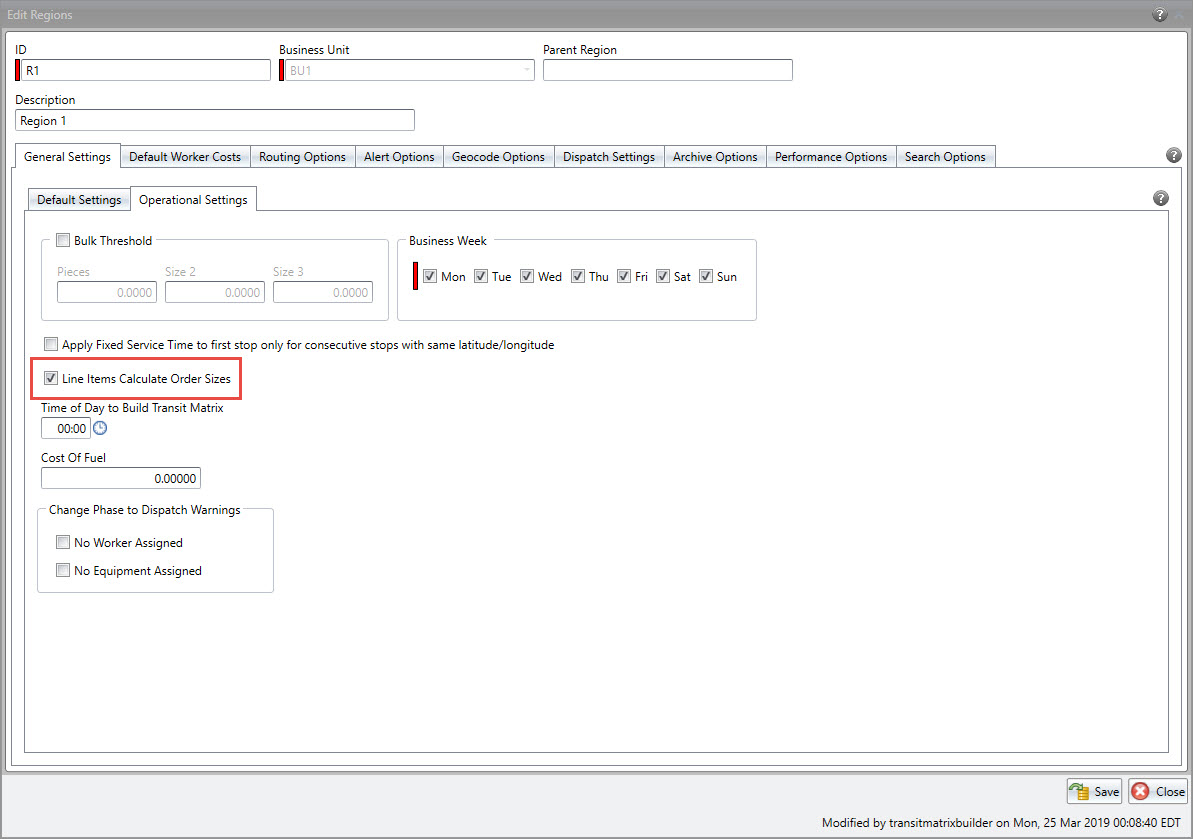
In Roadnet Anywhere Client:
1. Click on the Administration menu and scroll to Regions. The Regions list opens.
2. Click the Add icon to add a new region, or select a region and then the Edit icon to update an existing region. The Region notebook opens.
3. On the General - Operational Settings page. make sure Use Line Items to Calculate Order Sizes, then click the [Save] button.
Create Routes Enhancement
Found in Roadnet Anywhere Client
When Roadnet Anywhere creates routes, there are several guidelines that can be considered. One of these is Order End Date, or the last possible date when the customer can receive the order. The Create Routes process has been enhanced so that if an order's end date is the same as the routing session's date, the order is prioritized to be routed in that session, increasing the chances that the order will be delivered on time. There are a few factors that could prevent the order from being routed, including:
- The order exceeds the equipment's capacity
- The time to the stop exceeds the Max Time
- The option to Ignore Order End Date was selected when Create Routes was run.
Note: This enhancement only applies if Multi Day Routing is not enabled on the routing pass template.
Identifying the Current Driver
Found in Roadnet Anywhere Web and RDC Mobile
For Compliance customers who use co-drivers , it is very important that the dispatcher be able to quickly identify which of the two drivers is driving or on duty at any given moment. FleetView now gives you the ability to identify the on-duty worker just by looking at the Route Card in the Routes screens or the Equipment card in Overview. Both drivers will also appear on the mobile device.
Notes: This feature is only available for Compliance Customers.
Only drivers who were planned to be on the route will appear.
Viewing the On Duty Driver on the Route Card
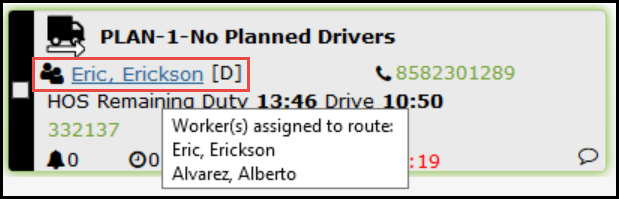
The name of the worker who is driving will appear on the route card. If you hover over the name, a tooltip will give you the name of the other driver in the vehicle. A two-person icon indicates that there is more than one driver.
Viewing the On Duty Driver in Overview.
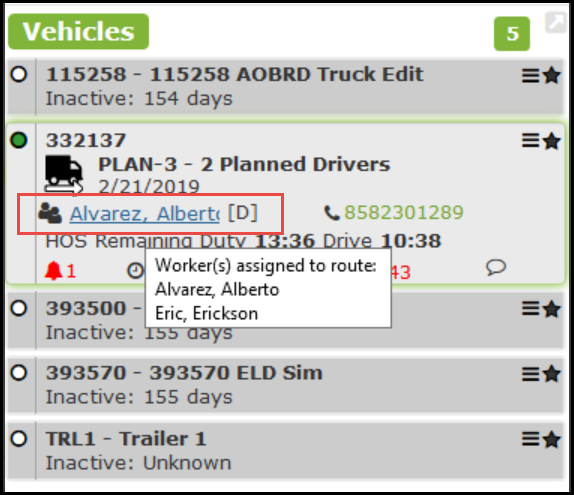
The name of the worker who is driving will appear on the route card. If you hover over the name, a tooltip will give you the name of the other driver in the vehicle. A two-person icon indicates that there is more than one driver.
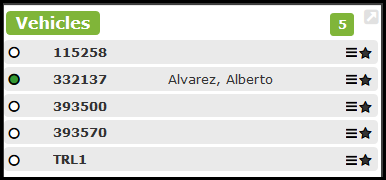
The name of the worker who is driving will also appear when the equipment cards are compacted.
Viewing the Worker in RDC Mobile Scheduling
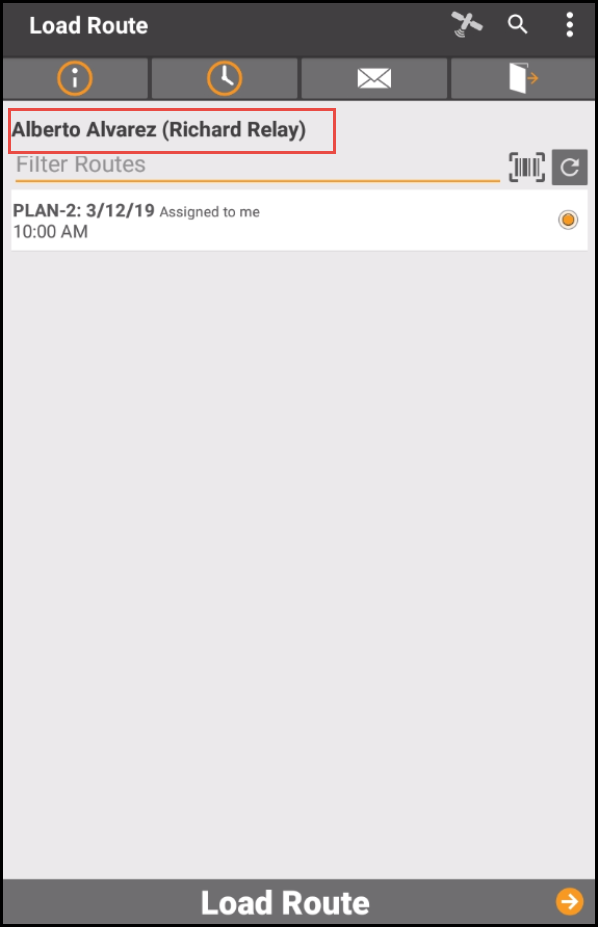
On the Android mobile device, when an additional worker logs into Hours of Service before the route/trip is loaded, both worker's names display in Scheduling at the top of the Load Route/Trip screen. If the additional worker logs in after the route is loaded, the worker's name is added to the route/trip and is only visible in Fleetview; it is not seen on the mobile device. The name of the worker that is driving or On-Duty displays first, while the co-driver name displays in parenthesis beside it.
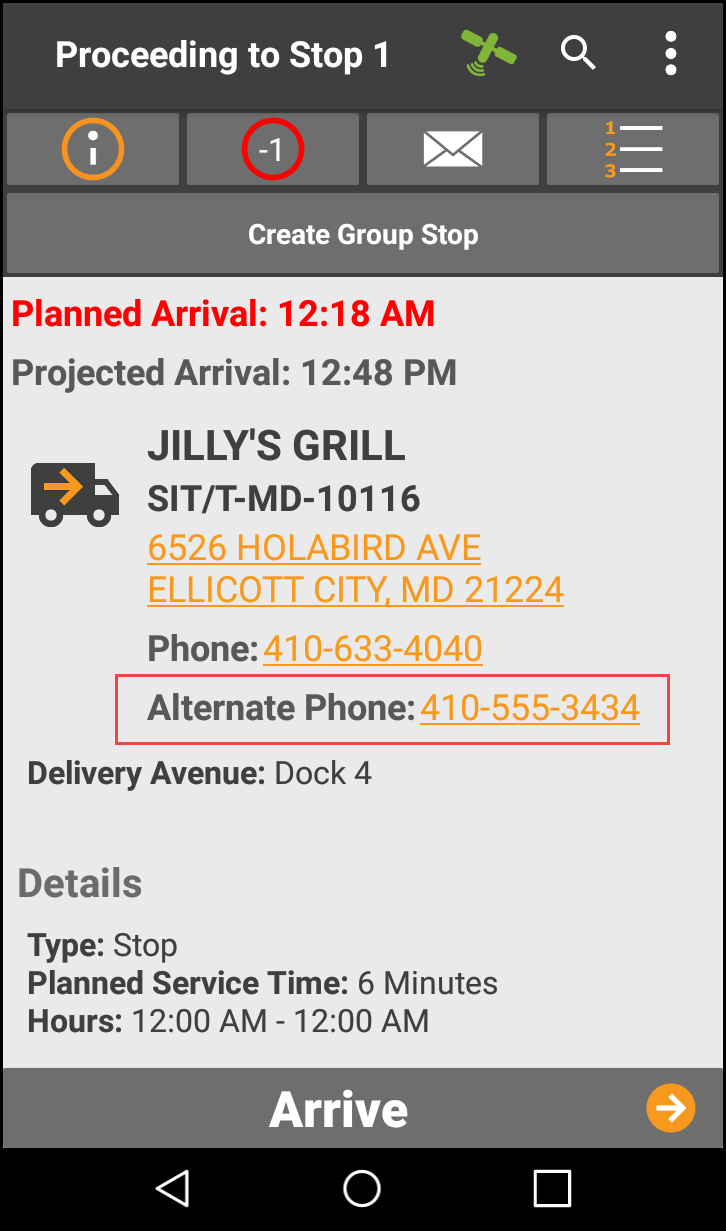
Using the Alternate Phone Number
Found in Roadnet Mobile for Android
Roadnet Mobile now displays a service location's alternate phone number, so that if the primary contact doesn't respond, the worker can simply click the Alternate Phone link to reach a secondary contact.
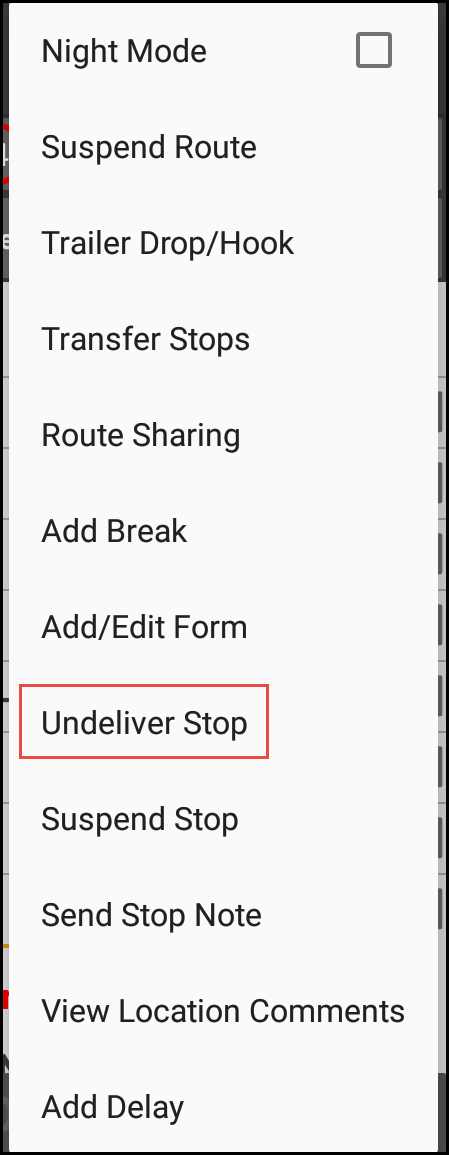
Automatically Marking Undelivered Stops For Redelivery
Found in Roadnet Mobile
There are times when a worker arrives a stop and then finds out that the delivery cannot be made. If the worker has permissions, the stop can be Undelivered. This lets the worker back out of the stop, without having to depart the stop without any delivery. When a stop is marked as undelivered, the worker is asked will the stop be visited later? If the worker answers Yes, the stop is marked as complete and undeliverable and a copy of the stop is added to the end of the route/trip for redelivery. If the worker answers No, the stop is marked as complete and undeliverable, and no copy of the stop is added to the end of the route/trip.
If you always want the worker to redeliver a stop that has been undelivered, you can now automatically have undelivered stops marked for redelivery. This not only removes the extra step for the worker on the mobile device, but ensures that the stop is always added back to the route, rather than left undelivered and marked as completed.
To set the region option in Roadnet Anywhere Web:
1. Go to Administration, then click the green button and scroll to Region.
2. Click the [Add] button or the ![]() Edit icon for the region with which you want to work. The Add/Edit Region window opens.
Edit icon for the region with which you want to work. The Add/Edit Region window opens.

3. Click on Phone Settings, and then the Smart Phone - Allowed Worker Actions tab.
4. Check Always Redeliver Undelivered Stops.
Note: Undeliver Stops must be checked for this option to be available.
5. Click the [Save] button.
To set the region option in Roadnet Anywhere Client:
1. Click on the Administration menu and select Regions.
2. To add a new region, click the ![]() Add icon.
Add icon.

To edit an existing region, double-click on the appropriate region.
3. Click on Dispatch Settings, and then click on the Smart Phone tab.
4. Check Always Redeliver Undelivered Stops.
Note: Undeliver Stops must be checked for this option to be available.
5. Click the [Save] button.
Undelivering Stops on the Mobile Device
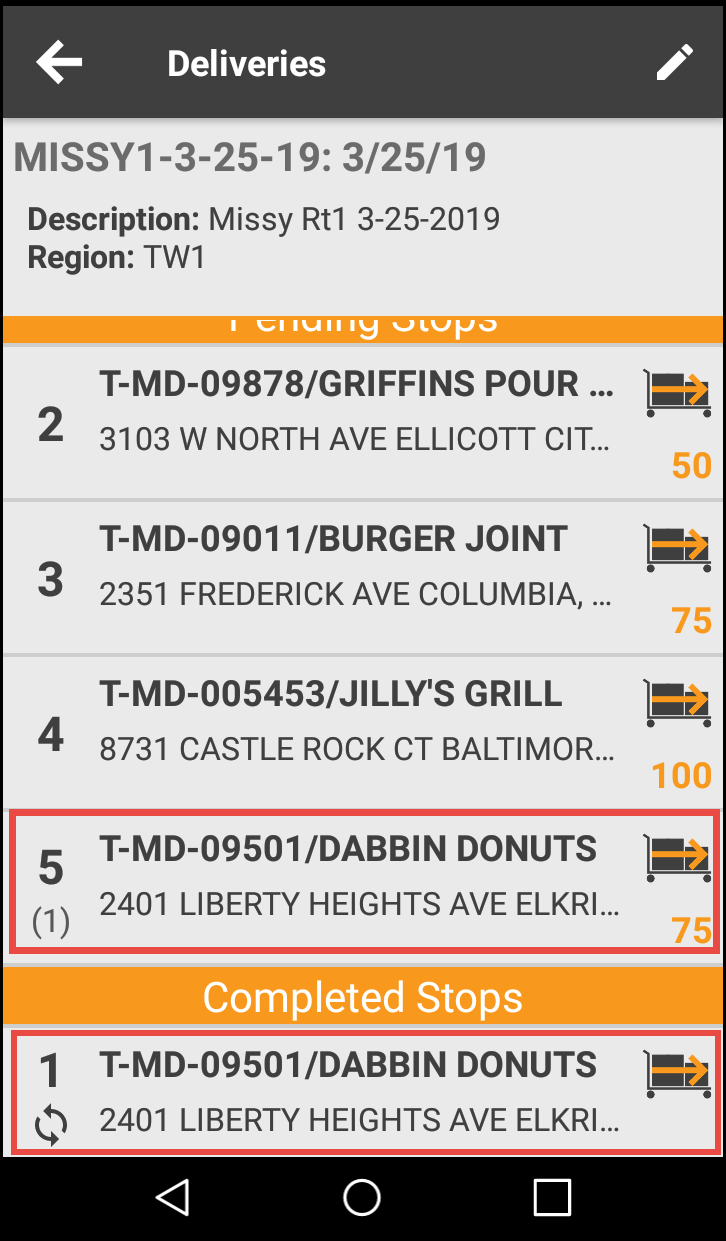
When the option is set and the worker chooses to undeliver an arrived stop, Roadnet Mobile automatically completes the arrived stop and creates a copy that is marked for redelivery.
When the worker looks at the Stops list, the arrived stop is in the Completed section and the redelivered stop is added as the last stop on the route under Pending. The redelivery is marked with the stop number of the original stop.
Note: If the worker has permission, the route/trip can be resequenced and the redelivery placed in a more appropriate spot.
Roadnet Mobile automatically updates the route/trip to In Progress and displays information for the next stop.
Assigning Reason Codes to Cancelled Orders
Found in Roadnet Mobile
If you allow your workers to cancel orders, you may wonder why it was cancelled. It is possible that the worker will send you a message with details or you can reach out to the worker, but when this doesn't happen, you are left without an explanation.
Now, you can add reason codes for cancelled orders and when the worker cancels an order on the mobile device, a code must be chosen before the order is cancelled.
Note: If order cancel reason codes exist, the worker is required to choose a reason code when cancelling an order on the mobile device.
When an order is cancelled, you can see the reason code in Roadnet Anywhere Web in Order Status and when you are viewing order details on the route details window in Fleetview. In Roadnet Anywhere Client, they are found on the Route Dispatching window, when you are viewing order details. Roadnet Mobile Manager shows them on the Cancelled Orders tab.

To create Order Cancel Reason Codes in Roadnet Anywhere Web:
1. Go to Maintenance, then click the green button and scroll to Order Cancel Reason Codes.
2. Click the [Add] button. The Add Order Cancel Reason Code window opens.

3. Enter a Code for the order cancel reason code. You must enter a Code.
4. Enter a Description for the order cancel reason code.
5. Click the [Save] button.
6. Repeat Steps 3 - 5 for any additional order cancel reason codes to be added to the list.
7. When you are finished, click the [Close] button to close the window.
To create Order Cancel Reason Codes in Roadnet Anywhere Client:
1. Click the Dispatching menu and select Order Cancel Reason Codes, or click the ![]() Order Cancel Reason Codes icon. The Order Cancel Reason Codes list opens.
Order Cancel Reason Codes icon. The Order Cancel Reason Codes list opens.

2. Click the New item icon. The Add Order Cancel Reason Codes window opens.

3. Enter the Code and Description for the order cancel reason code.
4. Click the [Save] button to save the changes.
5. Repeat Steps 3 and 4 for any additional order cancel reason codes to be added to the list.
6. Click the [Close] button to close the window.
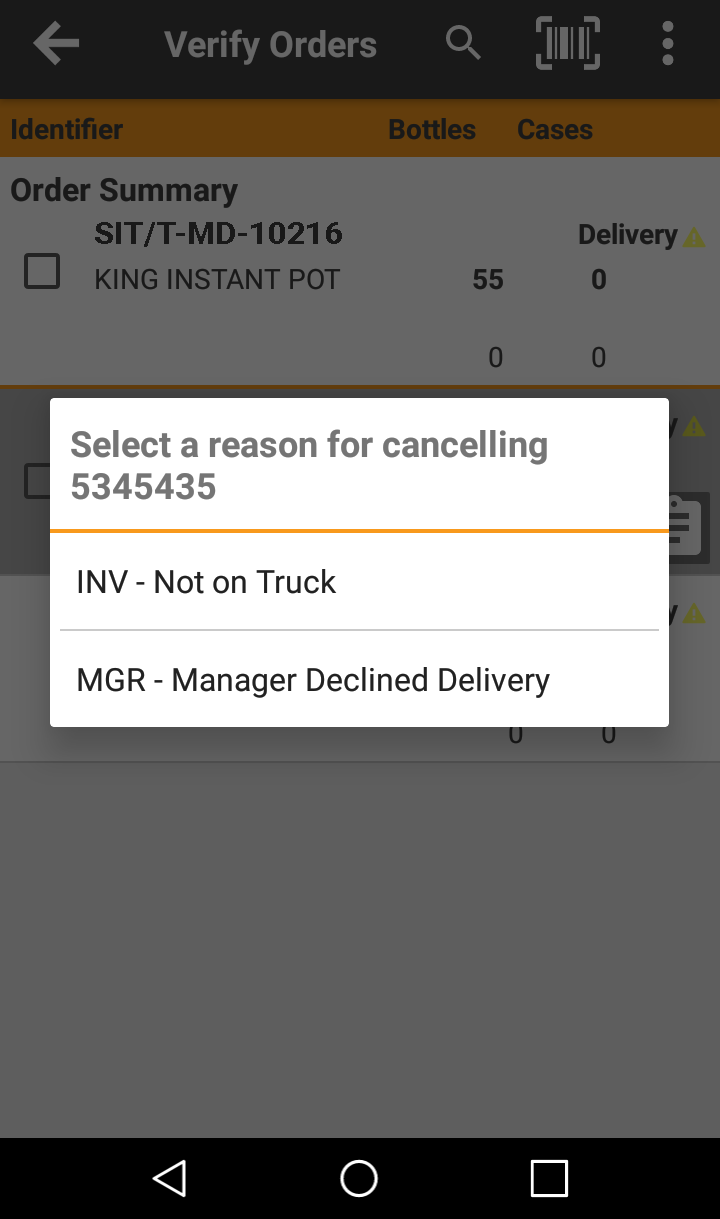
Assigning Reason Codes on the Mobile Device
On the mobile device, if a worker cancels an order and reason codes have been added in Roadnet Anywhere, the order cancel reason code list displays. The worker must choose a reason code from the list of available codes before the order will be cancelled.
Custom Property Enhancements on the Mobile Device
Found in Roadnet Mobile for Android
You can use custom properties on the mobile device to give your workers specific information that you think they need.
Route custom properties can display information to the worker about things that are related to the specific route the worker is running, while order properties carry information about the order that is being delivered or picked up.
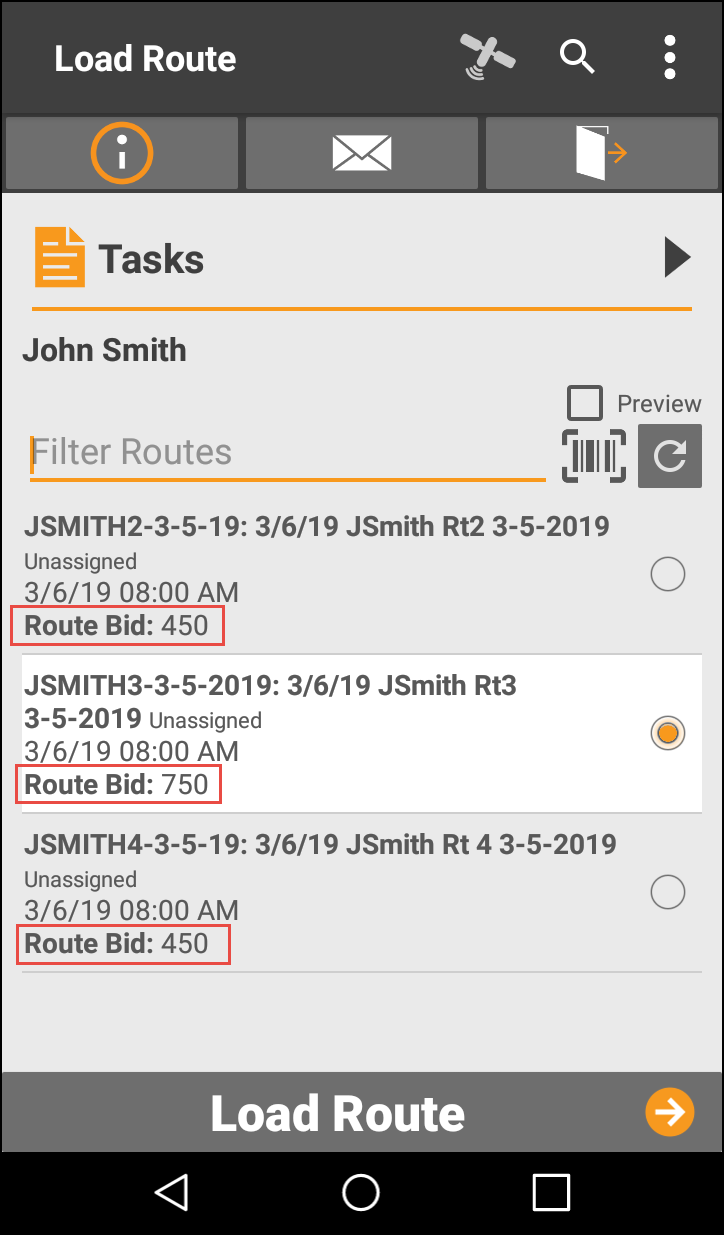
In the past, route custom properties were only seen after the worker had selected the route. Now, a single route custom property can be seen by the worker as part of the route information provided for routes in the select route list on the Load Route screen. For instance, if you want to label the route by which part of town it is in or you want to show the pay for a tendered route, the worker can see the information while viewing the list of available routes to select.
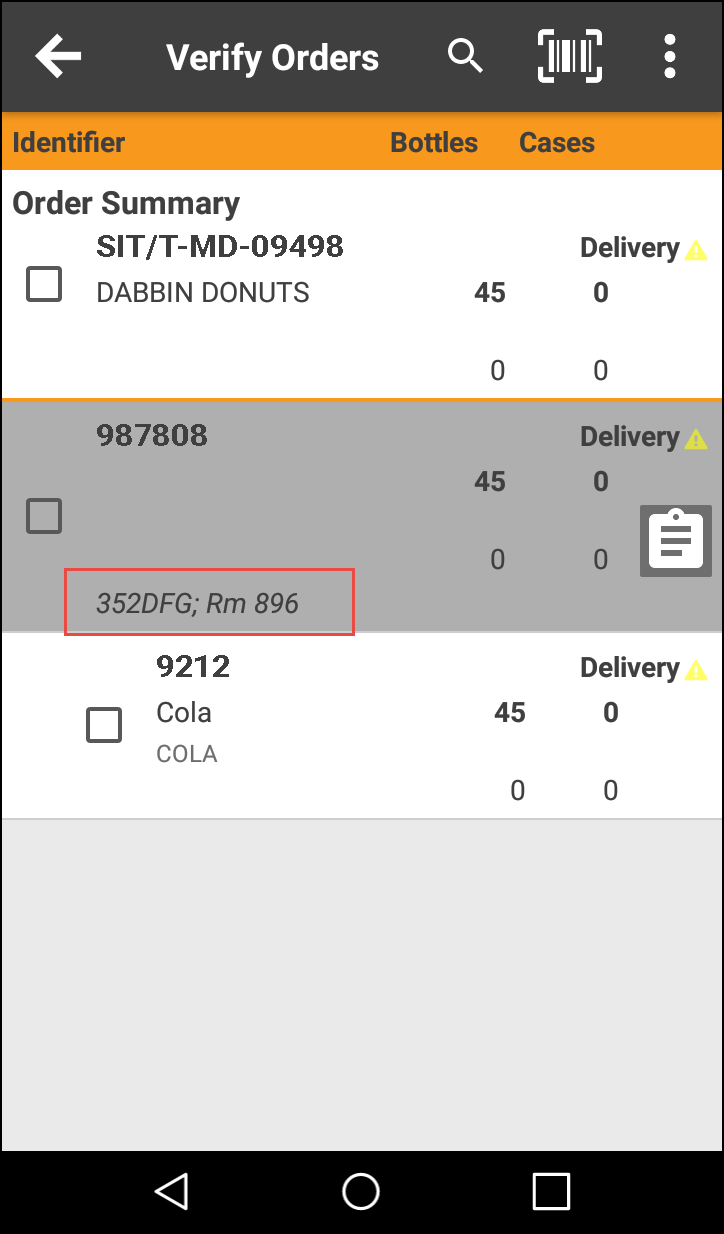
Currently, order custom properties are shown on the order detail screen. So that the worker can see the information without drilling into the order, Roadnet Mobile has been enhanced to show order custom properties on the Verify Orders screen. For example, order custom properties can be used to state which room to pick up an order from or to share the lock code for a lock box. The worker can now simply view the Verify Orders screen to see which orders are delivered to rooms that are close to each other.
Before a worker can see the route custom property on the Load Route screen and the order custom properties on the Verify Orders screen, you must turn on the options in Omnitracs Roadnet Anywhere.
To show custom properties on the mobile device Roadnet Anywhere Web:
1: Click on the Administration icon to open ![]() Administration.
Administration.
2: Click the green button and scroll to Region. The Region list opens.
3: Click the [Add] button or highlight a region and choose the ![]() Edit icon. The Add/Edit Regions window opens.
Edit icon. The Add/Edit Regions window opens.
4: Click the Phone Settings option.
5: Click the Smart Phone - Custom tab.
6: To let the worker see a route custom property on the Load Route screen, in the first Route custom property field, click the arrow and choose the route custom property you want the worker to see, and then check Show on Load Routes.

7: To let the worker see up to three order custom properties on the Verify Orders screen, in the first three order custom property fields, click the arrows and choose the order custom properties you want the worker to see, and then check Show on Verify Orders.
8: Complete all other information and changes as necessary.
9: Click the [Save] button to save your changes.
To show custom properties on the mobile device Roadnet Anywhere Client:
1: From the Administration menu, choose Regions. The Regions window opens.
2: Choose the ![]() Add icon or highlight a region and choose the Edit icon. The Regions window opens.
Add icon or highlight a region and choose the Edit icon. The Regions window opens.
3: Click the Dispatch Settings page.
4: Click the Smart Phone tab.
5: To let the worker see a route custom property on the Load Route screen, in the first Route custom property field, click the arrow and choose the route custom property you want the worker to see, and then check Show on Load Routes.

6: To let the worker see up to three order custom properties on the Verify Orders screen, in the first three order custom property fields, click the arrows and choose the order custom properties you want the worker to see, and then check Show on Verify Orders.

7: Complete all other information and changes as necessary.
8: Click [Save].
Viewing Custom Property Enhancements on the Mobile Device
Once the region options are enabled, the worker will see the route custom property as part of the route information provided to the worker when selecting an available route.
When viewing order custom properties, the worker no longer needs to drill into order details. The chosen order custom properties display on the Verify Orders screen on the mobile device.
Displaying Dead Head Miles
Found in Roadnet Mobile for Android
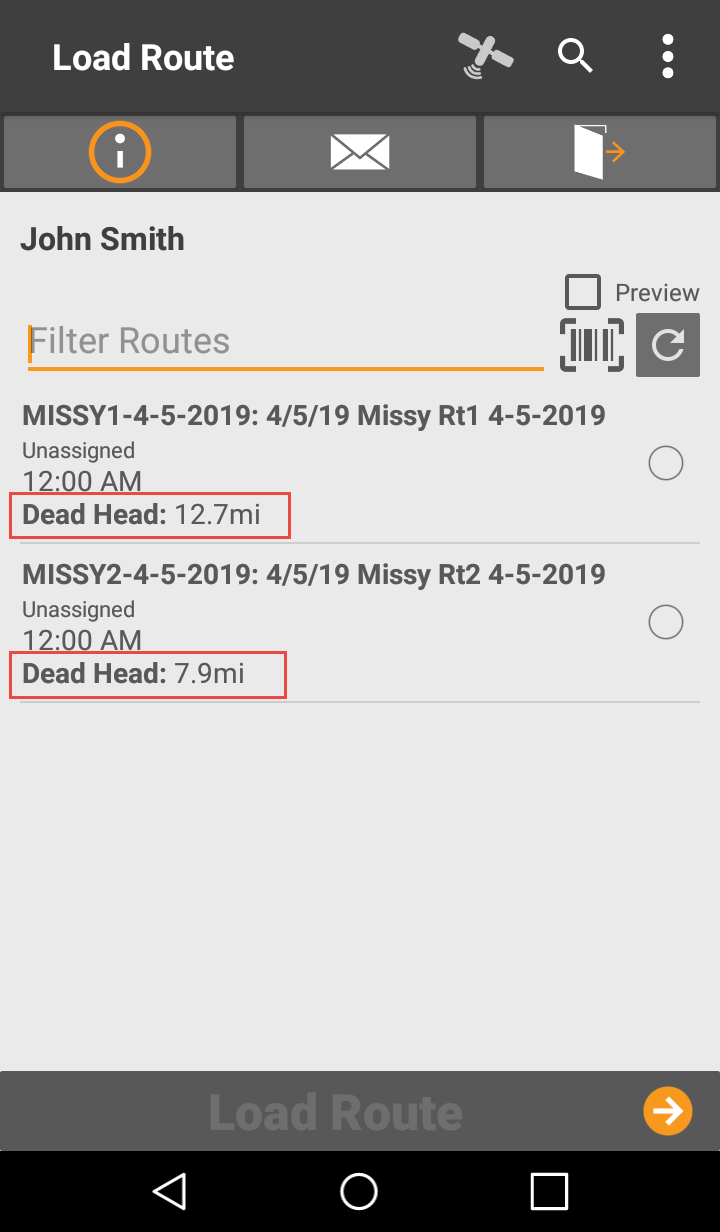
Dead head miles are the number of miles between a route's first stop and the worker's current position or the current route's destination. This information can help the worker make an informed decision as to whether to accept or decline an offered route. The worker can base a decision on the miles that must be traveled to the first stop on a route, from where the worker currently is located or where the current route ends.
To show dead head miles, the route cannot have a starting origin assigned. When adding a route in Roadnet Anywhere Web, you can choose First Stop as Origin or Create Unplanned Origin When Route is Loaded as the Origin setting and dead head miles will display on the mobile device.
If the worker is not running a route and previews an available route or views a tendered route, the worker's current position is used to calculate the dead head miles. If the worker is running a route, the final destination of the current route is used to calculate the dead head miles.
The worker can see dead head miles on the Load Route screen along with other route information for available routes, when previewing an available route, or when on the Accept/Decline screen when viewing a tendered route.
Requiring A New Signature If Quantities Change
Found in Roadnet Mobile Android
If your worker collects a signature at a stop, and then makes a change to the quantities that were delivered, the customer may refuse to pay because the invoice quantities are different. You can now require that if any quantities change, including over, short, and damaged, after the customer signs for an order, line item, or stop, Roadnet Mobile removes the original signature and prompts the worker to collect a new signature before the stop can be departed.
To clear a signature if quantities change for an order or line item in Roadnet Anywhere Web:
1. Go to Administration, then click the green button and scroll to Region.
2. Click the [Add] button or the ![]() Edit icon for the region with which you want to work. The Add/Edit Region window opens.
Edit icon for the region with which you want to work. The Add/Edit Region window opens.
3. Click on Phone Settings, and then the Smart Phone - General tab. The Smart Phone - General page opens.
4. Check Remove Signature If Modifications Are Made.

5. Click the [Save] button.
To clear a signature if quantities change for an order or line item in Roadnet Anywhere Client:
1. Click on the Administration menu and select Regions.
2. To add a new region, click the ![]() Add icon.
Add icon.
To edit an existing region, double-click on the appropriate region.
3. Click on Dispatch Settings, and then click on the Smart Phone tab. The Smart Phone tab displays.
4. Check Remove Signature If Modifications Are Made.
5. Click the [Save] button.
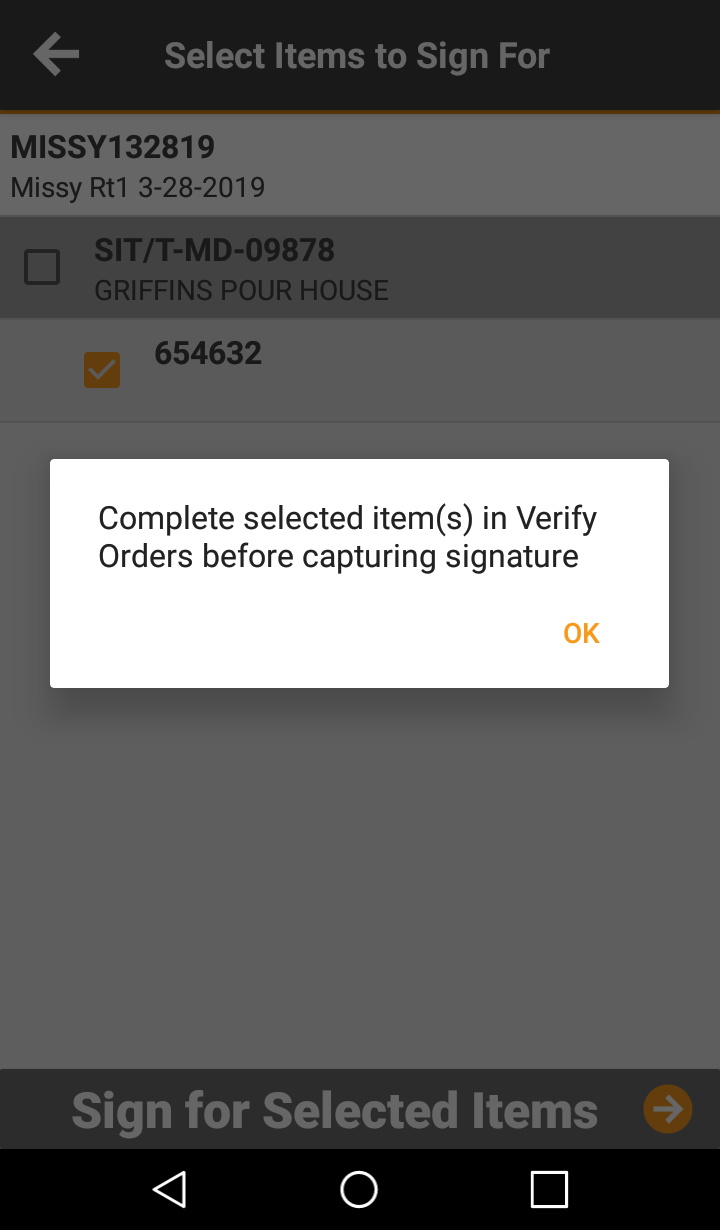
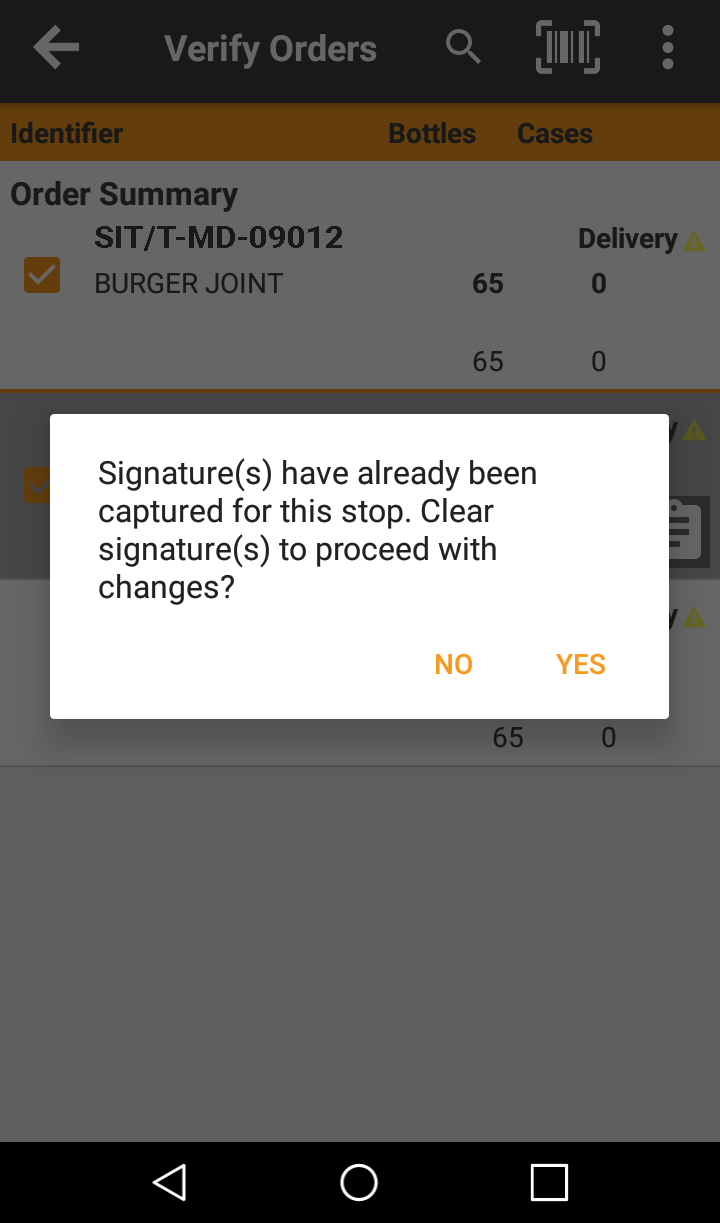
On the mobile device, workers will see new prompts that encourage proper work flow. The prompts tell them to collect a signature after orders have been verified or to confirm that the signature will be cleared if the worker modifies any quantity, including over, short, or damaged, or adds a new order or line item. A new signature must be collected before the worker can depart the stop.
Separating the Add Orders and Line Items Region Setting
Found in Roadnet Anywhere
Currently, when you allow workers to add line items to an order on the mobile device, they actually have the ability to add both orders and line items to the stop, even when you really only want them to be able to add line items to existing orders. This is because the region option that permits workers to add orders and line items enables both options with a single setting.
So that you can better control what workers are able to add to a stop on the mobile device, the option that allows workers to add orders and line items has been split into two settings, Add Orders and Add Line Items. Now you can limit your workers to only adding orders or only adding line items to stops on the mobile device. Of course, if you want them to be able to add both, simply enable both region settings.
Note: If you currently have the Add Orders and Line items option in Roadnet Anywhere Web or the Allow Worker to Add Orders and Line Items option in Roadnet Anywhere Client enabled, both the new options, Add Orders and Add Line Items, default to checked.
To turn off Add Orders or Add Line items in Roadnet Anywhere Web:
1. Go to Administration, then click the green button and scroll to Region.
2. Click the [Add] button or the ![]() Edit icon for the region with which you want to work. The Add/Edit Region window opens.
Edit icon for the region with which you want to work. The Add/Edit Region window opens.
3. Click on the Phone Settings - Smart Phone - Allowed Worker Actions tab.
4. Remove the check from the option you want to turn off, Add Orders or Add Line Items.

5. Click the [Save] button.
To turn off Add Orders or Add Line items in Roadnet Anywhere Client:
1. Click on the Administration menu and select Regions.
2. To add a new region, click the ![]() Add icon.
Add icon.
To edit an existing region, double-click on the appropriate region.
3. Click on Dispatch Settings, and then click on the Smart Phone tab.

4. Remove the check from the option you want to turn off, Add Orders or Add Line Items.
5. Click the [Save] button.
On the mobile device, the option to Add Orders or Add Line Items will no longer be available in the list that pops up when the worker presses Menu.
Offering Routes to Workers
Found in Roadnet Mobile for Android
Offering routes to workers just got quicker and getting a worker response just got easier.
If you tender routes to workers, you will find the new Route Tendering feature in Roadnet Anywhere Web and Roadnet Mobile Android very helpful. This new functionality lets you offer routes to multiple workers. Workers then review them and accept or decline them on their mobile device.
After your routes are created, you can use the Route Tender route action to offer a route to multiple workers. You can offer more than one route to the same worker and a worker can accept multiple routes.
Route custom properties can be used to send information about the route to the worker. A single route custom property shows with the route on the Load Route screen and up to six route custom properties can show on the Accept/Decline screen when the worker reviews the offered route.
When you offer a route to the worker, the route displays on the mobile device tagged with Tendered to me. The worker reviews the route and chooses to Accept or Decline the route. If the worker declines the route and there are reason codes for route tendering, a code must be chosen before the worker can proceed. The worker can accept or decline offered routes from the Load Route, In Progress, At Stop, and Depart Route screens.
A route is assigned to the first worker that accepts it. Once the route is accepted, the worker's name displays with that route in Roadnet Anywhere. If a route is accepted and it was offered to more than one worker, the other workers receive a notification that the route was withdrawn.
To make it easier to see which routes have been tendered, accepted, or declined, you can filter your routes by the Tender State in Roadnet Anywhere Web on the Routes Grid view.
There are many pieces to this new functionality. To use it to the fullest, follow the instructions below.
Enabling Route Tendering
The first thing that you need to do to be able to offer routes to your workers is to turn it on.
To be able to offer specific routes to workers in Roadnet Anywhere Web:
1. Go to Administration, then click the green button and scroll to Region.
2. Click the [Add] button or the ![]() Edit icon for the region with which you want to work. The Add/Edit Region window opens.
Edit icon for the region with which you want to work. The Add/Edit Region window opens.
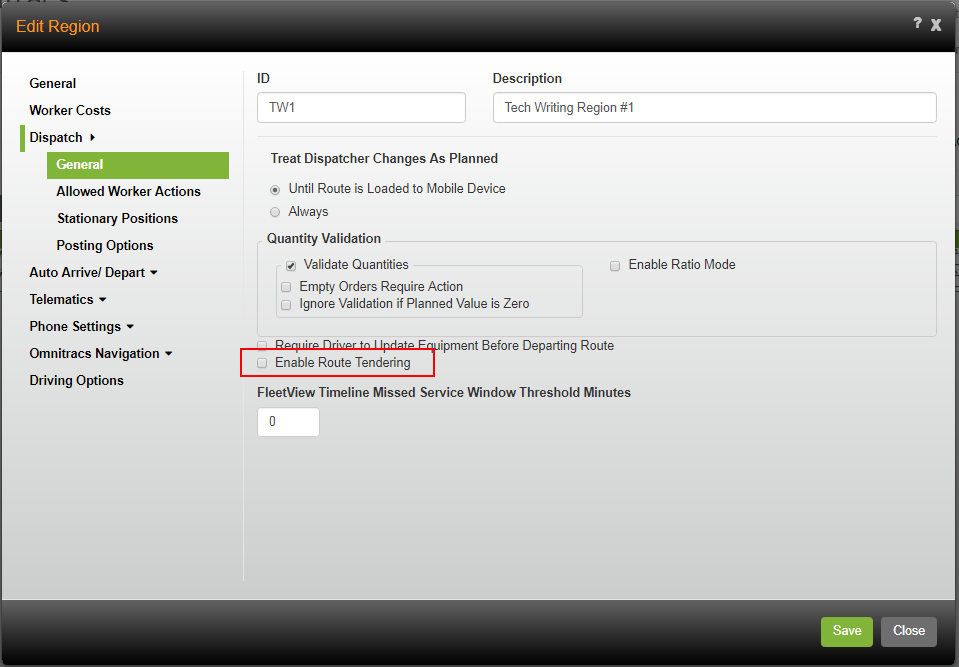
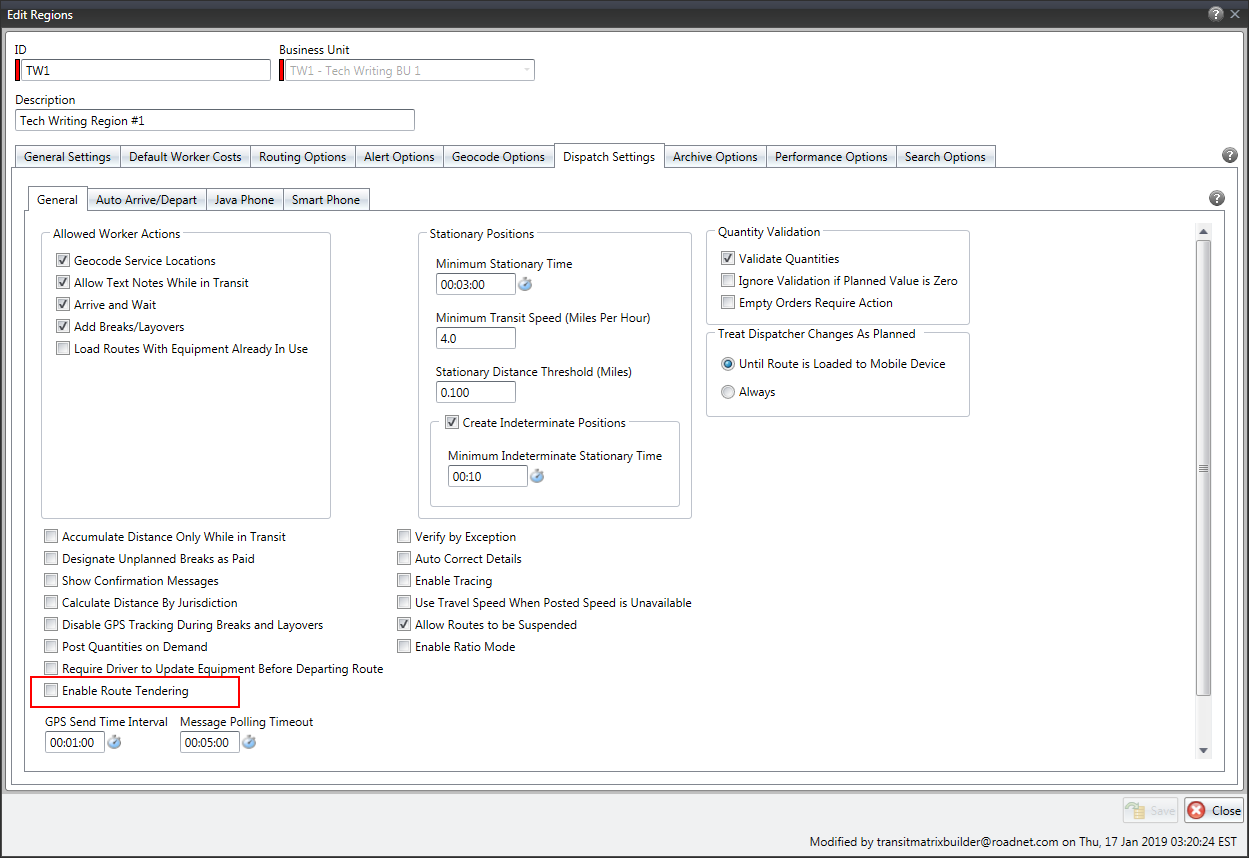
3. Click on the Dispatch - General tab.
4. Check Enable Route Tendering.
Note: When Enable Route Tendering is checked, the region options Select Route, Exclude Unassigned Routes, and Exclude Routes Assigned to Other Workers are automatically enabled, even if the boxes are not checked on the Phone Settings - Smart Phone - Allowed Worker Actions page.
5. Click the [Save] button.
To be able to offer specific routes to workers in Roadnet Anywhere Client:
1. Click on the Administration menu and select Regions.
2. To add a new region, click the ![]() Add icon.
Add icon.
To edit an existing region, double-click on the appropriate region.
3. Click on Dispatch Settings, and then click on the General tab.
4. Check Enable Route Tendering.
Note: When Enable Route Tendering is checked, Allow Worker to Select Route, Exclude Unassigned Routes, and Exclude Routes Assigned to Other Workers are automatically enabled, even if the boxes are not checked on the Dispatching - Smart Phone page.
5. Click the [Save] button.
Setting Up Route Tender Reason Codes
Route tender reason codes are used to explain why a tendered route was declined by the worker, such as the deadhead miles were too great or the timing of the route wasn't good. They are added in Roadnet Anywhere and sent to Roadnet Mobile. If a worker declines a tendered route and reason codes are available, they must pick the reason it was declined from a list.
Note: If route tender reason codes are available, the worker must choose a code when declining a route.
To add a Route Tender Reason Code in Roadnet Anywhere Web:
1. Click Maintenance.
2. Click the green button and scroll to Route Tender Reason Codes. The Route Tender Reason Codes list opens.
3. Click the Add button.
4. Enter a Code for the route tender reason code. You must enter a Code and each code must be unique.

5. Enter a Description for the route tender reason code.
6. Click the [Save] button.
To add a Route Tender Reason Code in Roadnet Anywhere Client:
1. Click the Dispatching menu.
2. Select Route Tender Reason Codes, or click the Route Tender Reason Codes icon. The Route Tender Reason Codes list opens.
3. Click the Add button.
4. Enter a Code for the route tender reason code. You must enter a Code and each code must be unique.

5. Enter a Description for the route tender reason code.
6. Click the [Save] button.
Offering Routes in Fleetview
Once you have enabled Route Tendering and your orders have been created, you can offer routes to workers from within Fleetview.
1. In Fleetview, while viewing routes in Card, Grid, or Map Routes view, choose one or more routes by checking the box for each route you want to offer to workers.
Note: You can also choose a route by viewing its route details.
2. Click the Route Actions arrow and choose Tender Routes from the list that pops up. The Tender Routes window displays.
3. In the Routes column, click on a route you want to offer. The route that is selected displays with a circle around it. Only one route can be tendered at a time.
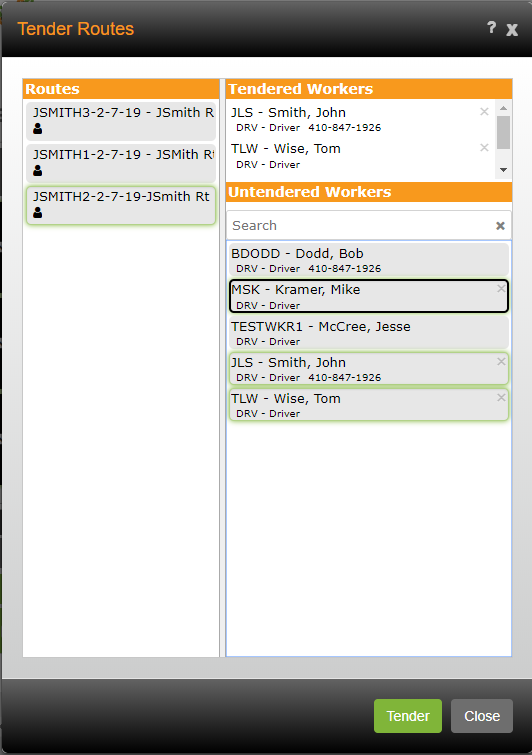
4. Choose the Untendered Workers that you want to offer the route to. The workers appears in the Tendered Workers area.
To choose a worker to offer the route to, click on the worker in the Untendered Workers list. The worker's name appears in the Tendered Workers area. You can offer a route to as many workers as you want. The first worker to respond yes to the offer is assigned to the route.
To remove a worker from the Tendered Workers list, click the X next to the worker's name in the Tendered Workers area.
Note:If you have a large list of workers, you can search to limit the list. As you type in the search field, the displayed list is filtered to only show items that start with the characters you typed. Roadnet Anywhere will use all the pertinent fields when searching. For instance, if you type SMI in the search field, all workers that have SMI in the ID, Worker name, or Worker Type fields will remain in the list. This can help you find that one worker that you want to work with.
5. Click [Tender]. A message appears in the window to confirm that your offers were successful.
Warning: Make sure to click [Tender] before moving to another route. If you select another route without first clicking [Tender], your offers will not take effect.
6. Repeat Steps 3 – 5 to offer other routes.
7. Click [Close] when finished.
Managing Offered Routes on the Mobile Device
Once you are done tendering your routes in Fleetview, they are sent to the workers to which they were offered. When those workers log into Roadnet Mobile or while they are running another route, they have the ability to accept or decline the tendered routes.
If the worker has just logged into Roadnet Mobile, on the Load Route screen the worker is presented with routes that are offered. The worker selects one and then chooses Accept/Decline.

The offered route is displayed on the Accept/Decline Routes screen for the worker to review. Information about the route, such as the Planned Start, Dead Head miles, and route custom properties, is presented to the worker. As well, the stops and the pick up and delivery quantities on the route display. The worker can choose to decline or accept the route. If the worker declines the route and there are route tender reason codes available, a reason for declining the route must be chosen before the worker can proceed. If there are no route tender reason codes available, the worker is taken directly back to the Load Route screen. The declined route is placed in the Declined section of the screen.
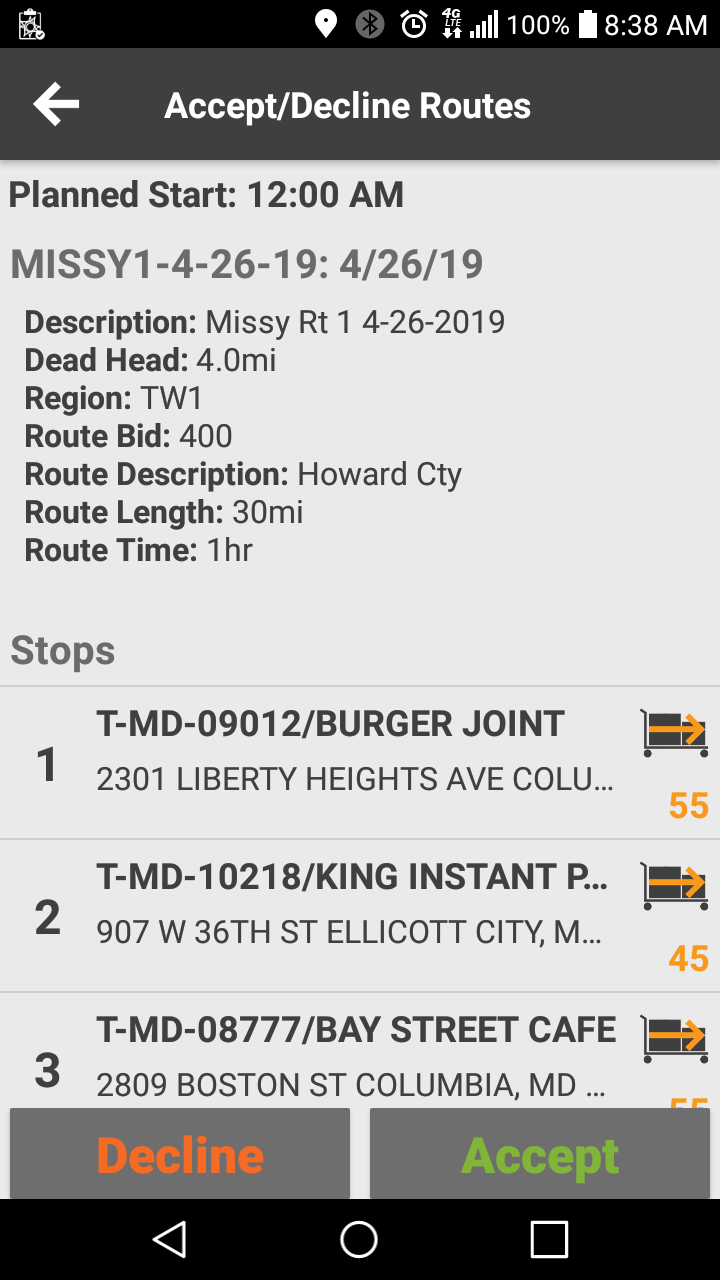

If the worker accepts the route, it is placed in the Accepted section of the Load Route screen. The worker can continue to preview and accept or decline other offered routes or select the accepted route and load it.
If more than one worker is offered a route and the route is accepted by another worker, all others that were offered that same route receive a notification that the route has been withdrawn.
The first worker who accepts the route is assigned to it.

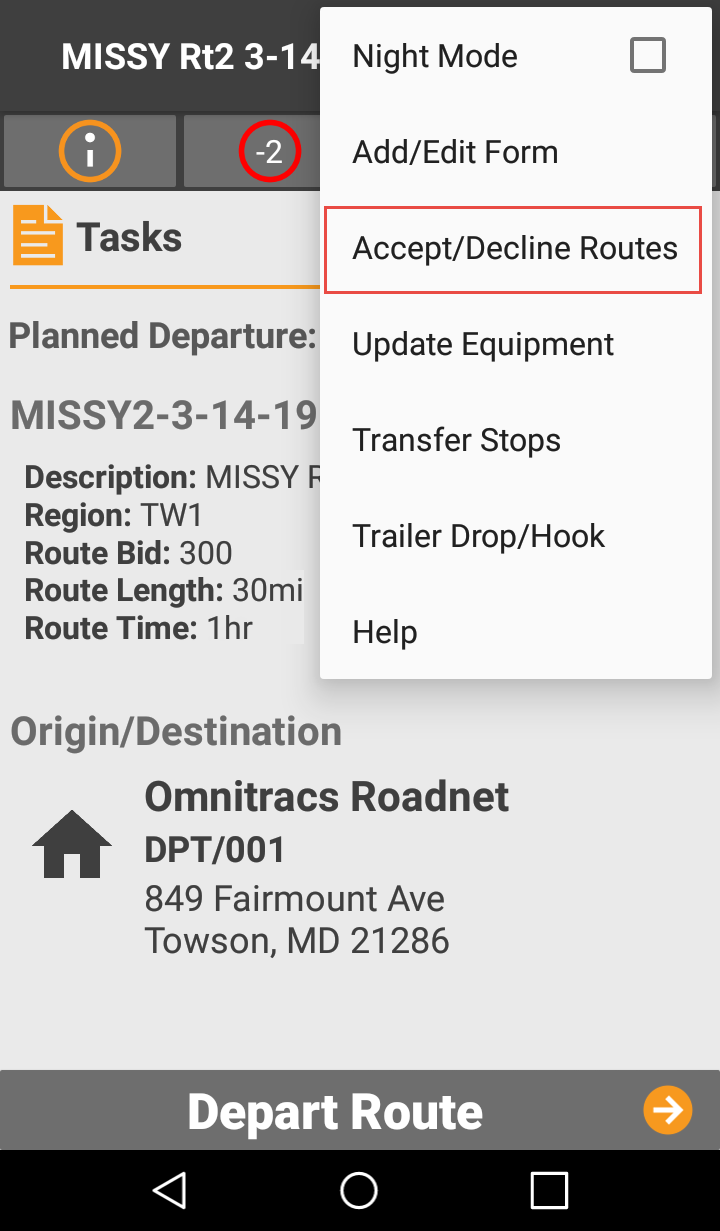
Workers can also accept routes while they are running another route. A notification is sent to the Inbox that a route has been tendered to the worker. From the In Progress, At Stop, and Depart Route screens, the worker can press Menu and choose Accept/Decline Routes from the list that pops up. The Accept/Decline screen displays and the worker can review the offered routes and mark them as Accept or Decline.
Enhancing Roadnet Anywhere Tracking
Found in Roadnet Anywhere Tracking Android
Currently, features are very limited in Roadnet Anywhere Tracking. Workers log into the mobile application and are able to press Start Day and End Day. They can also add a break while running the route.
Now, with the enhancements to Roadnet Anywhere Tracking, workers can do much more. All workers will see changes like sending and receiving messages, managing locations, and finding a nearby gas station. Given the proper permission, they can even choose their next stop from a list of locations.
Notes: If you want the worker to have the ability to pick a service location, you must check the Allow Tracking Worker to Add Stops region setting.
If you check Allow Tracking Worker to Add Stops, the worker must choose a location to service and manually arrive and depart that stop on the route. If you also check Enable Auto Arrive/Depart on the Workers window in Maintenance, not only can the worker manually arrive and depart stops, but if the worker doesn't press arrive and depart, stops will be auto arrived and departed based on the Auto Arrive and Depart settings in Roadnet Anywhere.
To allow workers to add stops in Roadnet Anywhere Tracking, in Roadnet Anywhere Web:
1. Go to Administration, then click the green button and scroll to Region.
2. Click the [Add] button or the ![]() Edit icon for the region with which you want to work. The Add/Edit Region window opens.
Edit icon for the region with which you want to work. The Add/Edit Region window opens.
3. Click on the Phone Settings - Smart Phone - Allowed Worker Actions tab.
4. Check Allow Tracking Worker to Add Stops.
![]()
5. Click the [Save] button.
To allow workers to add stops in Roadnet Anywhere Tracking, in Roadnet Anywhere Client:
1. Click on the Administration menu and select Regions.
2. To add a new region, click the ![]() Add icon.
Add icon.
To edit an existing region, double-click on the appropriate region.
3. Click on Dispatch Settings, and then click on the Smart Phone tab.
4. Check Allow Tracking Worker to Add Stops.
![]()
5. Click the [Save] button.
On the mobile device, the worker will have many new capabilities. For information on how to use them, the worker can view the online help.
![]()
Viewing Information About Cancelled Orders
Found in Roadnet Mobile Manager
Roadnet Mobile Manager is used to keep track of your routes while you are away from your desk. It makes it easier to see how your routes are progressing, where your equipment is, and which workers are not driving safely. Now, you can also keep up with orders that have been cancelled.
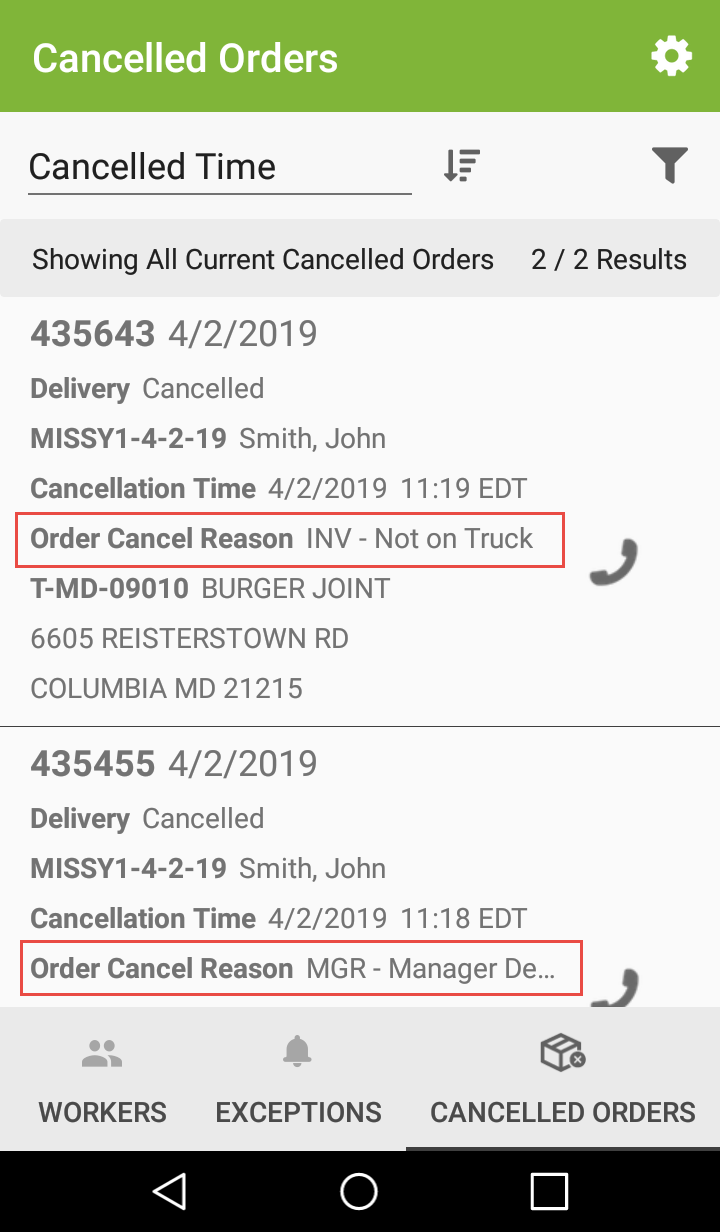
The new Cancelled Orders tab shows you information about the orders that are cancelled on your routes. You can see information such as the Order ID, the date and time the order was cancelled, if the order was a delivery or pickup, which worker cancelled it, and why it was cancelled, as well as information about the stops associated with the order.
Note: You may need to scroll across the bottom of the screen or press the More icon to see all the available tabs.

The cancelled order list is sorted by the Cancelled Time. You can switch between ascending and descending order by pressing the ![]() Ascending/Descending icon.
Ascending/Descending icon.

You can filter the cancelled orders list by the order's cancellation begin and end date. Simply press the ![]() filter icon and enter the dates of the time period you want included in the list.
filter icon and enter the dates of the time period you want included in the list.

If there is a contact number available for the worker or the service location and your mobile device can make a phone call , the ![]() Phone icon displays. Press the icon and choose which number you want to call. The phone dialer displays. Press the call icon to have your mobile device call the number.
Phone icon displays. Press the icon and choose which number you want to call. The phone dialer displays. Press the call icon to have your mobile device call the number.

Viewing All Your Equipment On A Map
Found in Roadnet Mobile Manager
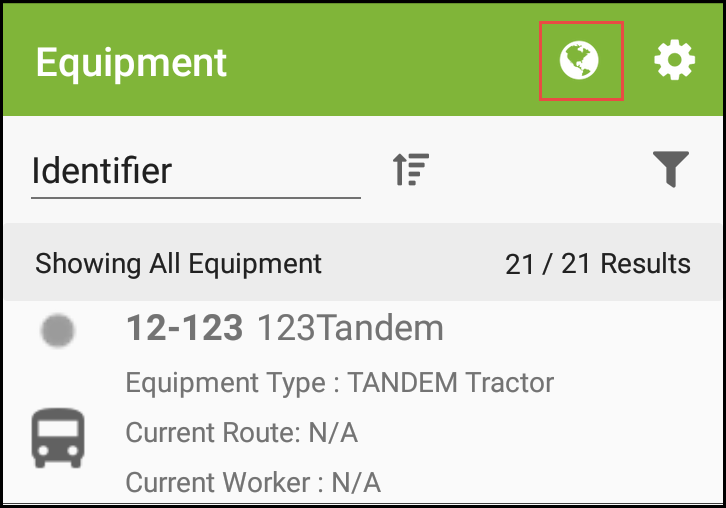
In Roadnet Mobile Manager, you can see where each individual piece of equipment is on a map. This is helpful when you are interested in one route, worker, or piece of equipment, but you may want an overview of how your equipment is spread around the area.
Now, you can see all of your equipment or a filtered list of your equipment on a single map. On the Equipment tab, a new fleet map icon lets you see multiple pieces of your equipment on the same map.
Note: If all the equipment in the list have no last known position, you are unable to map your fleet.
To see all the equipment in the list, press the fleet map icon. You can view all the equipment or you can filter the equipment list and then press the icon to see just the filtered list on the map.
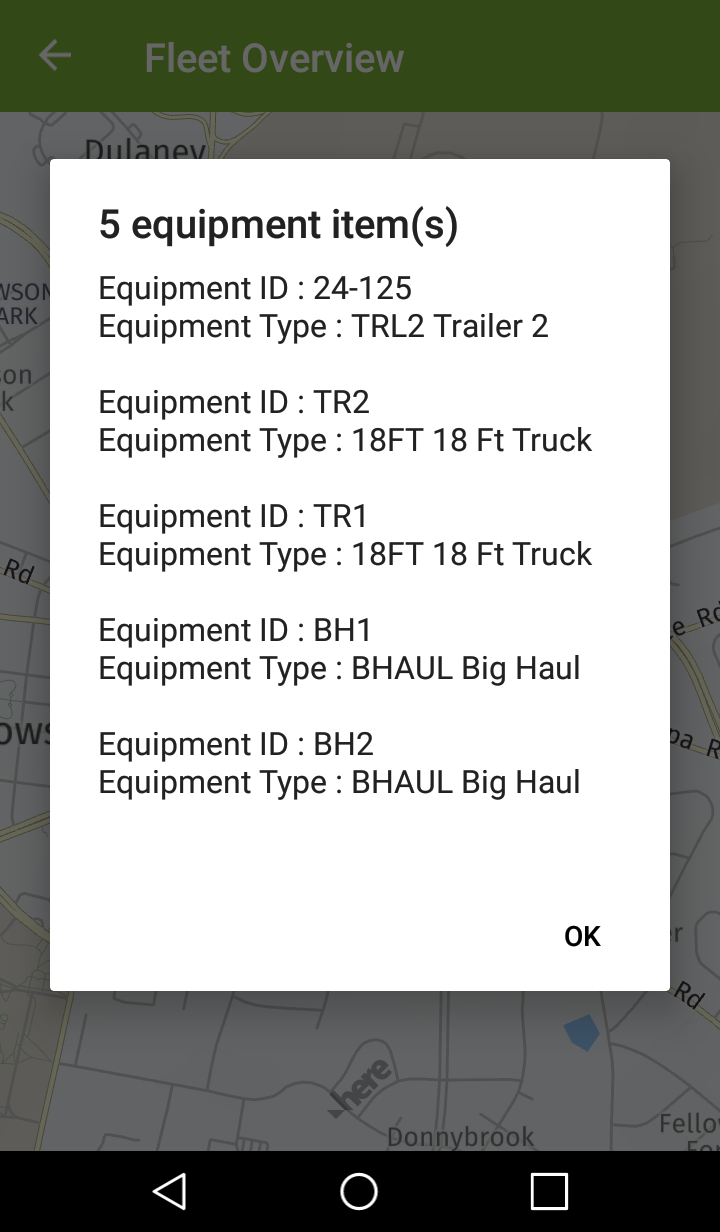
The color of the equipment on the map corresponds to the equipment's current state of motion: Green — In motion, Red — Stopped, Yellow — Idling, and Gray — Unknown or Inactive. Clusters of equipment display as a large circle and the number of pieces of equipment shows in the cluster.

Tap the circle to see a list of equipment that make up the cluster or zoom in to see the equipment individually.
Showing Route Information on a Map
Found in Roadnet Mobile Manager
When you have routes running all day, you want to know where your equipment and workers are. Previously when looking at your route on a map, Roadnet Mobile Manager would take you to a map outside the application and show you only the current position of the equipment. You could see the current position of the equipment, but you were not able to see what stops were completed or how many stops were left on the route.
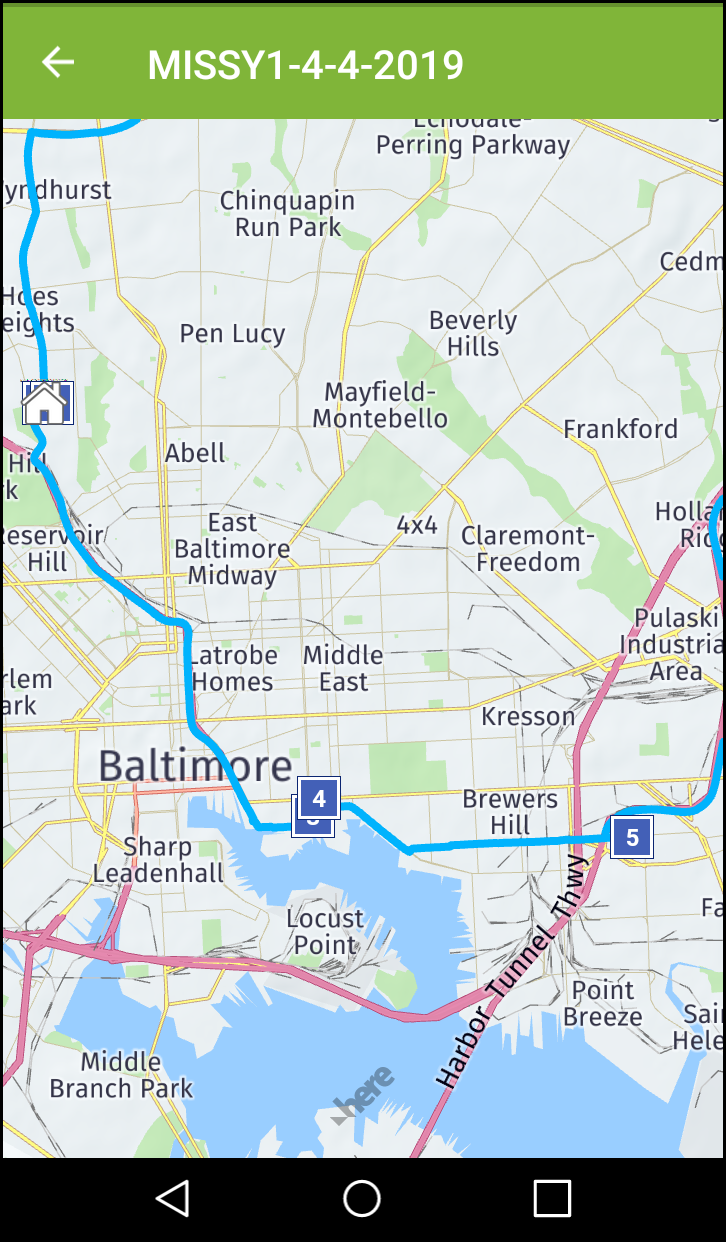
Now, Roadnet Mobile Manager opens a map inside the application, and shows you where your equipment is, the state of the route, such as a stop being serviced or the equipment traveling between stops, and what path the worker has taken to run the route.
When looking at the map, you'll see pending stops represented by blue squares and completed stops by blue circles. You'll also see the stop's sequence number displayed inside the blue square or circle.

The planned route path shows as a thin blue line, while the actual path shows as a thin black line. The remaining path is a thick blue line. Along the path you will see green dots that represent GPS pings.
The truck icon shows the current position and changes depending on the state of the route.
Mapping Unstarted Planned Routes
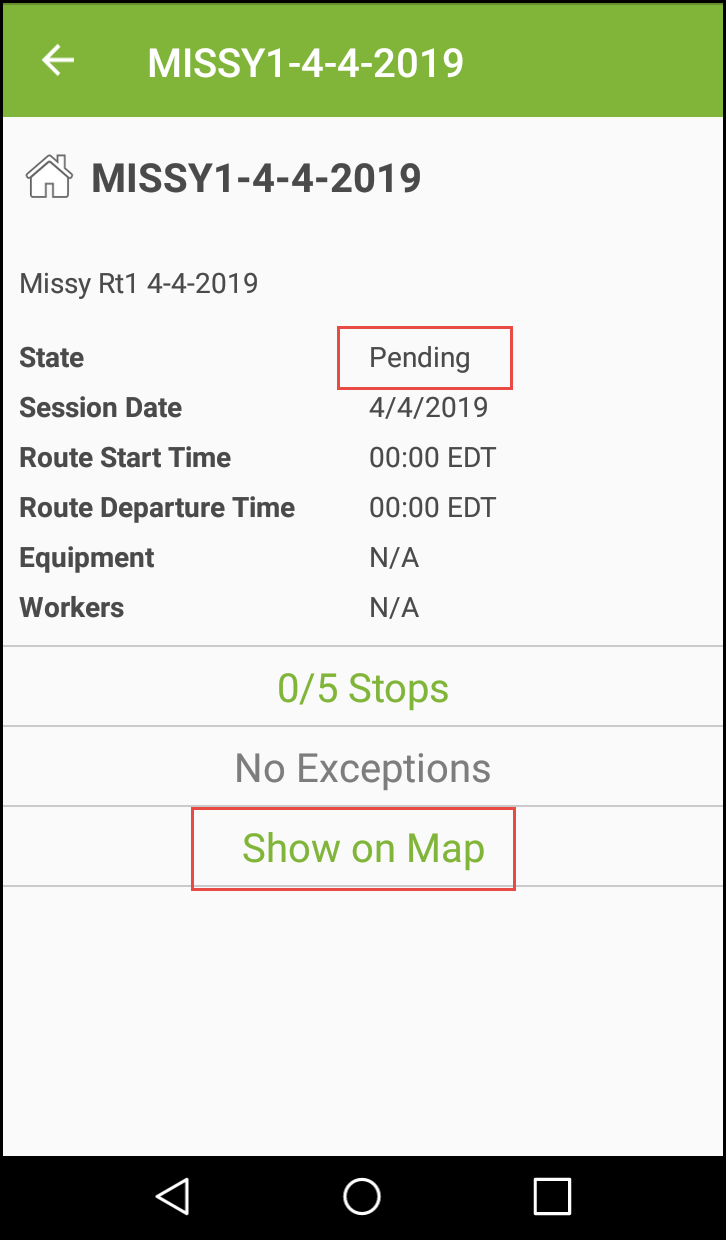
Found in Roadnet Mobile Manager
Previously, you were unable to view pending routes using the Show On Map option on the Route Details screen. Now, when you are looking at the details of a planned route that has not started and choose Show on Map, the route displays on the map.
Alerting Personnel to a Worker Emergency
Found in Roadnet Anywhere Web and Client
Note: This feature applies only if you use Telematics devices.
When your worker has an emergency on the road, you want to know as quickly as possible. If the worker presses the panic button installed in the equipment, Roadnet Anywhere can now alert the appropriate company personnel that there is a problem. Notifications that the panic button was pressed appear on the Overview, the Routes view, and the Exceptions view. To have company personnel alerted, set up the panic button exception in Roadnet Anywhere.
Panic Button — a worker presses the panic button installed in the equipment to alert others of an emergency.
If the worker presses the panic button, personnel is notified in Roadnet Anywhere Web by:
- an exception in the exceptions list in FleetView and on a generated exceptions report (only if enabled)
- a red horn icon on the vehicle card in Overview
- the Security List in the Overview displaying all the vehicle cards in panic state above the Vehicles list and the Watch List
- a red horn icon on the equipment or cluster icon on the map in Overview
- a red horn icon on the route card in Routes view
- a Panic Button report listing all panic button events for a specified date range or just panic button events on equipment and/or workers that you choose
Note: You can also set up the exception to send a text message and email alert, so that the appropriate recipients are automatically notified when the exception occurs.
- In Roadnet Anywhere Client:
- in the Exceptions list
- on the map in the Route Dispatching workspace, if set properly
- a Panic Button report listing all panic button events for a specified date range
Enabling the Panic Button Exception
Enabling the Panic Button Exception in Roadnet Anywhere Web
In Maintenance, click on the green button and scroll to Exception Rules. Click on the Edit icon on the Panic Button exception. On the General tab, check Enabled to enable the exception. You can then change the color that is associated with the exception. When the exception occurs, the color will appear with the exception in the exceptions list. If you want to require the exception to be acknowledged when it occurs, check Requires Acknowledgment.
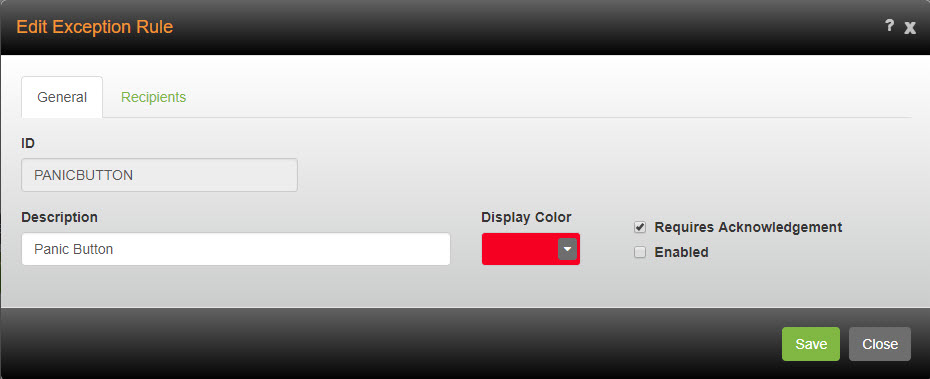
On the Recipients tab you can check Enable Email and Text Message Notifications if you want email and/or text message alerts to be automatically sent when this exception rule is broken.
Enabling the Panic Button Exception in Roadnet Anywhere Client
You can also enable the panic button exception in Roadnet Anywhere Client. Click on the Dispatching menu and scroll to Route Exception rules. Double click on Panic Button in the exception list. To receive exceptions when a panic button is pressed, check Enable. If you want users to have to acknowledge the exception for it to appear in the exception list, check Requires Acknowledgment. Make any other changes you need, then click [Save] to save your changes.

Viewing Indications of a Triggered Panic Button in Roadnet Anywhere Web
You can now see a list of vehicles in panic state displayed in a security list at the top of your vehicle list, as well as a panic icon on those vehicles’ icons on the map in Vehicle Overview in FleetView.
The cards for vehicles in panic state are automatically displayed in the Security List above the Vehicles list and/or the Watch List. A red horn icon is displayed on full vehicle cards that are in the panic state.

Note: No more than 100 cards may be included in the Security List. The number of cards in your Security List is displayed in a green square in the header of the Security List.
On the map, a red horn icon on an individual or cluster icon indicates that the piece of equipment, or one or more pieces of equipment in the cluster, are in panic state.

Note: The red horn icon can also be seen on a route card in panic state in the Routes view.
Clearing the Panic Button in Roadnet Anywhere Web
In FleetView, you can clear the panic button from a route on which it has been triggered. For example, you may want to clear the panic button if the emergency situation was resolved, or a worker triggered the panic button by mistake. To clear the panic button from a route, you can:
- Select a route on which the panic button has been triggered from the Cards screen in Routes view by checking the route’s color bar, click on the Route Actions menu and select Clear Panic Button.
OR
- Click on the desired route from the Cards screen to open Route Details, click on the Route Actions menu and select Clear Panic Button.
OR
- Click on the Bars icon on the vehicle card and select Clear Panic Button. The Clear Panic Button window opens.
![]()
Clearing the panic button removes the panic button indicators from the route card, vehicle card, and equipment and cluster icons, removes the vehicle card from the Security List, and acknowledges the panic button exception on the route.
New Panic Button Report
Found in Roadnet Anywhere Web and Client
There may be times that you want information on when and where the panic button on your vehicles was pressed. For instance, it may be important to know if a particular driver is pressing the panic button more than other drivers, or if the panic button is being pressed more in a specific geographic area. A Panic Button report is now available in Roadnet Anywhere Web and Client. This report lists all instances in which the panic button on a vehicle has been pressed. The report includes the name of the driver, equipment ID, license plate number, equipment type, time of the panic button was pressed, and the latitude and longitude and approximate street address of where the panic button was pressed.
Important: This report is not intended to replace your local reporting requirements; check with your local jurisdiction for the legal reporting requirements in your area.
To run the Panic Button report in Roadnet Anywhere Web:
1. Open the Reports module, if necessary.
2. Click on the Panic Button report. The criteria and options for the report appear next to the report list.
3. Enter the start and end date that should be included on the report. To choose a date, click on the date and enter the new date, or click the box next to the date to open a calendar. Click on the date you want to select. If you want to change the month, click the month at the top of the calendar to open a list of months, then click the month you want to select. To change the year, click on the year at the top of the calendar to open a list of years, then click on the year you want to select. To select a previous year, click on the left edge of the calendar.
4. Check All under Equipment to include all equipment in the report, or click on the [Select] button to open the Select Equipment window and select individual pieces of equipment.
5. Check All under Workers to include all workers in the report, or click on the [Select] button to open the Select Workers window and select individual workers.
6. Click the Report Format arrow and select whether you want to generate the report as an Excel or PDF file.
7. Click [Run]. The report file appears at the bottom of the window. Click on the report to open it.
To run the Panic Button report in Roadnet Anywhere Client:
1. From the View menu, select Reports.
2. Click the Panic Button report in the list of reports.
3. Enter the Start Date and End Date to indicate the time span you want to include in the report.
4. To automatically print the report with your default printer, click the Print box. Do not check this box if you want to review the report before printing it.
5. Click the Report Format arrow and select the format you would like the report to be produced in.
6. Click the [Run] button.
7. Click the [View] button to open and view the report.
Using Restricted Equipment Operating Hours for a Region
Restricted Equipment Operating Hours is an optional exception that allows you to monitor incidents when a worker departed a depot outside that depot's open/close time, or a worker still has not completed a route after the destination depot's close time. Previously, the depot's open/close hours were used to determine if the worker was operating outside the proper hours. But, what if you want to use different hours for the workers restricted time? Now, you can set restricted operating hours for a region, allowing the depot's open/close time to truly reflect the depot's hours.
Setting the Restricted Operating Hours for a Region
The first step in using region based restricted operating hours is to set up the hours for the region.
In Roadnet Anywhere Web
1. Click the Administration icon to open Administration.
2. Click the green button and scroll to Regions; the Regions list opens.
3. Click the [Add] button to add a region, or the Edit icon to change an existing region; the Region window opens.
4. Click Telematics, then Restricted Operating Hours to open the Restricted Operating Hours page.
5. For each day that you want to set restricted equipment operating hours for, check Enable. Then, enter the Restriction Start Time and Restriction End Time for that day. Enter the times using a 24 hour clock, so 1:00 PM would be entered as 13:00.
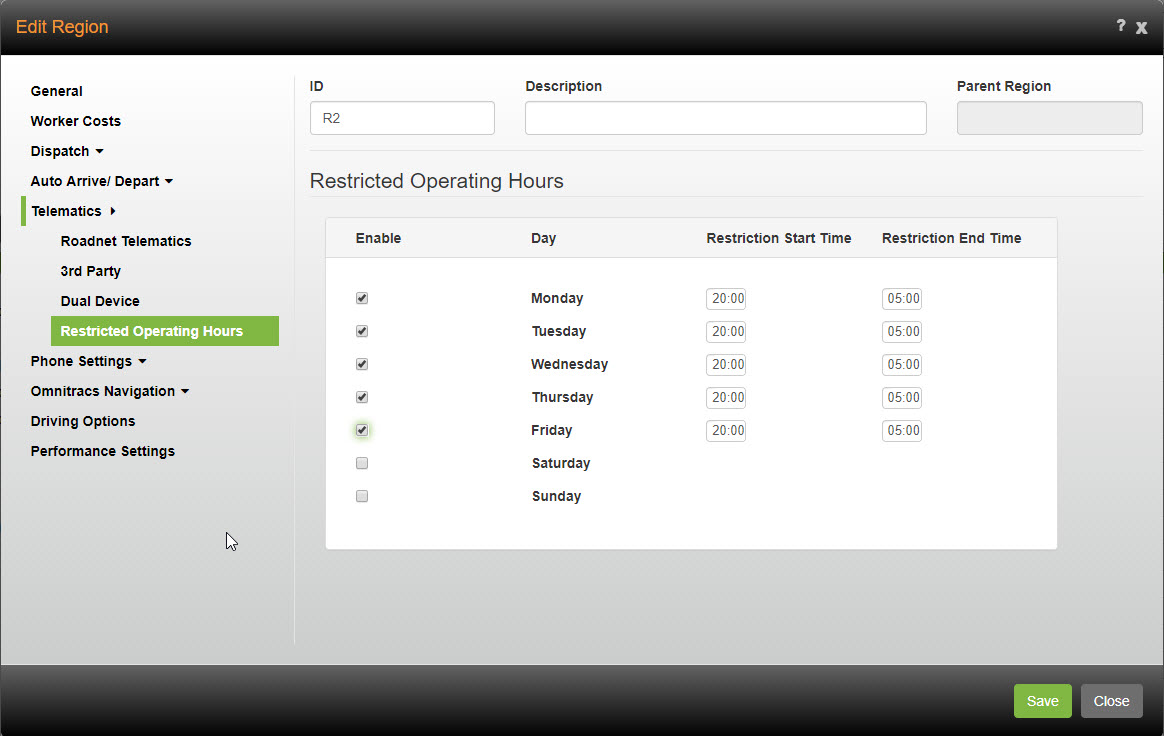
6. Click the [Save] button.
In Roadnet Anywhere Client
1. Click on the Administration menu and select Regions. The Regions list opens.
2. Click on the Add icon to add a region, or select a region and click on the Edit icon to change an existing region. The Region window opens.
3. Click on the Restricted Operating Hours tab. The Restricted Operating Hours page opens.
4. Click the Add icon. The Add Restricted Operating Times window opens.

5. Check each day that you want to set restricted equipment operating hours for. Then, enter the Start time and End time for those days. Enter the times using a 24 hour clock, so 1:00 PM would be entered as 13:00. Click the [Save] button.
Note: To enter different restricted operating times for different days, you will need to create separate restricted operating hours items.

6. Click the [Save] button to save the region.
Choosing Hours for the Exception Rule
Once you have defined the restricted operating hours for the region, you need to specify whether you want the exception rule to use the depots' open/close times or the region's open/close times when determining if the operating hours have been violated.
1. Click the Maintenance icon to open Maintenance.
2. Click on the green button and scroll to Exception Rules. The Exception Rules list opens.
3. Click on the Edit icon for the Restricted Equipment Operating Hours exception. The Edit Exception Rules window opens.
4. Click the Mode arrow and choose Use Region Open/Close Times.

5. Click the [Save] button.
In Roadnet Anywhere Client
1. Click the Dispatching menu and choose Route Exception Rules. The Route Exception Rules list opens.
2. Select the Restricted Equipment Operating Hours rule, then click the Edit icon. The Edit Exception Rule opens.
3. Click the Mode arrow and choose User Region Restricted Operating Hours.
4. Click the [Save] button.
Enhancing Your Group By Experience in Insight
Found in Roadnet Anywhere Web
Insight allows you to see your information in many ways. When you analyze your data using a KPI, you can group, filter, and sort the data, as well as add and remove data, and apply rules to the KPI to influence what data displays.
But, no matter what data you view you must drill into exclusive pieces of information to see more details. This leaves you deep into data for a single grouping and omits other similar information about your business.
For example, when you are analyzing information, you may want to see the number of miles a worker traveled for a specific month. When you view your KPI, you begin by reviewing a list of workers and their miles traveled. To see the number of miles traveled for a specific month, you drill deeper into a worker by choosing Month. Your KPI changes to display only the miles traveled by that specific worker.
This can make it tedious and time consuming if you need to export information for multiple workers by month or you want to compare one worker's February miles to another, because you must drill into each worker to see the monthly data.
An enhancement to the Group By setting lets you see deeper information, such as mileage over a more specific time period like month or even day, while leaving some parts at a higher level, such as all workers.
To show this detail, you are now able to add multiple groupings to your KPI.
1. With the KPI Settings menu open, click Group By.
2. Click the arrow to choose how you want the data grouped.
3. To add a another group by option, click the + next to the Group By header and then click the arrow that was added. From the list, choose how you want the data grouped.
4. Continue to click the + and then click the added arrow to choose how you want the data grouped, until you have chosen all the Group By options you want added to the KPI. You can add up to seven groupings.
5. Press Apply. The data on your KPI is grouped according to your choices.

For our monthly mileage by worker example, rather than drill into an individual worker to see the mileage per month, you can add the Worker and Month Group By options to the KPI. This lets you see all your workers on the same screen and for each worker you see the mileage split out by month.
You aren't limited to just two groupings. You can add up to seven groupings. So if you wanted to add Equipment Type or Location to the KPI, you would simply open the KPI Settings Menu and add the Group By option.
You can easily export this information into a single file.
When viewing Visualizations other than Grid, the Group By combination (Worker, Equipment Type, Month) shows on data labels, as the Sort By, and in the caption at the top of the screen. The Information page reflects the new Group By combination as well.
Notes: The Month-Year Time Group By option has been removed. The Month-Year grouping in existing KPIs will be replaced with a multiple grouping of (Year, Month). The new multiple grouping of (Year, Month) will sort information chronologically.
The Week-Year Time Group By option has been replaced with Start of Week.
Software Corrections
The following software corrections were made in Roadnet Anywhere 5.4.
| Item | Read Me Notes |
|---|---|
| Maintenance | |
| RA-38235 | A new HOS Exempt property now exists on Equipment for Compliance Customers. When enabled, HOS Mobile will not auto-update duty status to Driving. |
| RA-37585 | The service radius editor follows the unit of measurement settings defined for a user. |
| RA-39591 | Previously, there was an issue with the VIN on ELD equipment updating automatically. This has been corrected. |
| RACS-3269 | An issue preventing the service time updater from completing properly was identified and corrected. |
| RACS-3200 | Resolved an issue where user was not provided a reason when an add of a Telematics Device or Mobile Device failed because it already existed in the system. |
| RACS-3307 | There was an issue that was causing Compliance customers to receive an error when editing equipment. This has been corrected. |
| Roadnet Mobile - Android | |
| RA-36947 | The primary and alternate phone numbers of a service location now display on the in transit and at stop screens in Roadnet Mobile. |
| RA-38852 | The Route Load functionality in RN Mobile has been enhanced to allow loading of a Route where only the Co-Driver is assigned to the Planned Route. |
| RA-38160 | The system has been enhanced to include Co-Driver functionality in Roadnet Mobile for Compliance Customers. Now a Co-Driver in XRS Mobile is automatically assigned to the Route upon Route Load if the Co-Driver is already logged in or upon Co-Driver login if the Route has already been loaded. |
| RA-38158 | You can now have one route custom property appear on the Select Route screen in Roadnet Mobile for Android. |
| RACS-3241 | Resolved an issue in Roadnet Mobile's Auto-Arrive Depart behavior for Compliance-enabled customers where going Off Duty while at a stop would depart the stop rather than suspend it, even when the region was configured to require task completion. |
| RACS-3001 | The issue that pushed the exclamation icon off-screen when the form description is too long, has been identified and fixed. |
| RACS-3000 | There was an issue that was preventing the service location's phone number from appearing on the Proceeding to Stop screen. This has been corrected. |
| Roadnet Mobile Manager | |
| RA-38506 | Roadnet Mobile Manager allows users to call the driver or service location of a cancelled order. |
| RA-38498 | GPS position information is now available when viewing routes in Roadnet Mobile Manager on iOS. |
| RA-39004 | The current position of all visible equipment is now available for display on a map when viewing equipment in Roadnet Mobile Manager. |
| RA-38609 | Roadnet Mobile Manager now displays reason codes for cancelled orders and stops when provided. |
| RA-38511 | You can now view the current position of a piece of equipment on a map in Roadnet Mobile Manager, if the data is available. |
| Admin | |
| RACS-2972 | The "Envision Subscriber" checkbox is no longer displayed on the User window when Envision is not purchased. |
| RACS-3196 | There was an issue that was preventing region settings from being properly saved. This has been corrected. |
| RACS-3071 | There was an issue that was preventing safety values from saving properly on the business unit. This has been corrected. |
| RACS-3291 | There was an issue where customers were receiving an error trying to clone a business unit. This has been corrected. |
| RA-39569 | The ability to sort by by Administrator flag was removed from Roadnet Anywhere, and replaced with the ability to sort by role adn user group. Multiple Role/User Group entries are indicated by blue info icon with appropriate tooltip. |
| Data Transfer | |
| RACS-3189 | There was an issue that was preventing users with the SYSTEMNONADMIN role from being able to import routed solutions. This has been corrected. |
| RACS-3085 | The report print preview window opened from the Import results contained some redundant options on the toolbar, including Save and Open. These options have been removed from the toolbar. |
| RACS-3300 | There was an issue where orders were not be marked as Published after Send Orders completed. This has been corrected. |
| RACS-3030 | There was an issue where users were receiving an error when importing service locations that have an advanced geofence. This has been corrected. |
| RACS-3288 | There was an issue importing items and using Auto Map to map the data to the column headers. This has been corrected. |
| RA-39841 | An issue causing the Published flag to be checked when Send Orders is unable to create the export file has been fixed. |
| Dispatching | |
| RACS-3318 | The geofence for layover locations now appear properly when viewing routes on a map. |
| RA-38538 | The number of missed service windows was accidentally removed from the route cards in Fleetview's Overview. This has been corrected |
| RA-35358 | Roadnet Anywhere users can now provide reason codes for cancelled orders. |
| RA-38335 | FleetView has been enhanced to show multiple Workers for Compliance-enabled Customers, with the Worker who is in Drive status appearing first. In the case of an On Duty and Off Duty Worker, the On Duty Worker will appear first. |
| RACS-3175 | Dispatchers can no longer mark an arrived stop as undeliverable if a region's auto-arrive/depart settings are configured to use the device for arrivals and departures. |
| RACS-2860 | There was an issue where users using Internet Explorer 11 on a computer with a touch screen, could not properly geocode a service location when double clicking on a stop in Fleetview. This has been corrected. |
| RACS-3329 | In FleetView Route Details, the Messages tab has been renamed to Route Notes. |
| RACS-3226 | There was an issue where restricted equipment operating hours exceptions where being generated even when the equipment was at a depot. This has been corrected, and the exception will not be generated if the equipment is inside the service radius for any depot, even if the depot is not the origin depot. |
| RACS-3119 | Corrected an issue where going Off Duty in XRS Mobile would result in re-sequencing and arriving a planned at-layover location layover, even when the layover was not associated with a location. This has been corrected, and going Off Duty will not arrive at a layover not associated with a location, but Roadet Anywhere will still re-sequence and arrive planned breaks and at-stop layovers. |
| RACS-3203 | There was an issue that was causing routes to be displayed in FleetView when the user filtered for Future Routes, even though the routes were not in the future. This was corrected. Please note, now it is highly recommended that the user set the OS time zone equal to the region time zone. Moreover, using Filter By Selected Regions is also recommended if regions have different time zones. This will help to avoid any other issues with filtering. |
| RACS-2752 | There was an issue where the exceptions list in FleetView Route Details was showing a negaitve number. This has been corrected. |
| RACS-3327 | There was an issue in FleetView where the stop selected from the selection dialog on the map was being properly selected. This has been corrected. |
| RACS-3229 | During the last upgrade, Inactive Vehicles filter options in the Overview view were removed from some user's saved parameters when they should not have been. This has been resolved. |
| RACS-3308 | Resolved an issue with going off duty while at a group stop. |
| RACS-3244 | There was an issue where users were not seeing all the expected routes when filtering by depot in FleetView. This has been corrected. |
| RACS-3330 | Routes run with different equipment and the same trailer should no longer be ending mid route. |
| RA-39645 | A status of "No GPS" or indeterminate state will now display in Overview with a black symbol and corresponding text when the user hovers over the equipment. |
| RACS-3388 | There was an issue that displaying some route exceptions in Notification panel prevented the route from loading Route Details properly. This has been corrected. |
| RA-35676 | Resolved an issue where the distance from an unknown stop to the route's destination could be incorrect for customer's using both a telematics device and a mobile device. |
| RA-39150 | The Remove Signature If Modifications Are Made setting under Smart Phone - General is no longer dependent upon the Signature Capture Required setting. |
| RA-38538 | Roadnet Anywhere users can now provide reason codes for cancelled orders. |
| Insight | |
| RACS-3216 | There was an issue where the export report was not displaying the stop type when exporting the stop detail view. This has been corrected. |
| RACS-3315 | There was an issue running KPIs that were reporting on a large number of routes. This has been corrected. |
| Miscellaneous | |
| RA-37871 | Clicking on Geofence Type->Advanced on Interactive Geocoder will now auomatically enable Map Options->Show Geofence. |
| RA-39387 | There was an issue where customers were seeing pink tiles instead of satellite maps in Roadnet Anywhere Client. This has been corrected. Users will need to install .NET framework 4.7.1 in order for Roadnet Anywhere Client to work properly. |
| RACS-3251 | There was an issue that cause users to receive an error when changing regions in Roadnet Anywhere Client. This has been resolved. |
| RACS-3055 | There was an issue that was causing the times for exceptions to be reported incorrectly in Roadnet Mobile Manager. This has been corrected. |
| RACS-3012 | There was an issue where the stop list for a route would not open in Modeling. This has been corrected. |
| RACS-3341 | There was an issue that was causing Route Query to crash when searching for routes over a long period of time. This has been corrected. |
| RACS-3340 | The defect preventing Roadnet Mobile routes from unloading has been identified and resolved. |
| XRS-12280 | There was an issue that was preventing the Clock-In and Clock-Out buttons in the Driver Clock from functioning. This has been corrected. |
| XRS-7123 | There was an issue that was causing the Consecutive Time Off tab to be displayed inconsistently in the Driver Log Editor. This has been corrected. |
| XRS-6298 | There was an issue that was preventing users from being able to add a yard move for a driver assigned to a child region. This has been corrected. |
| XRS-5907 | There was an issue where the incorrect time zone may appear in the Driver Log Editor when Projecting Logs using Last Know Status. This has been corrected. |
| XRS-6746 | There was an issue that was sometimes causing an empty comment field to appear in the eRODS file if two comments fields were enabled. This has been corrected. |
| Reporting | |
| RA-39666 | An issue causing the Device Communication report to show devices from business units other than the selected business unit has been fixed. |
| RACS-3136 | The description for the Simple Actual Stop List report has been updated to indicate that the report includes completed routes, not all routes, which is more accurate. |
| RACS-3108 | There was an issue preventing users from selecting unplanned routes to include in the Actual Stop List. This has been corrected. |
| RACS-3331 | The Driver Performance Extended report was only displaying routes which were started and ended for the selected day, but routes that started on one day but completed on another day were not included. This is now corrected. |
| RACS-3204 | User was unable to see primary driver's name for each route on daily operations report. Since it is impossible to determine who is the primary driver in Fleetview, the report will only display 1st driver's name |
| RACS-3187 | The Daily Operations report was displaying planned routes which are created in Fleetview, even when the report was only supposed to include actual information. These routes will no longer be displayed on the report. |
| RACS-3110 | There was an issue where no data was appearing under the Direction column in the Position History report. This has been corrected. Note, historical routes will still not include this information; only routes run in Roadnet Anywhere 5.4 and later will display this data. |
| RACS-3140 | There was an issue that was causing discrepancies between the Driver Summary report and similar data reported by Insight. This has been corrected. |
| RACS-3171 | There was an issue where monthly reports were not being run when scheduled if the last execution time was the prior year. This has been corrected. |
| RACS-3056 | Mobile form reports were missing to the response to the first question the driver entered. This has been fixed. |
| RACS-3082 | There was an issue where the Device Communications report wasn't showing all telematics devices. This has been corrected. |
| RACS-3014 | There was an issue where the Idling report was reporting incorrect idling times. This has been corrected. |
| RACS-3285 | There was an issue where the Mobile Form Results report was not including answers from anytime forms on Tracking routes. This has been corrected. |
| Routing | |
| RA-36474 | There was an issue where routed transfer order stops that are temporarily re-geocoded and subsequently unassigned, were not maintaining the temporary geocode. This has been corrected, and the temporary geocode is retained. |
| RA-38448 | The Create Routes feature will now heavily favor routing orders with end dates that match the session date. For additional information please see the What's New document. |
| RA-39525 | Imported orders with overlapping service window overrides could cause a performance issue and an error during create routes. This has been corrected. |
| RACS-3289 | The tool-tip for the open/close time of a service location in a route list no longer incorrectly changes based on the local timezone of a user. |
| RACS-3352 | The drag and drop of transfer orders with combine orders enabled no longer causes the orders to be split in the Roadnet Anywhere client. |
| RACS-3121 | There was an issue that could that could prevent users from dragging a stop onto a route if multi-day routing was enabled on the routing pass, the destination route exceeded its maximum runtime, and there were no layover locations in the system. This has been corrected. |
| RACS-2949 | There is a more descriptive error message when users manually add a route containing an equipment type that is no longer visible for the region. Now the following error is shown:
"Route could not be added. Default Equipment Type is not visible in this region." |
| RACS-2550 | There was an issue that was causing the Planned Number of Stops column to have a 0, even when stops were on the route. This has been corrected. |
| RACS-3163 | There was an issue that was preventing routes from being created when drivers were able to choose their layover locations. This has been corrected. |
| RACS-2871 | There was an issue that was causing users to receive an error when creating a cell from an active route. This has been corrected. |
| RACS-2962 | The Assign Route Times menu option is no longer available for Plan-Built routes to prevent users from inadvertently changing the times on fully planned routes. |
| RACS-3293 | There was an issue where reload depots were being placed on routes, even though reloads were not enabled on the routing pass. This has been corrected. |
| RACS-3072 | There was an issue where Scroll Mode would change zoom levels when dragging and dropping a stop onto a route that was not the selected route. This has been corrected. |
© 2019 Omnitracs, LLC. All rights reserved.
Omnitracs is a trademark of Omnitracs, LLC. All other trademarks are the property of their respective owners.
Omnitracs endeavors to ensure that the information in this document is correct and fairly stated, but Omnitracs is not liable for any errors or omissions. Published information may not be up to date, and it is important to confirm current status with Omnitracs. Specifications subject to change without notice.
This technical data may be subject to U.S. and international export, re-export or transfer (export) laws. Diversion contrary to U.S. and international law is strictly prohibited.